
Computer Graphics for Virtual
and Augmented Reality
Lecture 08 – Tracking Methods for
Augmented Reality in Unity
Edirlei Soares de Lima
<edirlei.lima@universidadeeuropeia.pt>

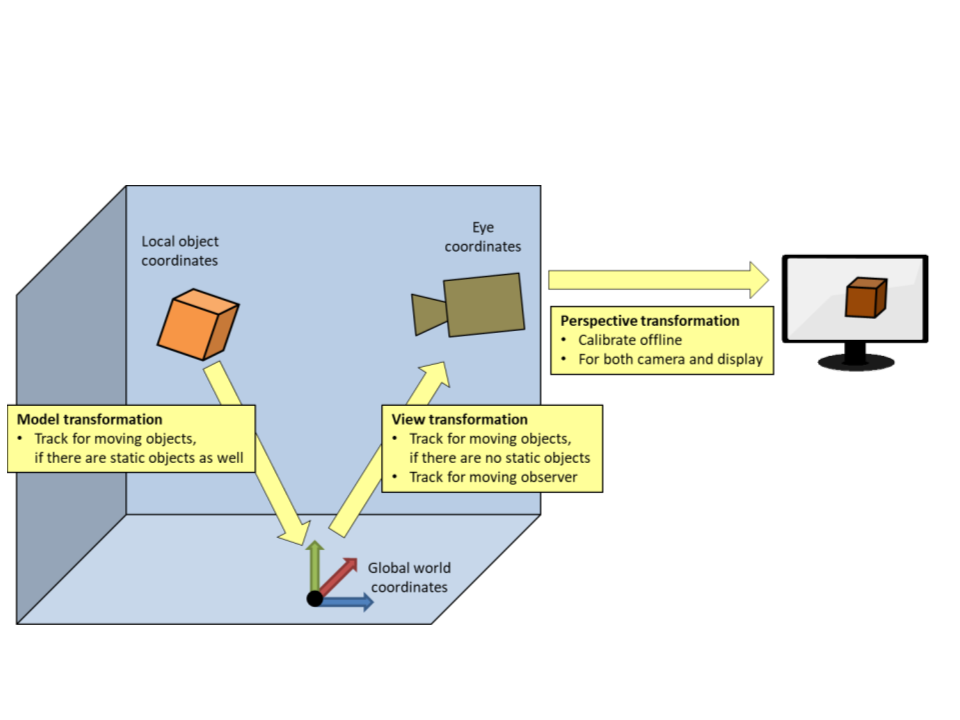
Tracking, Calibration, and Registration
Registration: alignment of spatial properties.
•
•
Calibration: offline adjustment of measurements.
–
–
–
Spatial calibration yields static registration.
Offline: once in lifetime or once at startup.
Alternative: autocalibration.
•
Tracking: dynamic sensing and measuring of spatial properties.
–
Tracking yields dynamic registration.
–
Tracking in AR/VR is always 3D.
Tracking, Calibration, and Registration
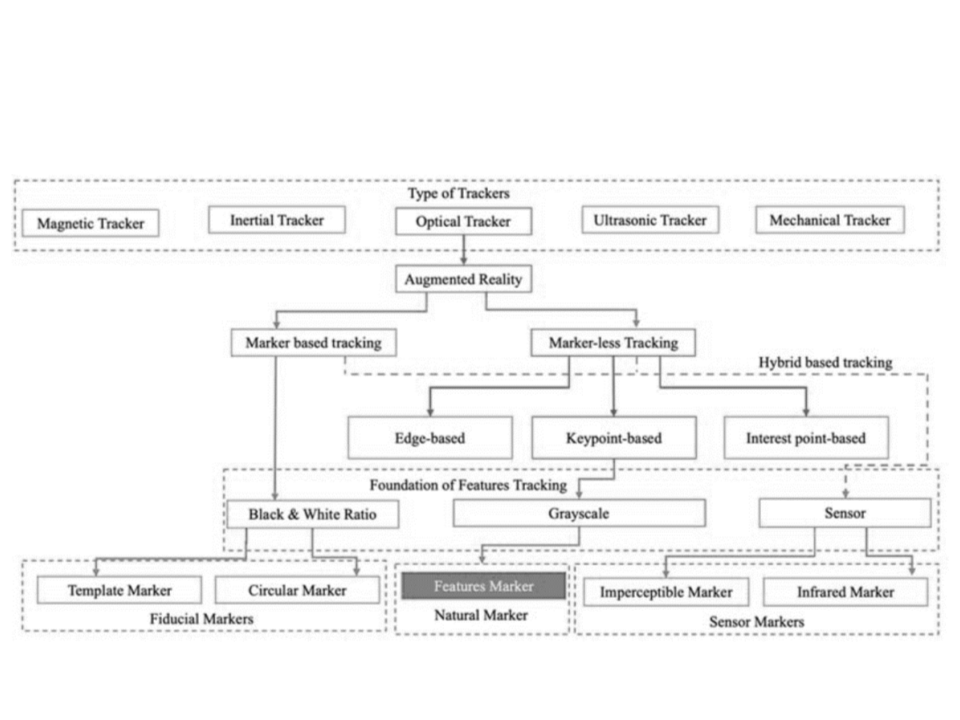
Tracking Technologies for AR
•
•
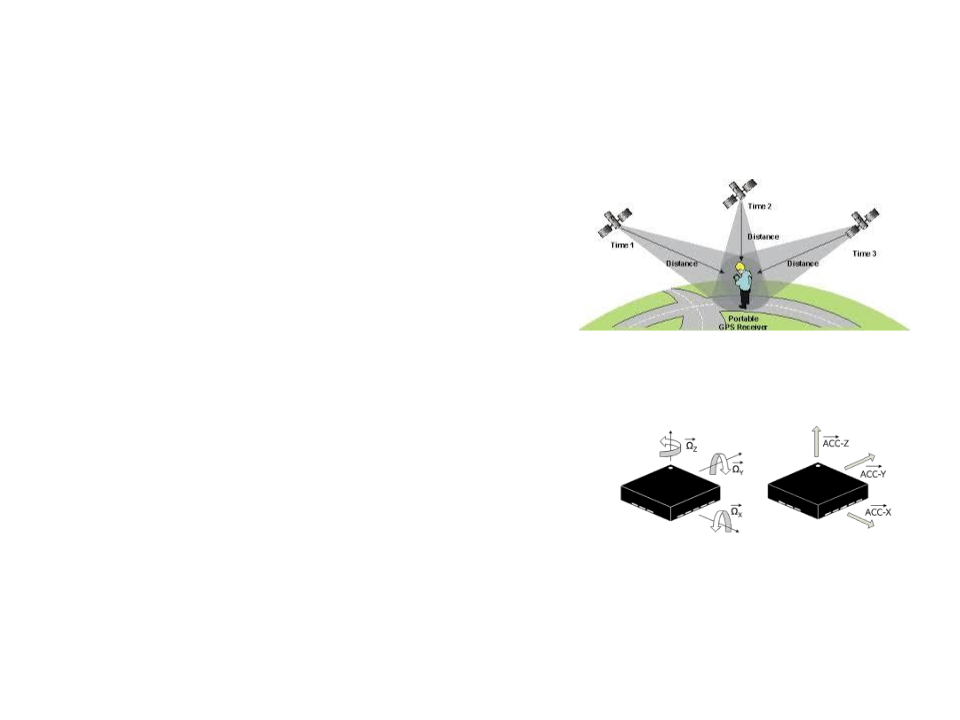
Active Tracking:
–
Mechanical, magnetic, ultrasonic.
–
GPS, Wi-Fi, cell phone location, etc.
Passive Tracking:
–
Inertial sensors (compass, accelerometer, gyroscope).
–
Computer vision techniques
•
Marker-Based tracking, natural feature tracking.
•
Hybrid Tracking:
–
Combined sensors (e.g., computer vision + inertial sensors)
Tracking Methods for AR
Optical Tracking
•
•
Based on computer vision techniques for
tracking objects on video.
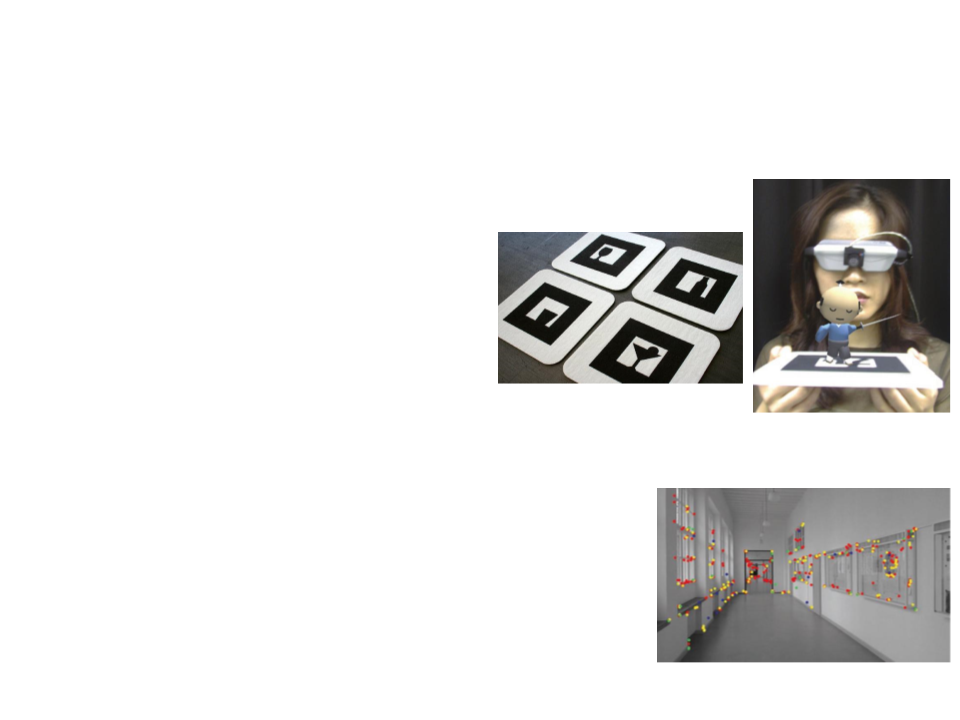
Marker-Based Tracking:
–
–
–
Tracks know artificial markers.
Markers can be easily identified.
Simple and common method used by early AR
systems.
•
Markerless Tracking:
–
Automatically extracts and uses features from
any image.
–
Edges, surface textures, interest points, etc.
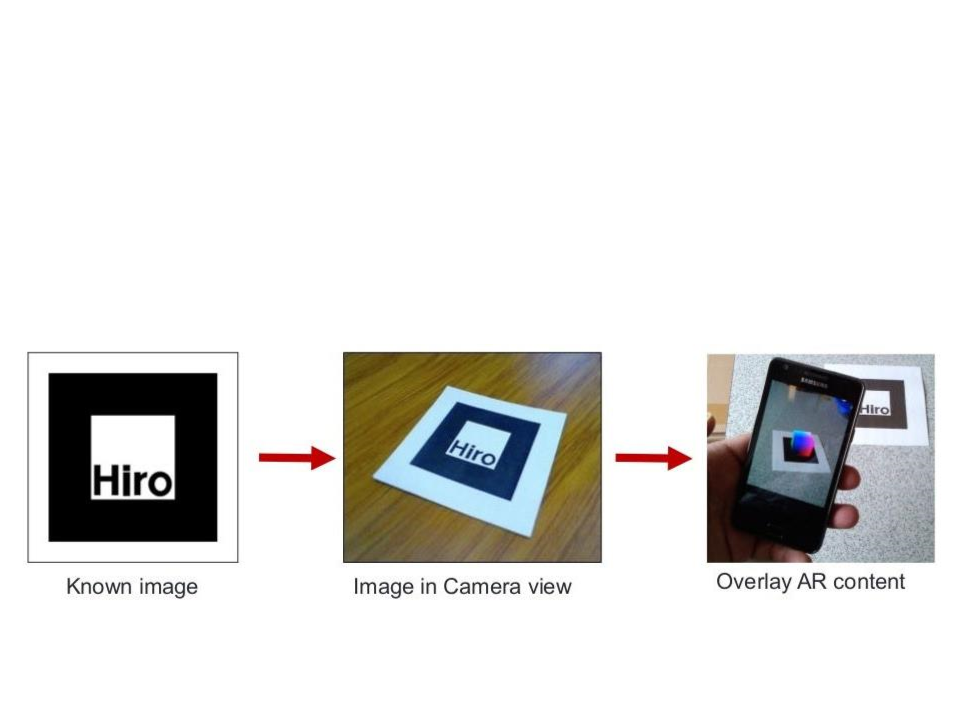
Marker-Based Tracking
•
Marker-Based Tracking:
–
–
–
Use simple computer vision techniques.
Markers provide 4 corners points that can be used for pose estimation.
Key problem: finding the virtual camera position
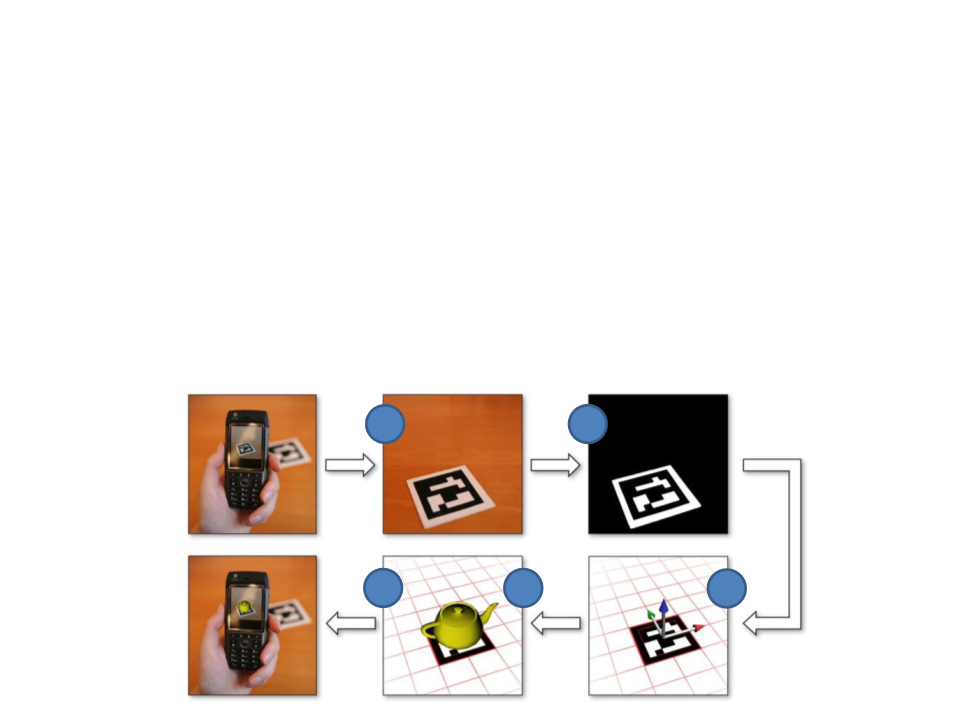
Marker-Based Tracking
•
Process overview:
1
2
3
4
5
. Capture a video frame;
. Search for quadrilaterals;
. Pose estimation from homography;
. Pose refinement and object identification;
. Render the final image combining the camera frame and the 3D object.
1
5
2
4
3
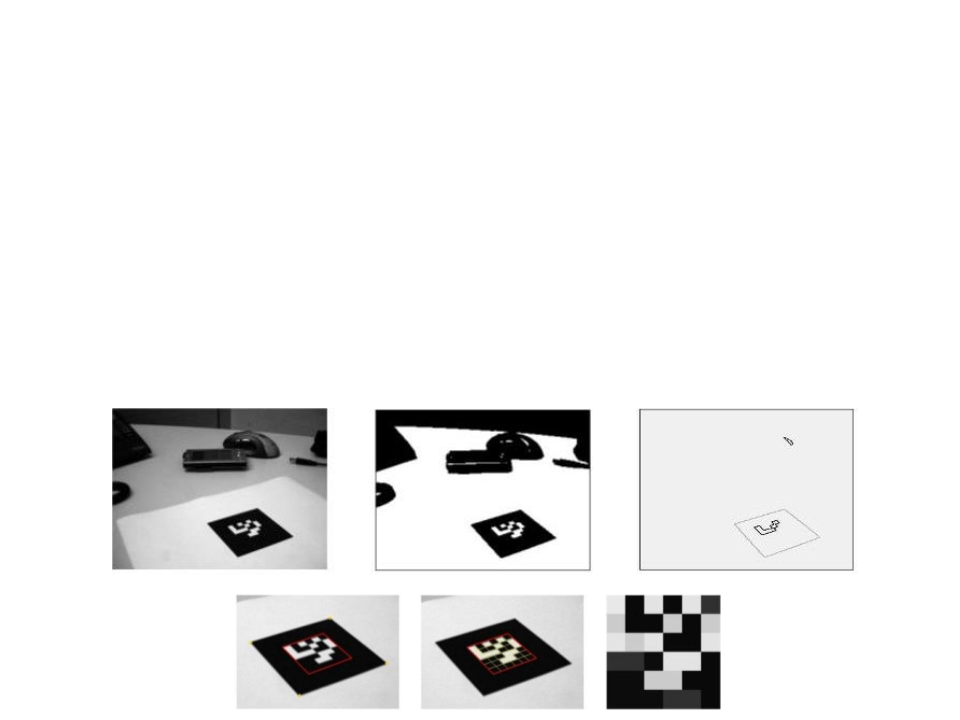
Marker-Based Tracking
•
Marker detection:
–
–
–
Uses simple threshold techniques to simplify the image and remove
noise.
Quadrilateral identification methods are applied to find possible
markers in the image.
Extract the marker pattern to identify the marker.
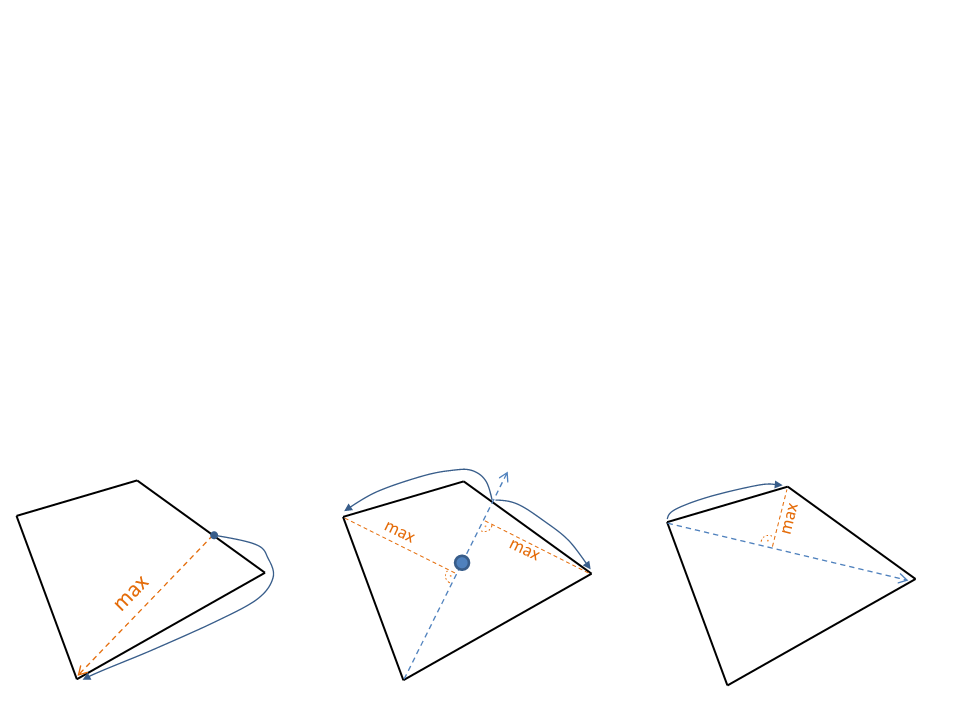
Marker-Based Tracking
•
Quad Finding:
1
2
3
4
5
6
7
8
. Find edges (black pixel after white) on every n-th line;
. Follow edge in 4-connected neighborhood;
. Until loop closed or hitting border;
. Start at a and walk contour, search p1 at maximum distance;
. Compute centroid m;
. Find corners p2, p3 on either side of d1,m=(p2,p3);
. Find farthest point p4;
. Determine orientation from black corner at si=(pi+m)/2.
p4
a
p2
p2
m
d2,3
p3
p3
d1,m
p1
p1
p1
Marker-Based Tracking
•
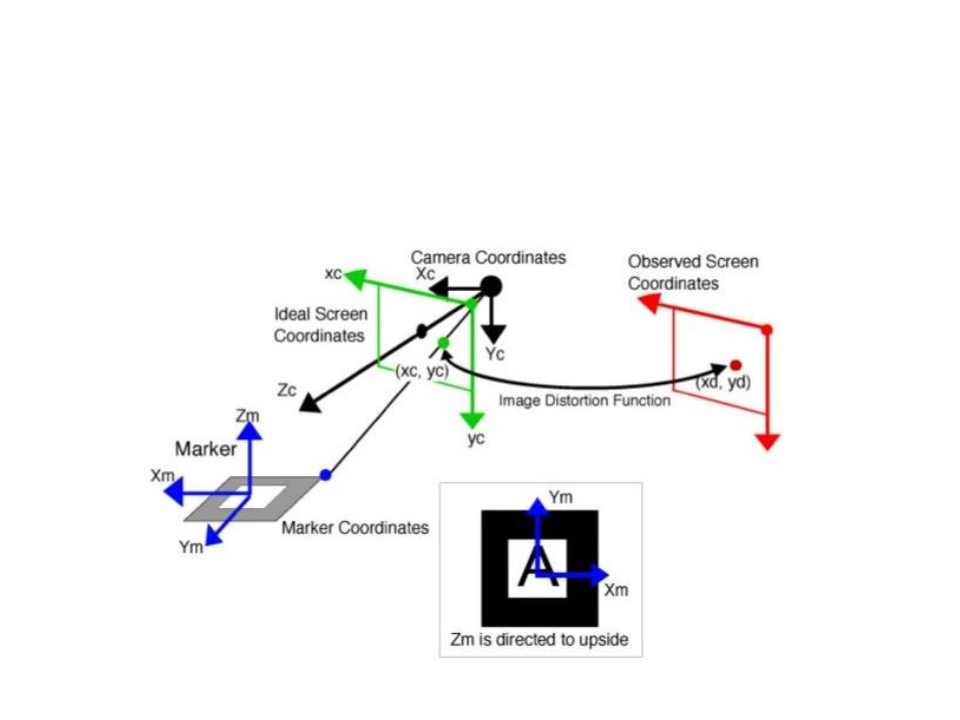
Find camera pose:
Marker-Based Tracking
•
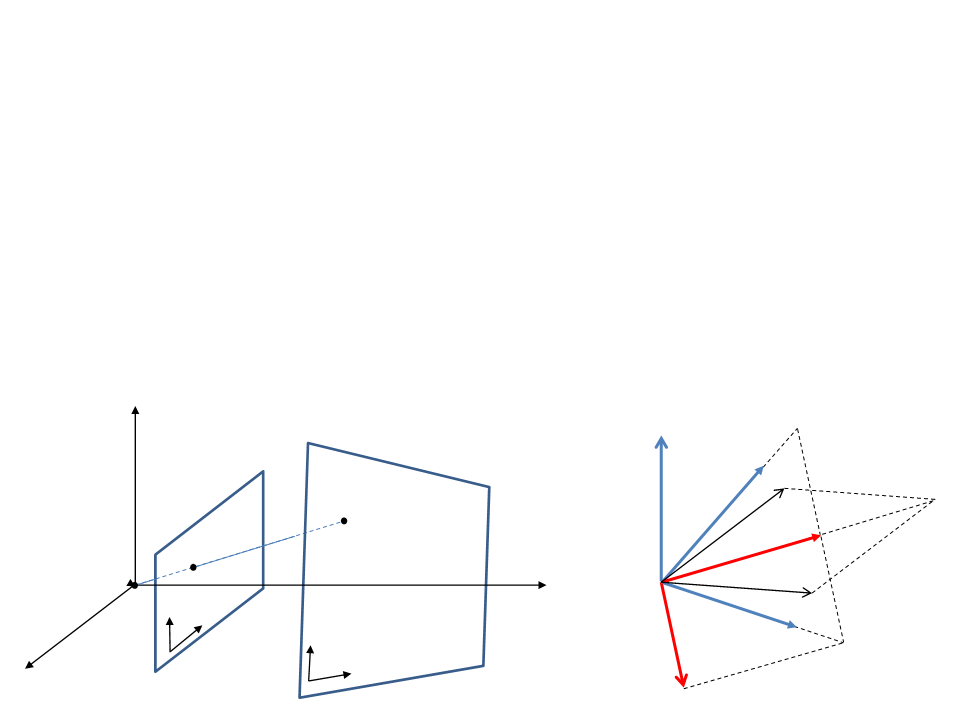
Pose estimation from homography:
–
–
–
–
–
Marker corners lie in plane ꢀ’: qz=0
Express 3D point qϵ ꢀ’ as homogeneous point q’=[qx,qy,1]
Mapping = homography p = H q’
Estimate H using direct linear transformation
Recover pose R,t from H=K[RC1|RC2|t]
RC3
RC2
π'
π
h1
p
h1,2
q
h2
y
x
RC1
u
h2,1
v
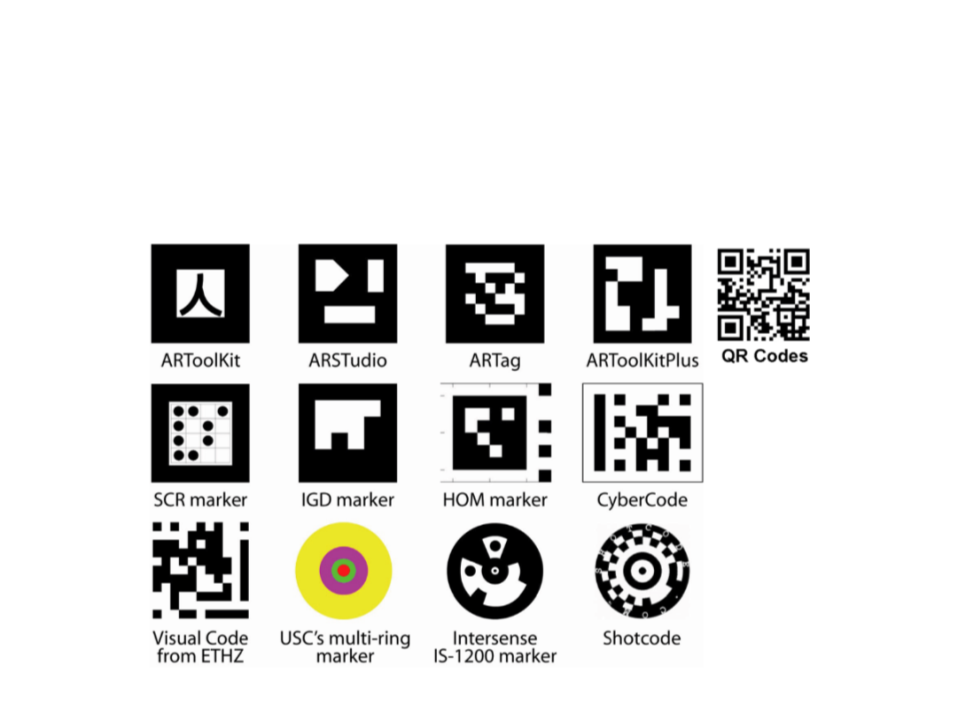
Marker-Based Tracking
•
Different marker designs:
Markerless Tracking
•
•
Markerless tracking:
–
Use natural features and clues extracted from real world objects.
–
Edges, surface textures, interest points, etc.
Natural feature points:
–
Detects salient interest points in
images.
–
–
The points must be easily found.
The location of the points should
remain stable when the viewpoint
changes.
–
Requires textured surfaces or
edges.
Markerless Tracking
•
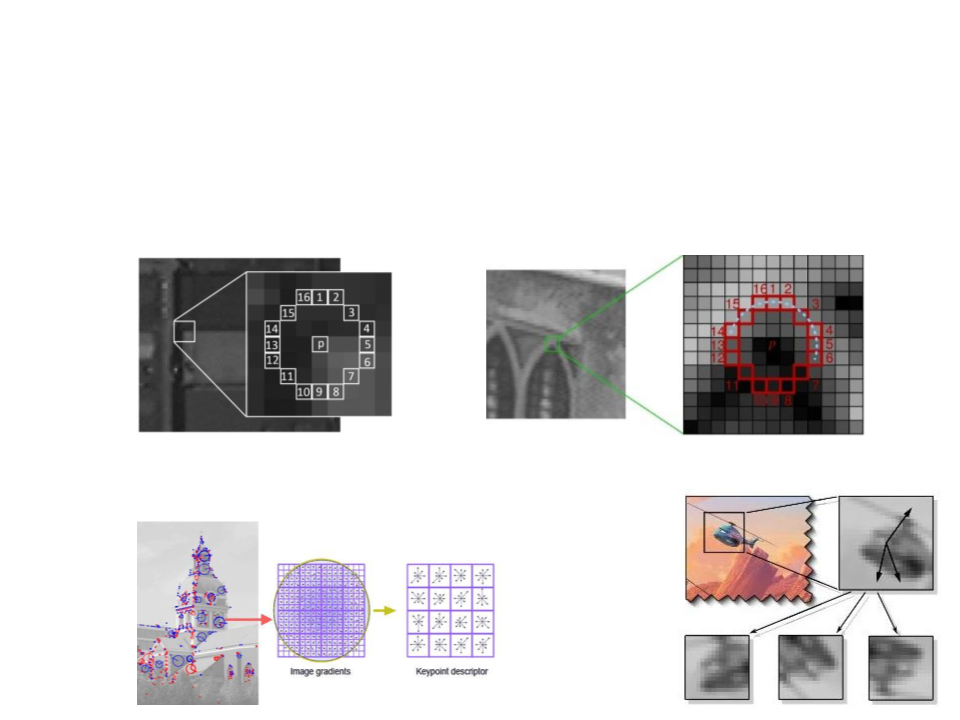
Algorithms to find feature and keypoints:
–
FAST: Features from Accelerated Segment Test
–
SIFT: Scale-Invariant Feature Transform
•
Estimates dominant feature orientations using gradients
Markerless Tracking
•
Algorithms to find feature and keypoints:
–
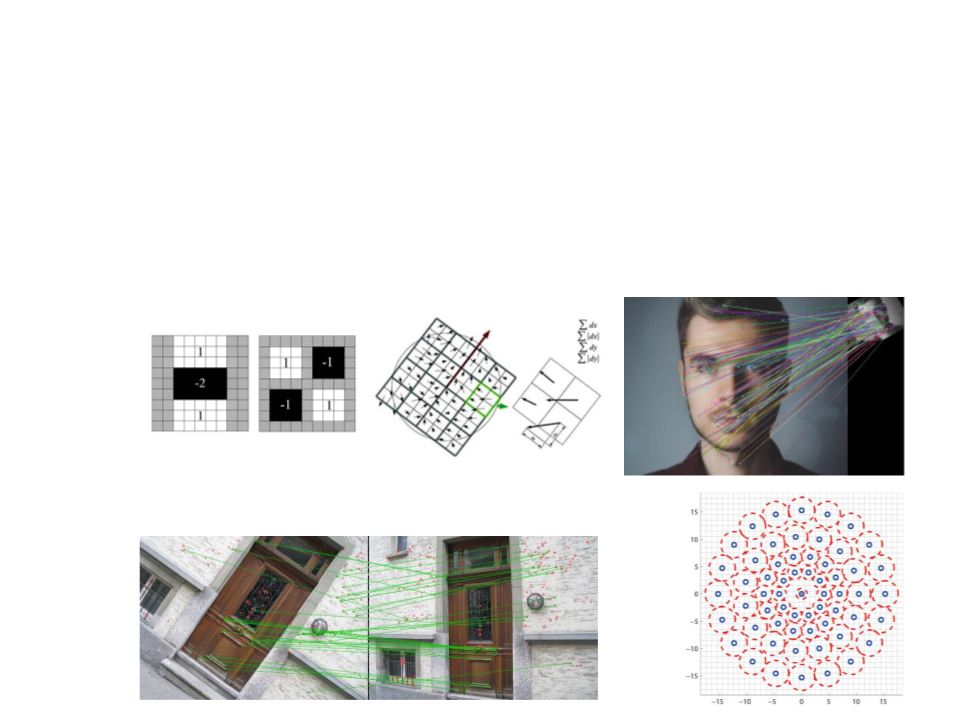
SURF: Speeded Up Robust Features
• Uses an integer approximation of the determinant of Hessian blob detector
–
BRISK: Binary Robust Invariant Scalable Keypoints
Markerless Tracking
•
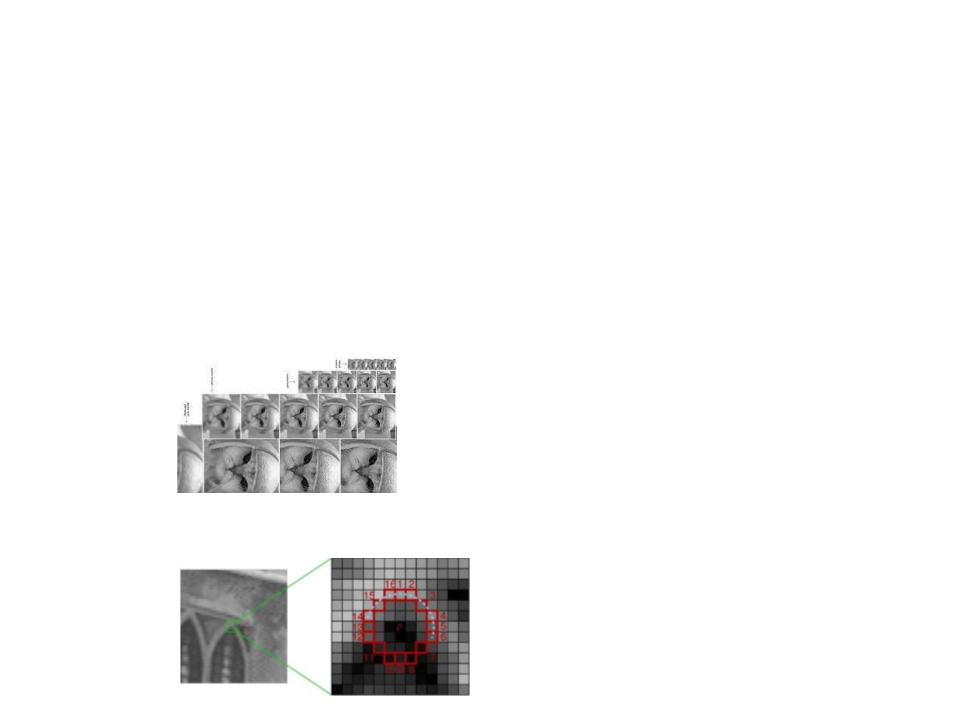
General keypoint detection process:
1
. To make the feature point candidates scale-invariant and less
dependent on noise, most algorithms create scaled variants of the
image (blurring the image).
•
SIFT and SURF algorithms use this approach.
•
FAST and BRISK use a different approach by analyzing the circular surroundings of
each pixel.
Markerless Tracking
•
General keypoint detection process:
2
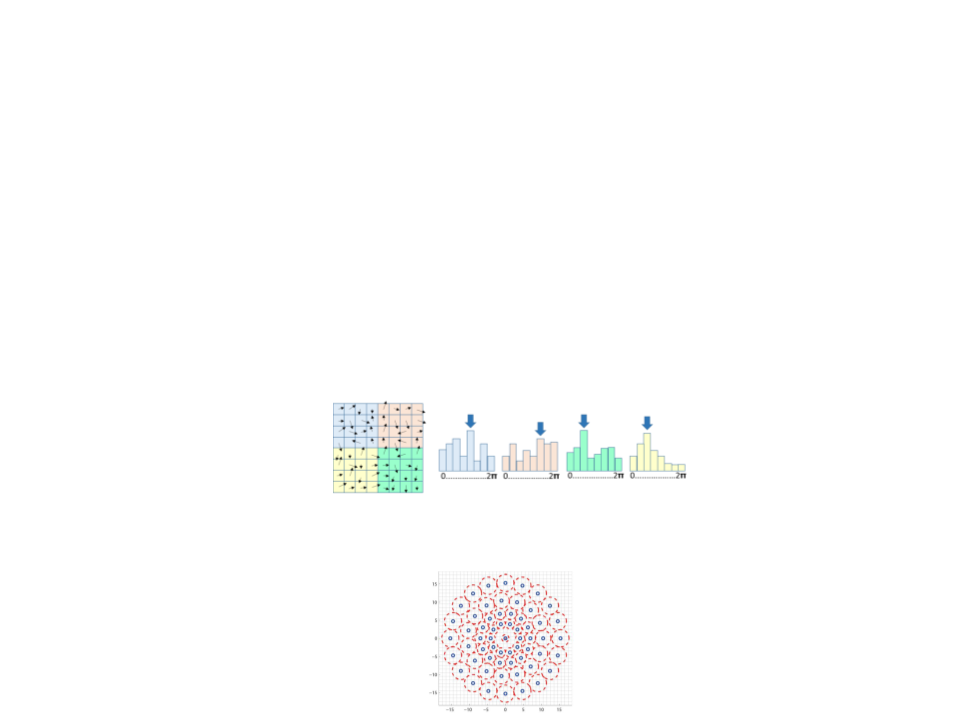
. After identifying the features, keypoint descriptors are created:
•
Each keypoint needs a unique fingerprint (the algorithm must find the feature
again in a different image).
•
•
A match must be possible even in different perspectives, lightning situations, etc.
SIFT descriptors are spatial histograms of the image gradients that characterizing
the appearance of a keypoint.
•
BRISK descriptors are binary strings with 512 bits that concatenate brightness
comparison results between different samples surrounding the center of the
keypoint.
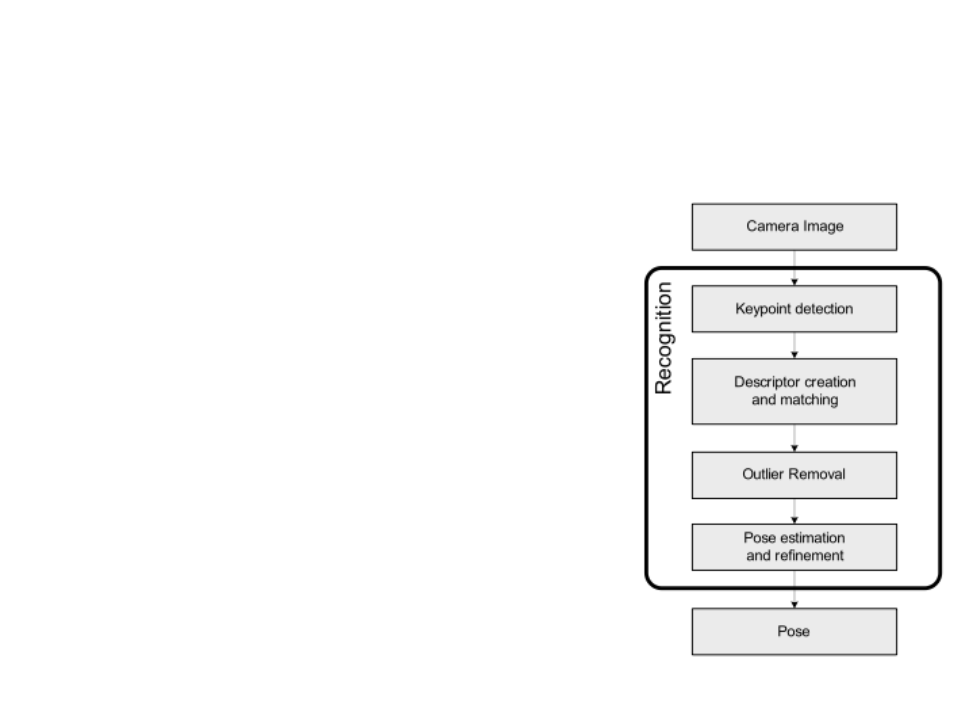
Markerless Tracking
•
•
Database creation:
–
Offline process to create a database of
keypoint descriptors extracted from a set of
image variants.
Real-time tracking:
–
–
–
Search for keypoints in the video frames.
Create the descriptors.
Match the descriptors from the video with
those in database.
•
Specialized data structures are necessary for real
time performance
–
–
Remove outliers
Estimate the pose of the camera using the
keypoints.
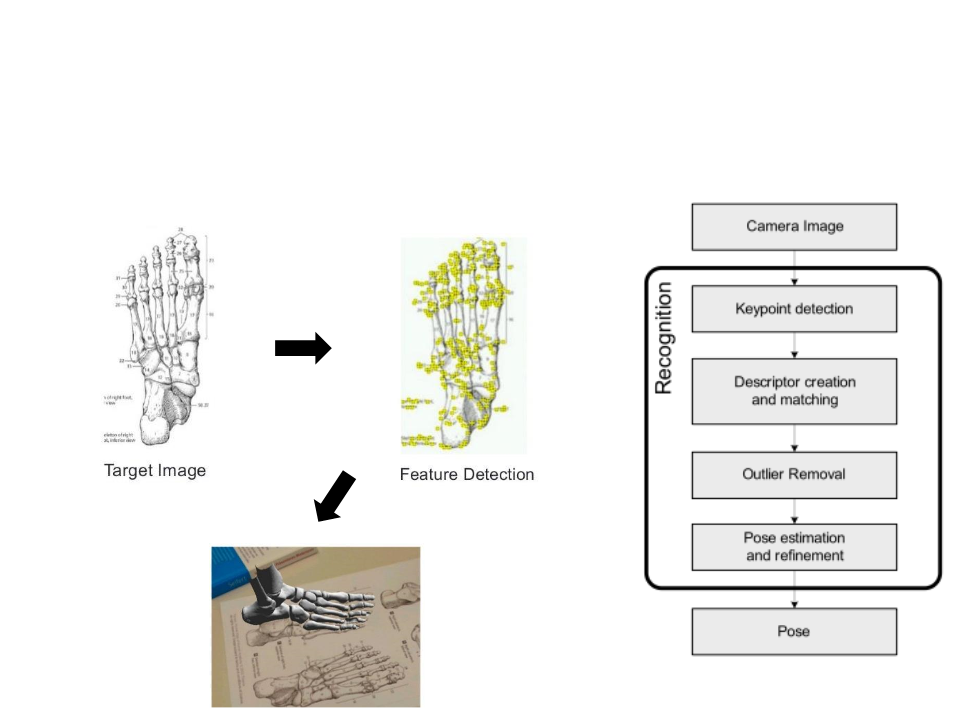
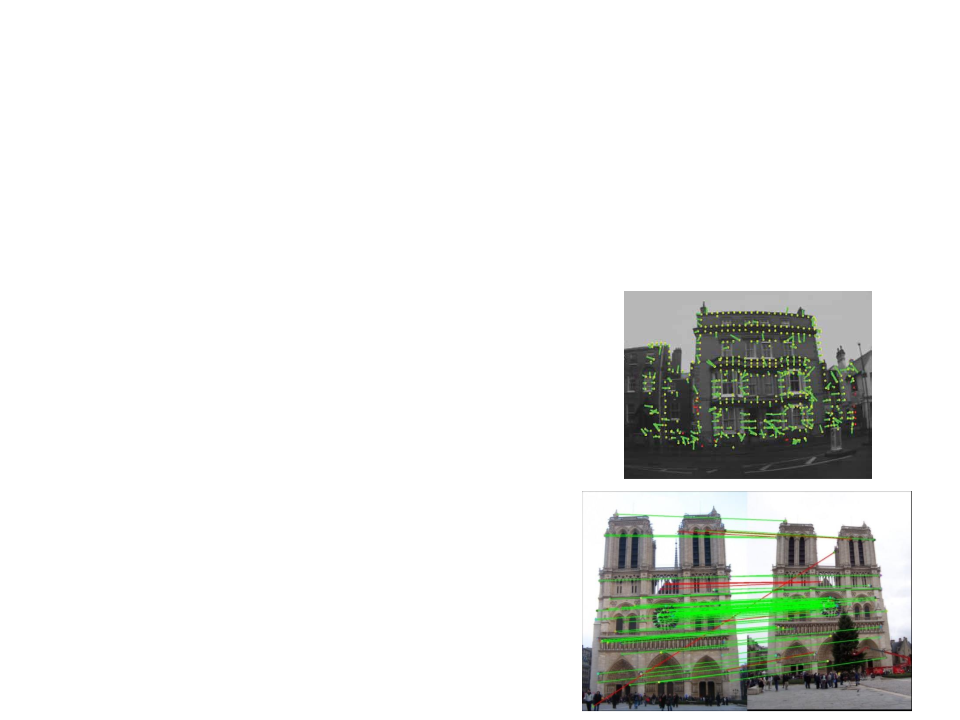
Markerless Tracking
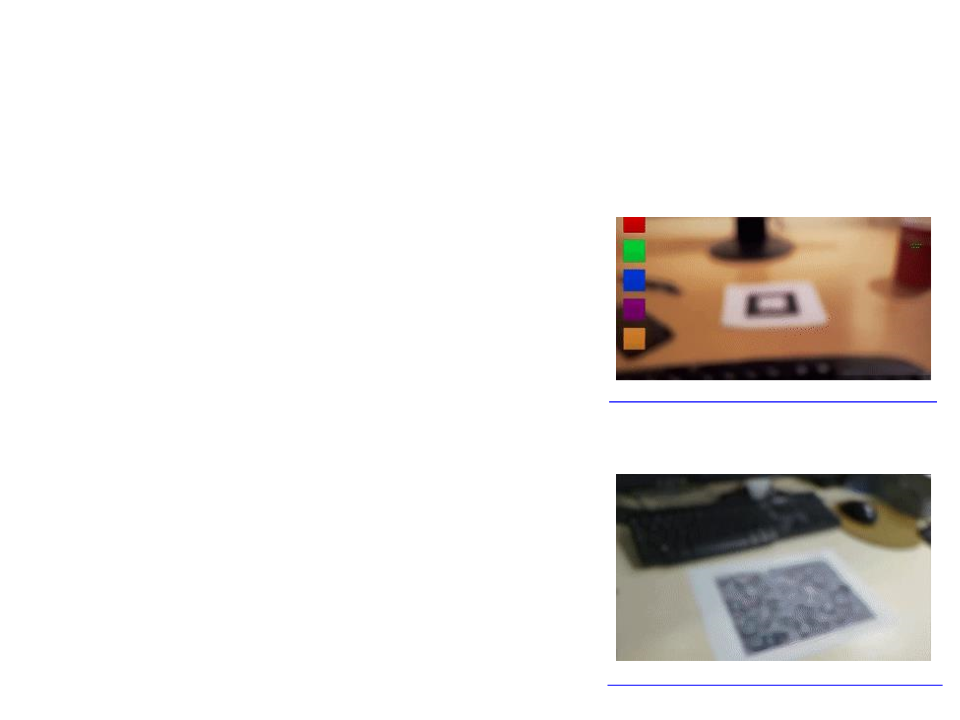
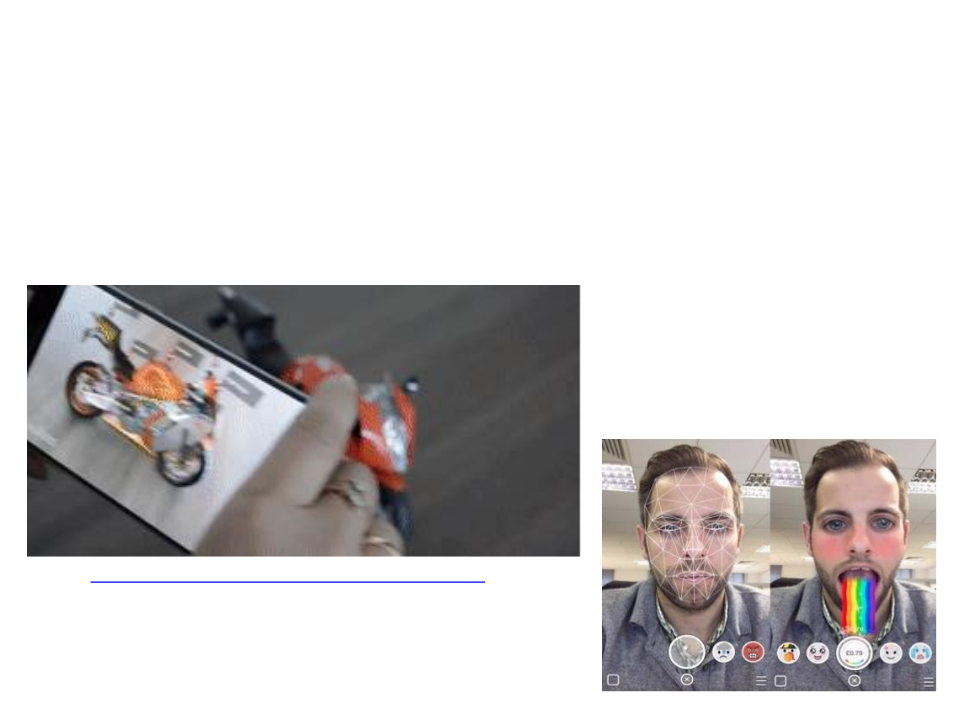
•
Example:
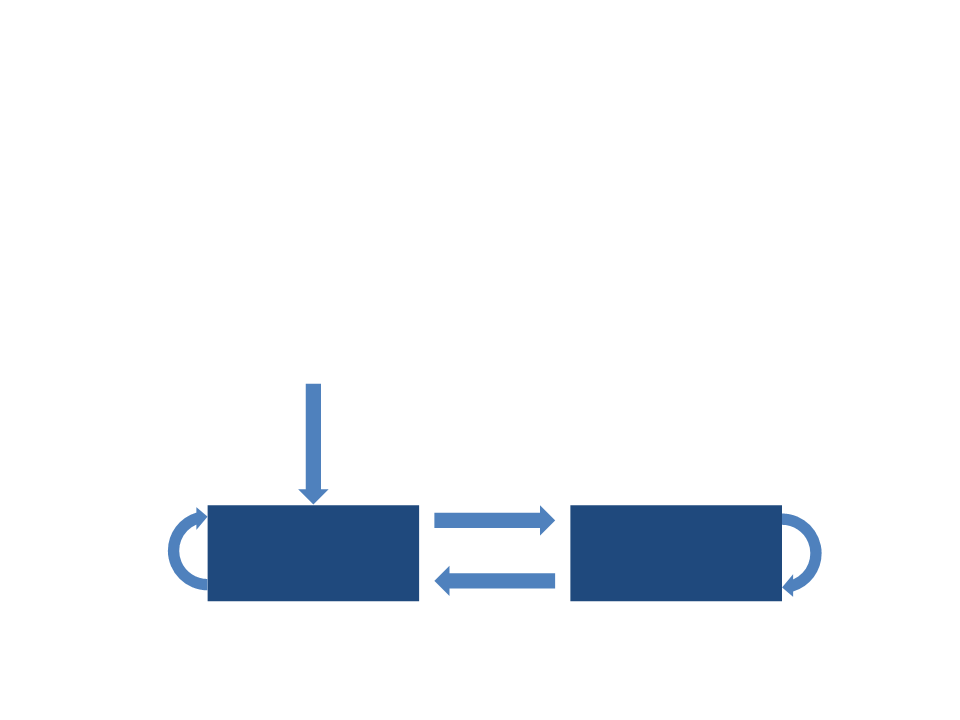
Markerless Tracking
•
Detection and tracking:
–
–
–
Tracking and detection are complementary approaches.
After successful detection, the target is tracked incrementally.
If the target is lost, the detection is activated again.
Start
Tracking target
detected
Tracking target
not detected
Incremental
tracking ok
Incremental
tracking
Detection
+
+
+
Recognize target type
Detect target
Initialize camera pose
Tracking target + Fast
+ Robust to blur, lighting changes
lost
+ Robust to tilt
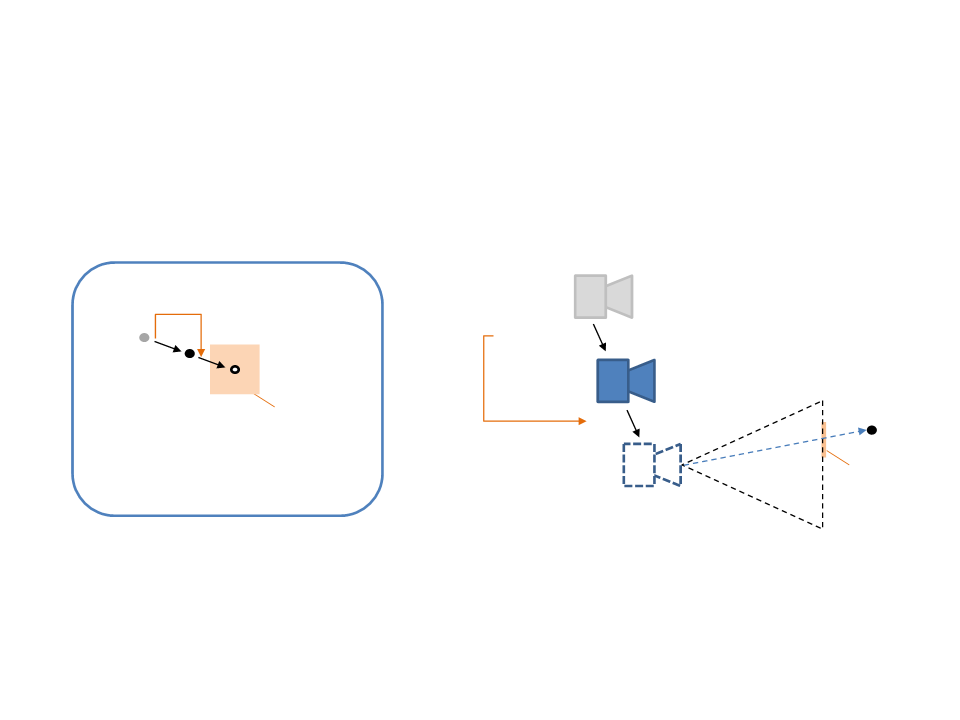
Markerless Tracking
•
Motion model:
xt-1
2
D motion model
t=p -p
t
t-1
t=(xt-xt-1)
pt-1
3D
motion
model
pt
xt
search
q
t
window
Xt+1
search
image space
window
Active search in 2D
Active search in 3D
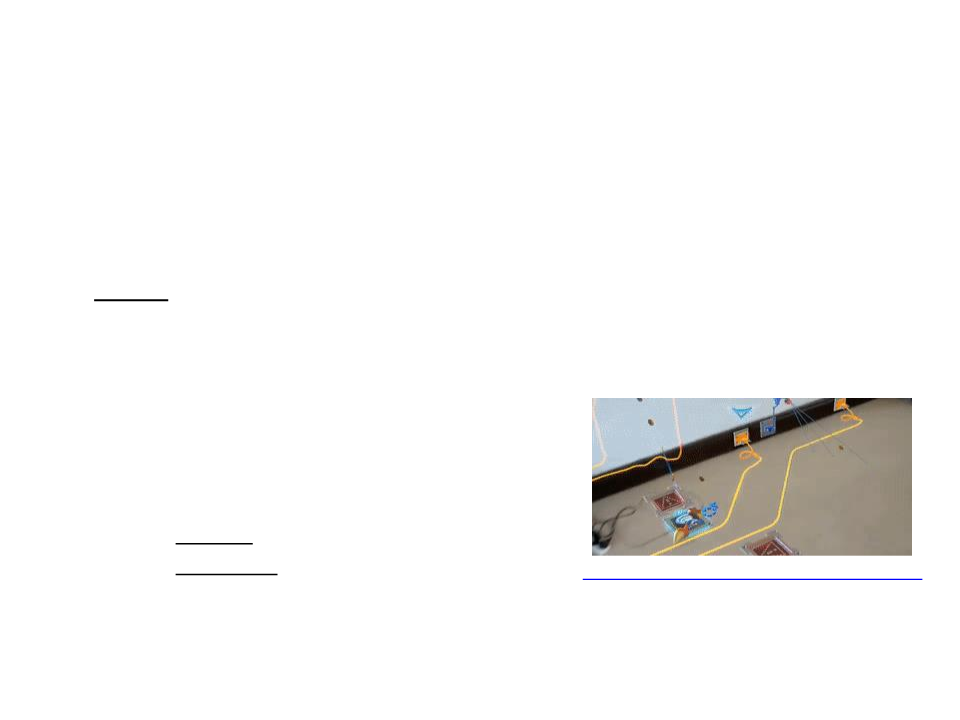
Marker vs. Markerkess Tracking
•
•
Marker-Based Tracking:
–
–
–
–
Usually requires no database
Marker can be eye-catching
Tracking is less demanding
Markers usually work only when fully in
view
https://www.youtube.com/watch?v=AYDaIodABus
Markerkess Tracking:
–
A database of keypoints must be
created/downloaded
–
–
Natural features are potentially anywhere
Natural features targets work also when
partially in view
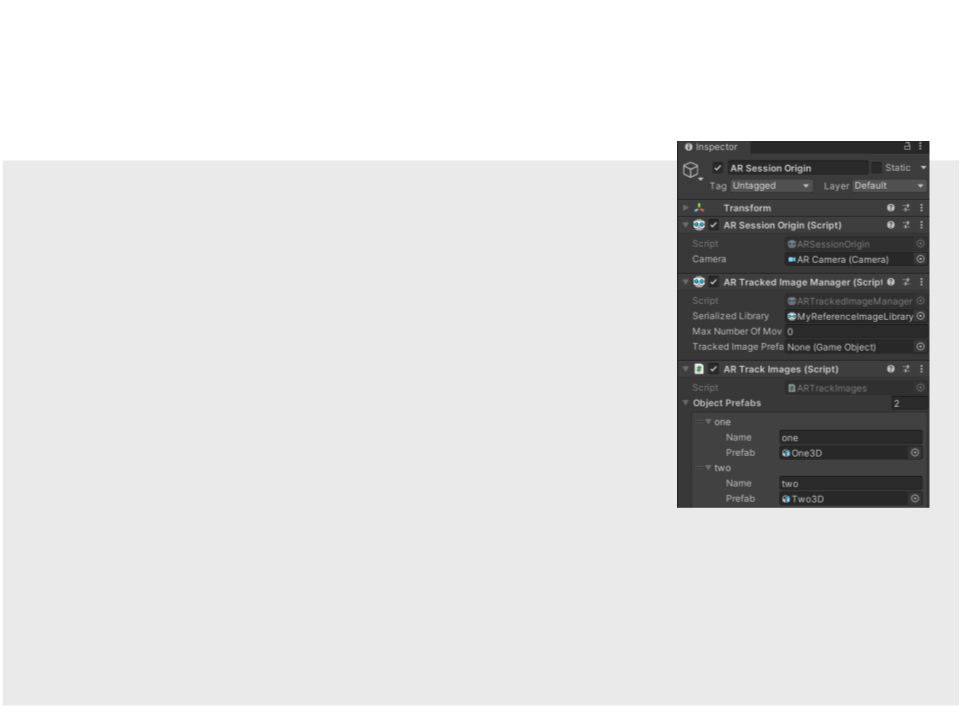
Markerless Tracking in Unity
•
•
Scene setup:
–
Add an "AR Tracked Image Manager" component to the "AR Session
Origin" GameObject.
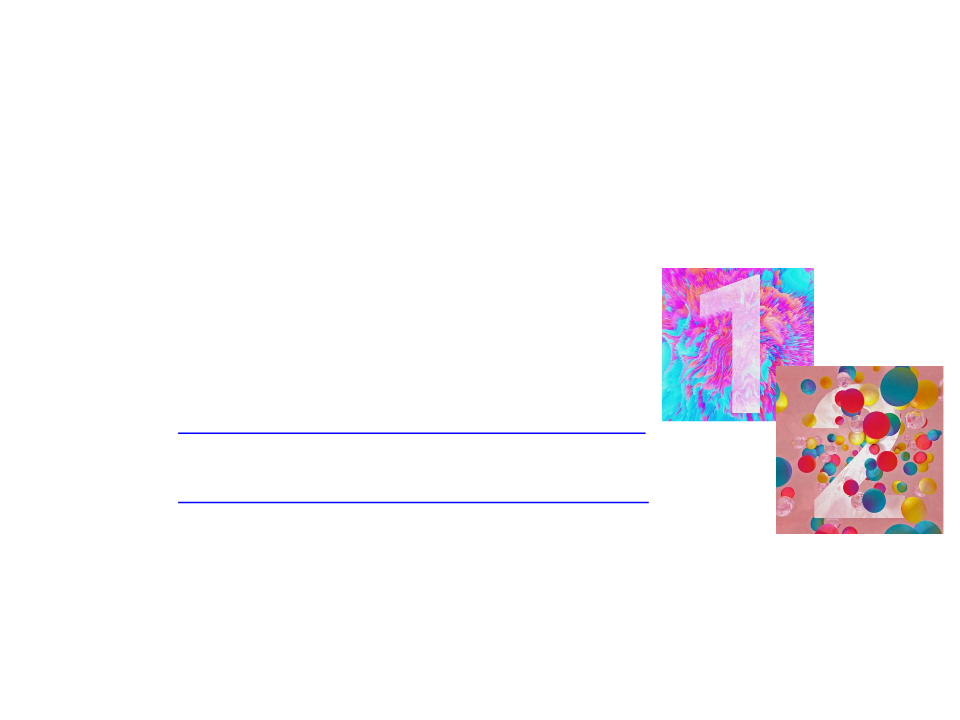
Reference Image Library:
–
Import the reference images:
• https://edirlei.com/aulas/vrar/ARReferenceImages.zip
–
Import the 3D models to instantiate:
•
https://edirlei.com/aulas/vrar/ARReferenceModels.zip
•
Set the scale factor to 3.
–
Create a "Reference Image Library“ asset (Assets -> Create -> XR ->
Reference Image Library).
•
Add the images and specify the physical size to improve tracking (X and Y = 0.2159)
Markerless Tracking in Unity
using System.Collections.Generic;
using UnityEngine;
using UnityEngine.XR.ARFoundation;
using UnityEngine.XR.ARSubsystems;
[
System.Serializable]
public struct ARObjectPrefab
{
public string name;
public GameObject prefab;
}
public class ARTrackImages : MonoBehaviour
{
public List<ARObjectPrefab> objectPrefabs = new List<ARObjectPrefab>();
private Dictionary<string, GameObject> instantiatedObjects;
private ARTrackedImageManager trackedImagesManager;

Markerless Tracking in Unity
void Start()
{
trackedImagesManager = GetComponent<ARTrackedImageManager>();
trackedImagesManager.trackedImagesChanged += OnTrackedImagesChanged;
instantiatedObjects = new Dictionary<string, GameObject>();
}
private void OnTrackedImagesChanged(ARTrackedImagesChangedEventArgs
eventArgs){
foreach (ARTrackedImage trackedImage in eventArgs.added)
{
foreach (ARObjectPrefab obj in objectPrefabs)
{
if ((obj.name == trackedImage.referenceImage.name) &&
(
!instantiatedObjects.ContainsKey(obj.name)))
{
}
instantiatedObjects[obj.name] = Instantiate(obj.prefab,
trackedImage.transform);
}
}

Markerless Tracking in Unity
foreach (ARTrackedImage trackedImage in eventArgs.updated)
{
if (trackedImage.trackingState == TrackingState.Tracking)
{
instantiatedObjects[trackedImage.referenceImage.name].
SetActive(true);
}
else
{
instantiatedObjects[trackedImage.referenceImage.name].
SetActive(false);
}
}
foreach (ARTrackedImage trackedImage in eventArgs.removed)
{
Destroy(instantiatedObjects[trackedImage.referenceImage.name]);
instantiatedObjects.Remove(trackedImage.referenceImage.name);
}
}
}
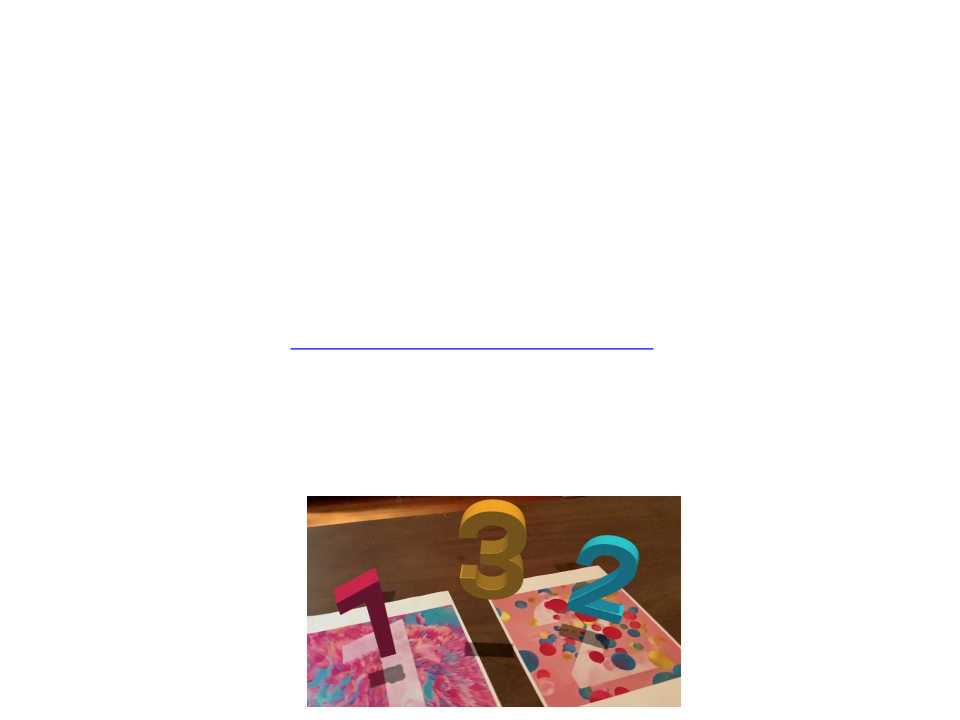
Assignment 1
1
) Continue the implementation of the markerless tracking
example.
–
When both tracked images (one and two) are visible, instantiate
another 3D model between them (a three model).
3D model: http://edirlei.com/aulas/vrar/Three3D.fbx
•
–
–
The new model must be constantly adjusting its position to be
always between the other models.
If one of the tracked images disappear, the new model must be
destroyed.
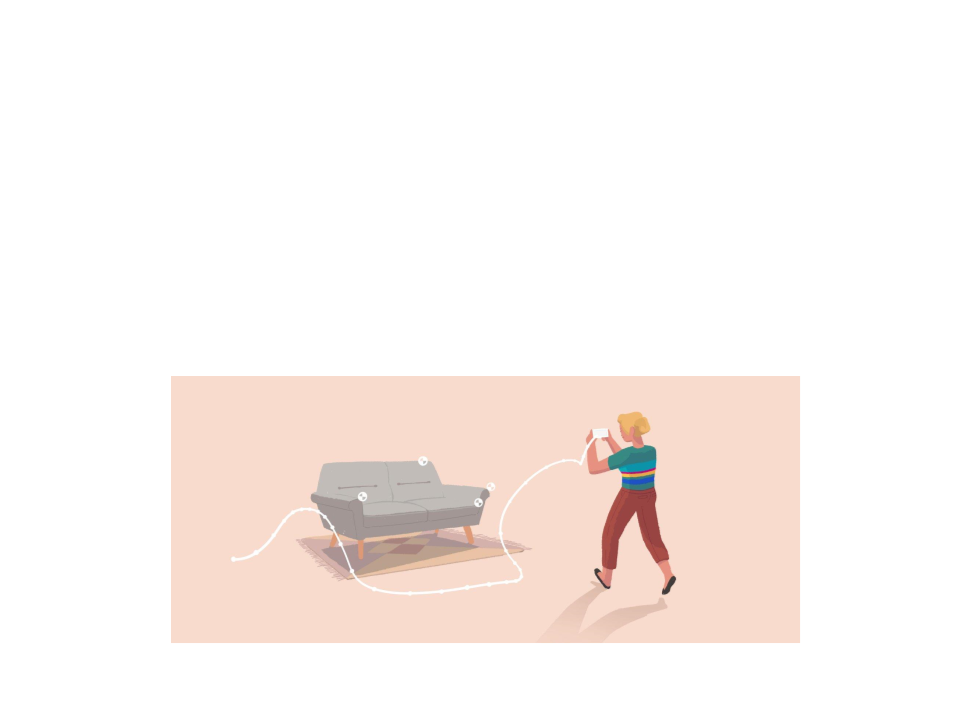
Tracking in Unknown Environments
•
What to do when you don’t know any environment feature?
•
SLAM: Simultaneously Localize And Map the Environment:
–
–
Very common problem in robotics.
Recover both camera pose and map
structure while exploring the
environment.
–
Mapping: build the map of the environment.
–
Localization: navigate in the environment
using the map while keeping track of the
camera position and orientation.
https://www.youtube.com/watch?v=kMA8Ec_TtQM
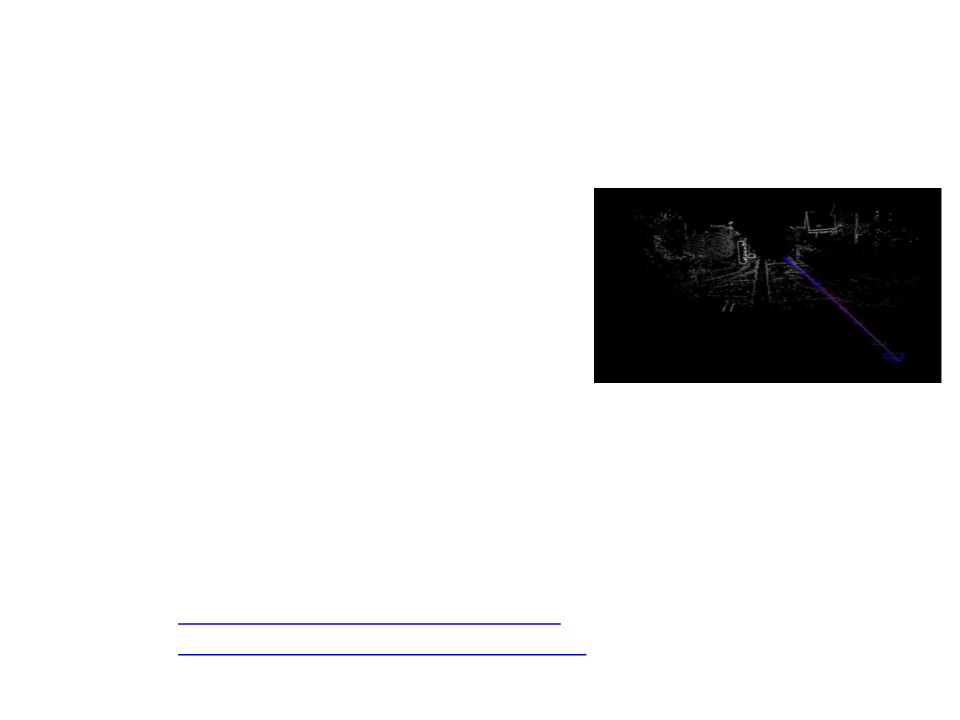
Tracking in Unknown Environments
•
General process:
–
–
–
Track a set of points through successive camera frames;
Use the tracked points to triangulate their 3D position;
Simultaneously, use the estimated points locations to calculate the
camera pose which could have observed them.
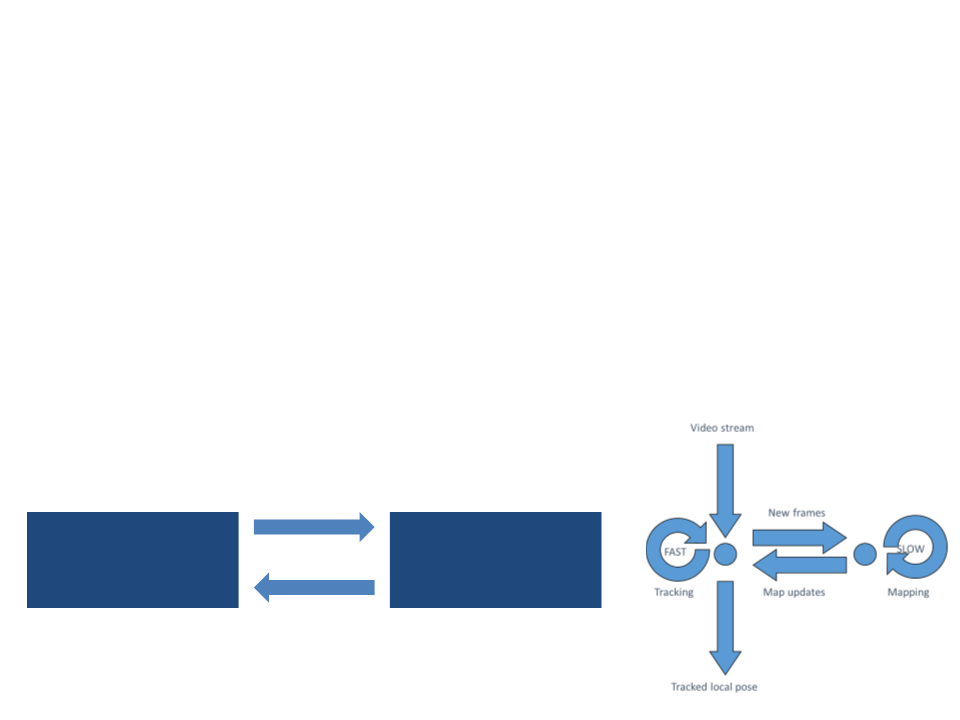
•
Parallel tracking and mapping:
New keyframes
Tracking
Mapping
+
+
Estimate camera pose
For every frame
Map updates + Extend map
+ Improve map
+
Slow updates rate
Tracking in Unknown Environments
•
SLAM Algorithms:
–
–
–
–
–
–
MonoSLAM (2007)
• Real time SLAM from single camera.
FAB-MAP (2008)
•
Probabilistic location and mapping
PTAM (2009)
•
First SLAM implementation for mobile devices.
DTAM (2011)
•
3D surface reconstruction from every pixel in image.
KinectFusion (2011)
•
Real-time dense surface mapping and tracking using RGB and depth cameras.
Surveys on SLAM methods:
•
https://doi.org/10.1186/s41074-017-0027-2
•
SLAM in Unity
•
ARCore uses SLAM to estimate where the phone is relative to
the world.
–
Feature and keypoint detection methods are used to map the
environment.
–
The visual information is combined with inertial measurements.
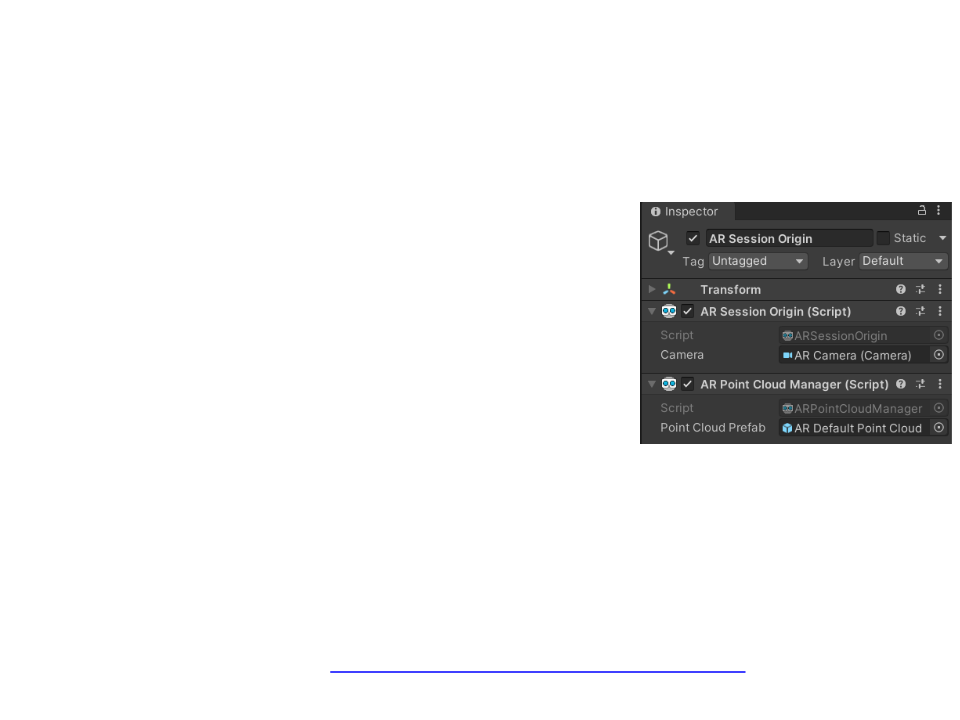
SLAM in Unity
•
Scene setup to detect features/keypoints:
–
Create an "AR Default Point Cloud"
GameObject in the scene (GameObject -> XR
-> AR Default Point Cloud).
–
Create a prefab of the "AR Default Point
Cloud". Then, delete the original GameObject
from the scene.
–
–
Add an "AR Point Cloud Manager" component
to the "AR Session Origin" GameObject.
Select the prefab of the "AR Default Point
Cloud“ in the properties of the "AR Point
Cloud Manager".
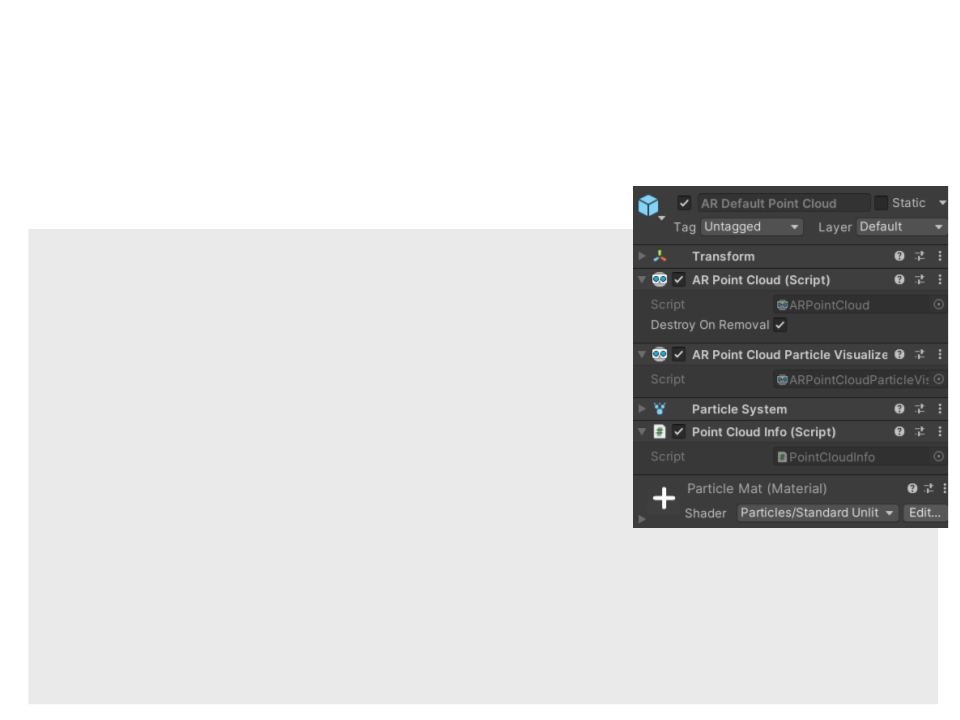
–
Optional:
•
Improve the feature point particle.
•
Example texture: https://edirlei.com/aulas/vrar/FeaturePoint.png
SLAM in Unity
•
Accessing the point cloud information:
using System.Collections;
using System.Collections.Generic;
using UnityEngine;
using UnityEngine.XR.ARFoundation;
using TMPro;
using Unity.Collections;
public class PointCloudInfo : MonoBehaviour{
private ARPointCloud pointCloud;
private TMP_Text logText;
void Start()
{
logText = GameObject.FindGameObjectWithTag("LogText").
GetComponent<TMP_Text>();
pointCloud = GetComponent<ARPointCloud>();
pointCloud.updated += OnPointCloudChanged;
}

SLAM in Unity
private void OnPointCloudChanged(ARPointCloudUpdatedEventArgs
eventArgs)
{
if ((pointCloud.positions.HasValue) &&
(
(
pointCloud.identifiers.HasValue) &&
pointCloud.confidenceValues.HasValue)){
NativeSlice<Vector3> positions = pointCloud.positions.Value;
NativeSlice<ulong> identifiers = pointCloud.identifiers.Value;
NativeSlice<float> confidence =
pointCloud.confidenceValues.Value;
if (positions.Length > 0)
{
logText.text = "Number of points: " + positions.Length +
"
\nFirst Point: x = " + positions[0].x + ", y = " +
positions[0].y + ", z = " + positions[0].z +
,\n Identifier = " + identifiers[0] + ", Confidence = " +
confidence[0];
"
}
}
}
}

SLAM in Unity
•
Environmental understanding:
–
ARCore looks for clusters of feature points that appear to lie on
common horizontal or vertical surfaces, like tables or walls, and makes
these surfaces available as geometric planes.
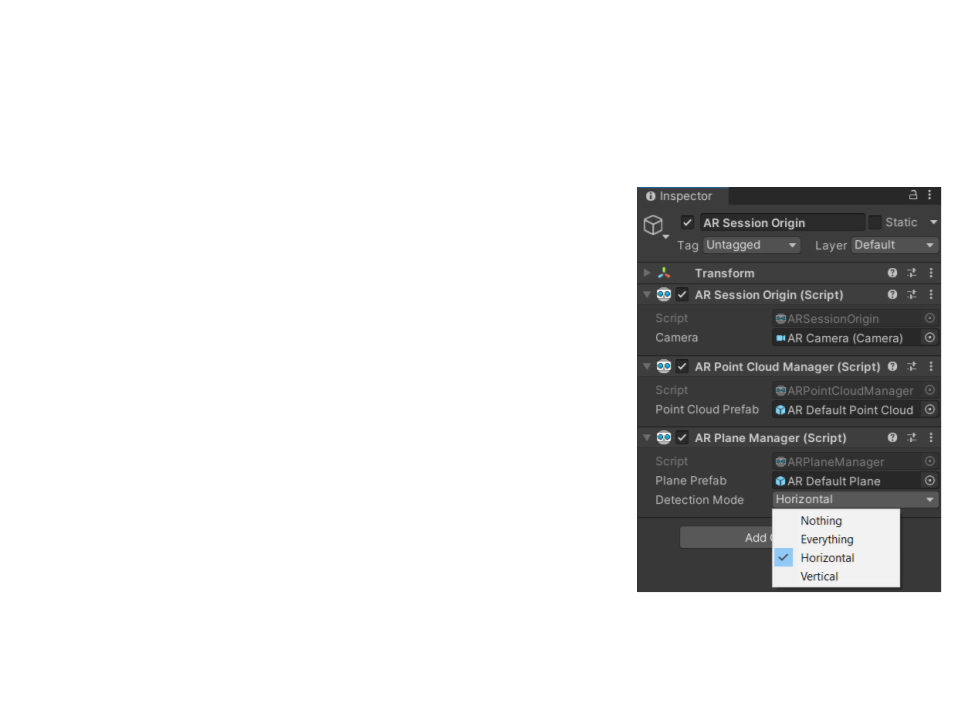
SLAM in Unity
•
Scene setup for plane detection:
–
Create an "AR Default Plane" GameObject in
the scene (GameObject -> XR -> AR Default
Plane).
–
Create a prefab of the "AR Default Plane".
Then, delete the original GameObject from
the scene.
–
–
Add an "AR Plane Manager" component to
the "AR Session Origin" GameObject.
Select the prefab of the "AR Default Plane" in
the properties of the "AR Plane Manager".
•
In the detection mode, select types of planes to be
detect: Horizontal, Vertical, or Everything
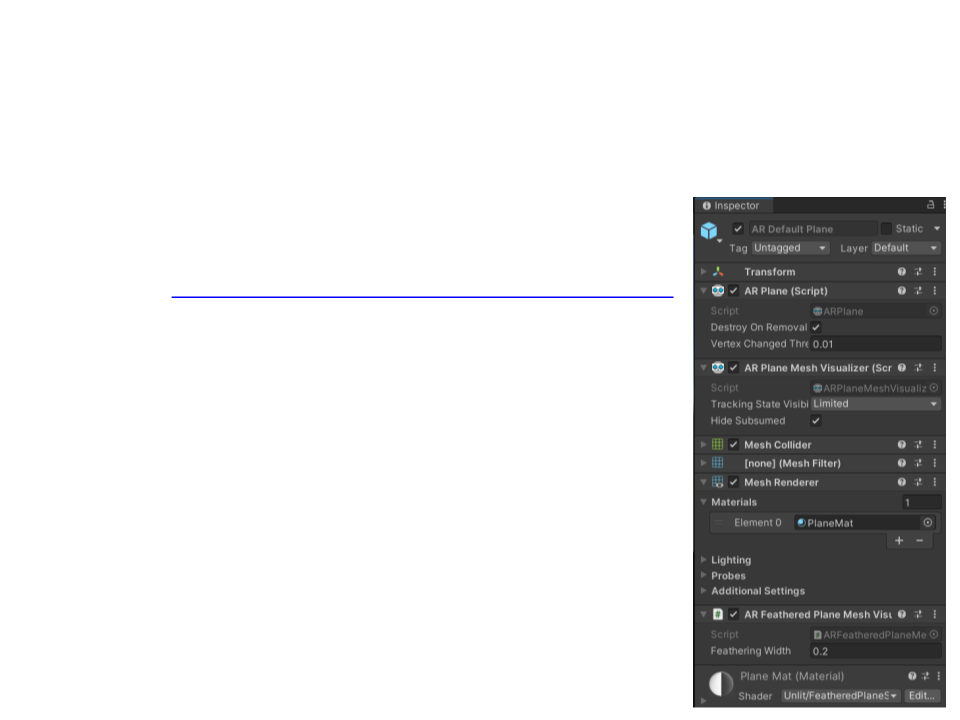
SLAM in Unity
•
Optional: improve the plane rendering
–
Feathering effect: smooth the edges of planes.
–
Shader + texture + script:
•
http://edirlei.com/aulas/vrar/FeatheringEffectARPlane.zip
–
Create a new material:
•
•
•
•
Select the shader Unlit -> FeatheredPlaneShader.
Select the plane texture and set the tilling X and Y to 2.25.
Set the alpha channel of the Texture Tint Color to 120.
Set the alpha channel of the Plane Color to 0.
–
–
–
Select the new material in the prefab of the "AR
Default Plane“.
Remove the "Line Renderer" component from the
prefab of the "AR Default Plane".
Add the "ARFeatheredPlaneMeshVisualizer"
component to the prefab of the "AR Default Plane".
3
D Model-Based Tracking
•
Tracking from 3D object shapes
–
Search for the alignment of 3D model features
https://www.youtube.com/watch?v=6W7_ZssUTDQ
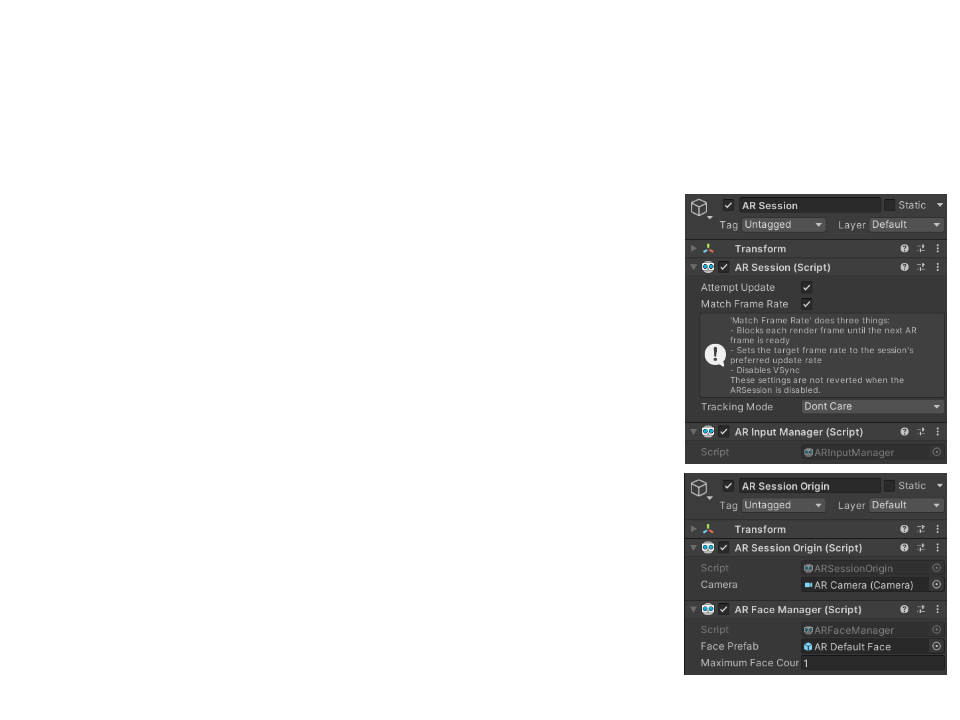
Face Tracking in Unity
•
Scene setup for face detection:
–
Set the "Tracking Mode" of the "AR Session"
to "Don’t Care".
–
Create an "AR Default Face" GameObject in
the scene (GameObject -> XR -> AR Default
Face).
–
Create a prefab of the "AR Default Face".
Then, delete the original GameObject from
the scene.
–
–
Add an "AR Face Manager" component to the
"
AR Session Origin" GameObject.
Select the prefab of the "AR Default Face" in
the properties of the "AR Face Manager".

Face Tracking in Unity
•
Add an AR filter (texture-based):
–
–
–
–
–
ARCore default 3D face model:
• http://edirlei.com/aulas/vrar/ARFaceMesh.fbx
Example of beard texture:
•
https://edirlei.com/aulas/vrar/BeardTexture.png
Create a new material and select the beard
texture.
Select the new material in the "AR Default
Face" prefab.
More details about how to create custom
textures and 3D face models:
•
https://developers.google.com/ar/develop/java/aug
mented-faces/create-assets
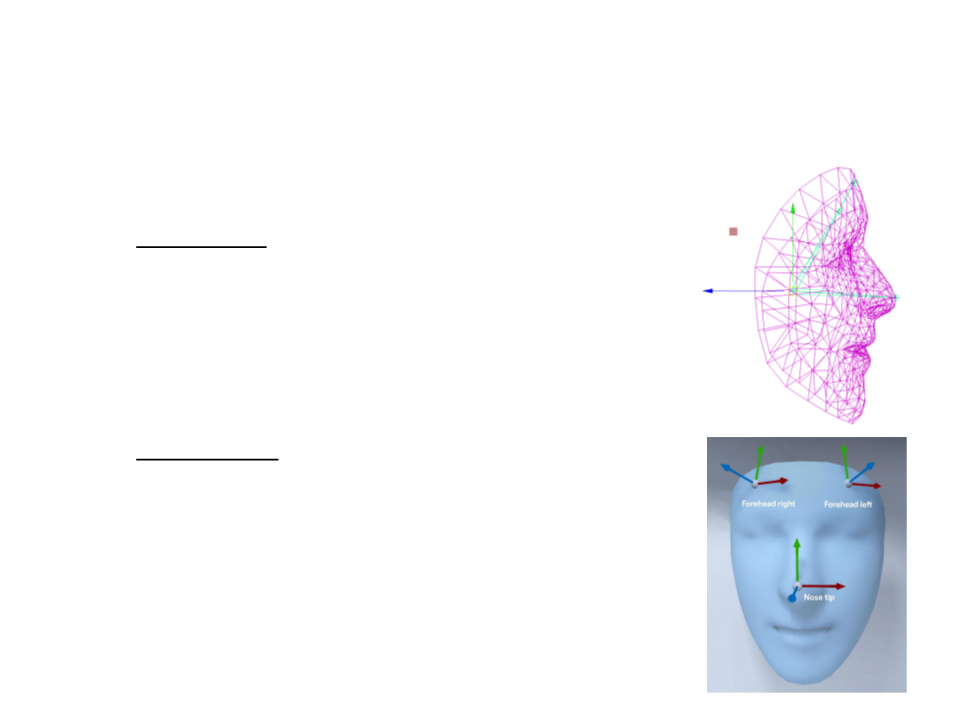
Face Tracking in Unity
•
Face References:
–
Center pose:
•
Located behind the nose, the center pose marks the
middle of a user’s head.
•
Can be used to render assets such as a hat on top of
the head.
–
Region poses:
•
Located on the left forehead, right forehead, and tip of
the nose, region poses mark important parts of a user’s
face.
•
Can be used to render assets on the nose or around the
ears.
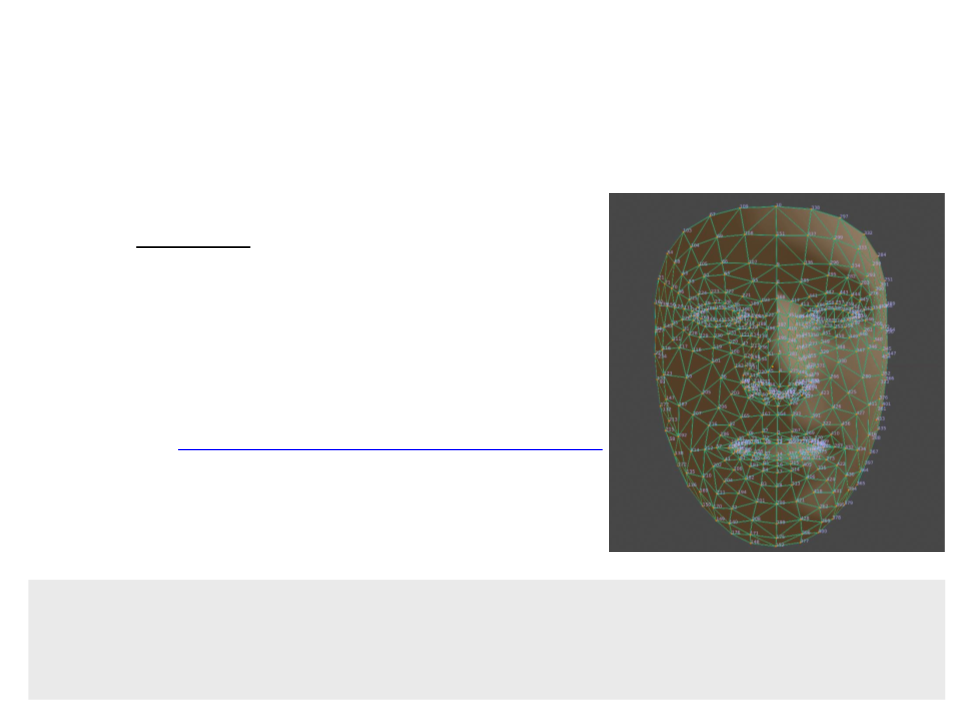
Face Tracking in Unity
•
Face References:
–
Face mesh:
•
The 3D face mesh comprises 468-points
•
Can be used to paint adaptable, detailed textures
or 3D assets that accurately follow a face.
•
•
Indexes of the mesh vertices:
https://edirlei.com/aulas/vrar/ARFaceMeshVertices.png
Accessing the world coordinate of the face mesh
vertices by script:
...
assetGameObject.transform.position = faceMesh.transform.localToWorldMatrix.MultiplyPoint3x4(
faceMesh.vertices[1]);
...
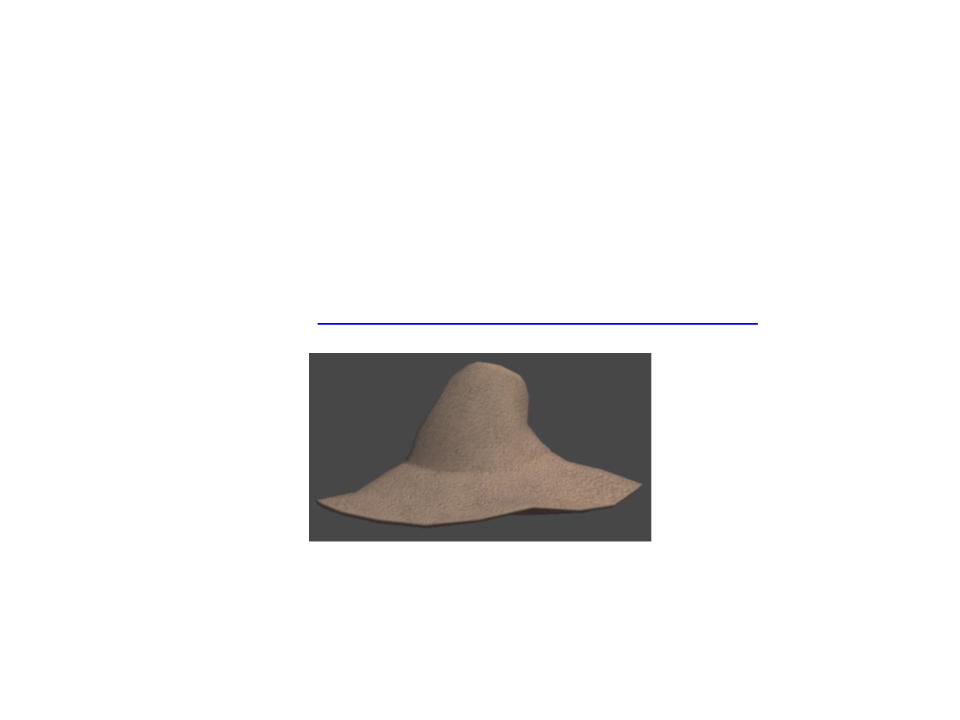
Assignment 2
2
) Implement the process of adding the 3D model of a hat on
top of the user’s head using the face tracking method.
–
3D Hat Model: https://edirlei.com/aulas/vrar/3DHat.zip

Further Reading
•
Schmalstieg, D., Hollerer, T. (2016). Augmented Reality: Principles and
Practice (1st ed.). Addison-Wesley Professional.
–
–
Chapter 3: Tracking
Chapter 4: Computer Vision for Augmented Reality