
Game Frameworks
Lecture 06: 2D Tilemaps in Unity
Edirlei Soares de Lima
<edirlei.lima@universidadeeuropeia.pt>
Tilemap
•
The Tilemap component is a system which stores and handles
Tile Assets for creating 2D levels.

Tilemap Workflow
•
General workflow to create and paint a Tilemap in Unity:
1
. Create a Tilemap GameObject.
• A Grid GameObject is also created automatically in the process.
2
. Create Tile Assets or generate Tiles from Sprites, and then assign
them to a Tile Palette.
3
4
. Paint on a Tilemap with your Tile Palette.
. Attach the Tilemap Collider 2D component to the Tilemaps to make
them interact with Physics2D.
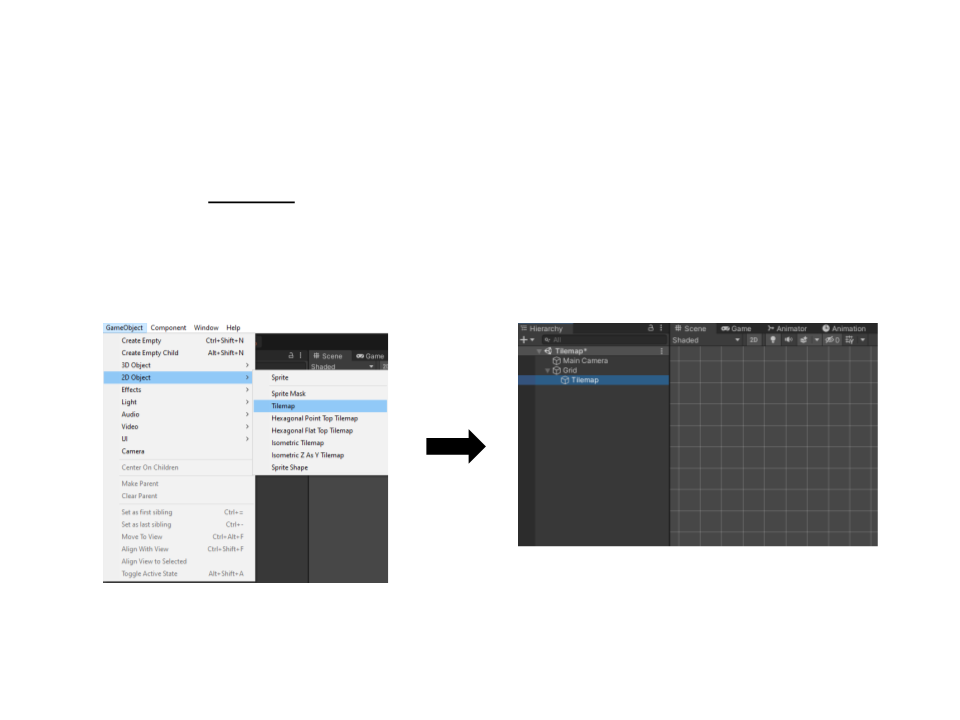
Tilemap Workflow
1
. Create a Tilemap GameObject.
–
A Grid GameObject is also created automatically in the process.

Tilemap Workflow
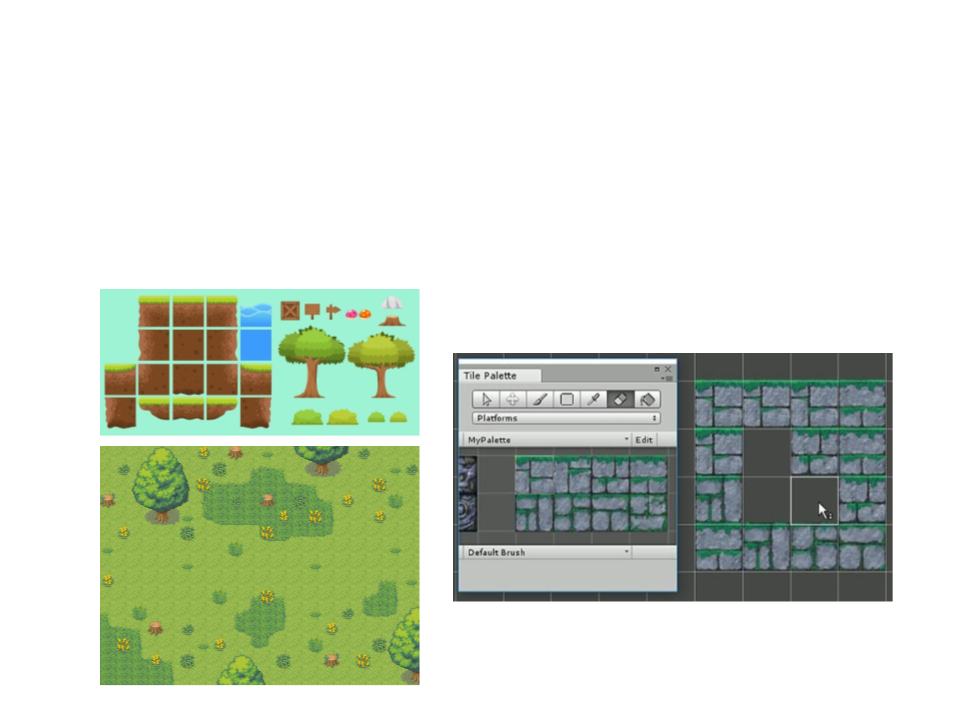
2
. Create Tile Assets or generate Tiles from Sprites, and then assign them
to a Tile Palette.
–
Individual Tiles (Create -> Tile):
–
Tiles from Sprites (Window -> 2D -> Tile Palette):
https://edirlei.com/aulas/gameframeworks/tileset_example.png
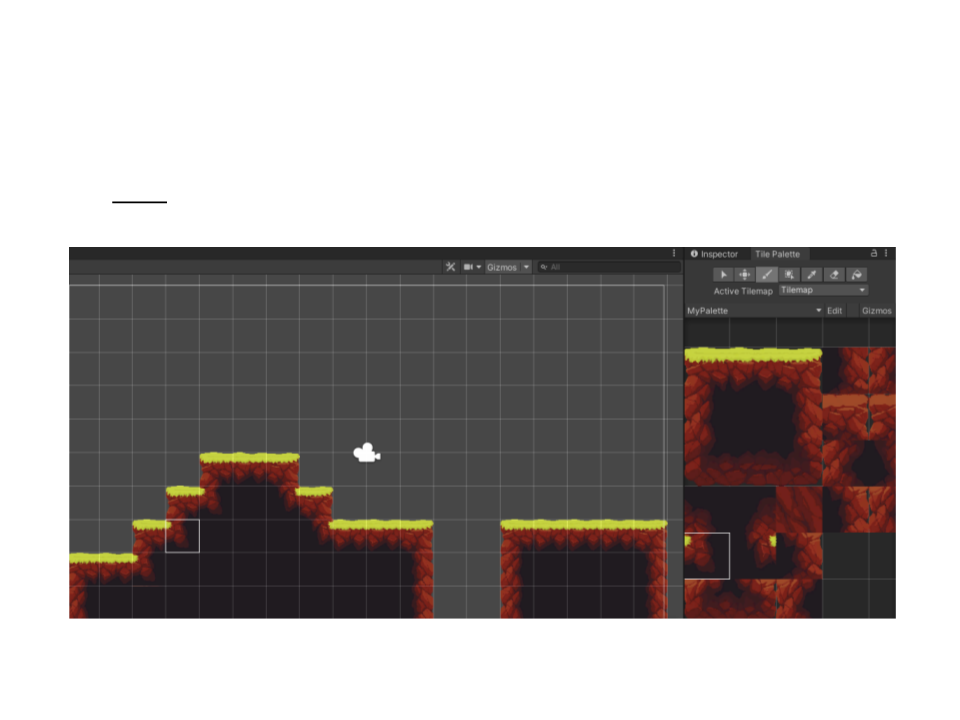
Tilemap Workflow
3
. Paint on a Tilemap with your Tile Palette.
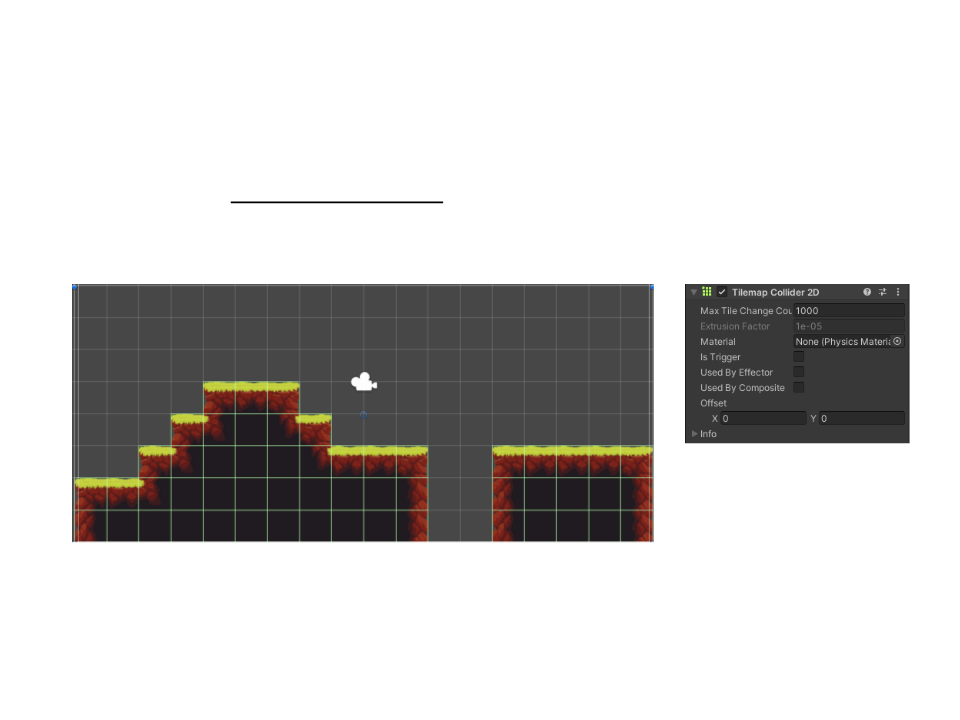
Tilemap Workflow
4
. Attach the Tilemap Collider 2D component to the Tilemaps to make
them interact with Physics2D.

Tilemap Layers
•
Multiple Tilemaps can be added to the same grid, which
allows the creation of different types of layers: background,
foreground, collision, and event layers.
–
Example: a layer dedicated to collision detection.

Scripting – Accessing Tiles
•
Example 1: Instantiate bombs on click that destroy tiles on collision.
public class InstantiateBomb : MonoBehaviour
{
public GameObject bombPrefab;
public float cooldownTime = 0.5f;
private float bombTimer = 0;
void Update(){
if ((Input.GetMouseButton(0)) && (bombTimer <= 0)){
Vector2 screenPos = Input.mousePosition;
Vector3 worldPos = GetComponent<Camera>().
ScreenToWorldPoint(screenPos);
Instantiate(bombPrefab, new Vector2(worldPos.x, worldPos.y),
Quaternion.identity);
bombTimer = cooldownTime;
}
if (bombTimer >= 0){
bombTimer -= Time.deltaTime;
}
}
}

Scripting – Accessing Tiles
•
Example 1: Instantiate bombs on click that destroy tiles on collision.
public class Bomb : MonoBehaviour
{
private void OnCollisionEnter2D(Collision2D collision)
{
bool explode = false;
Tilemap tilemap = collision.gameObject.GetComponent<Tilemap>();
if (tilemap){
Vector3 hitPosition = Vector3.zero;
foreach (ContactPoint2D hit in collision.contacts){
hitPosition.x = hit.point.x - 0.01f * hit.normal.x;
hitPosition.y = hit.point.y - 0.01f * hit.normal.y;
tilemap.SetTile(tilemap.WorldToCell(hitPosition), null);
explode = true;
}
}
if (explode){
Destroy(gameObject);
}
}
}
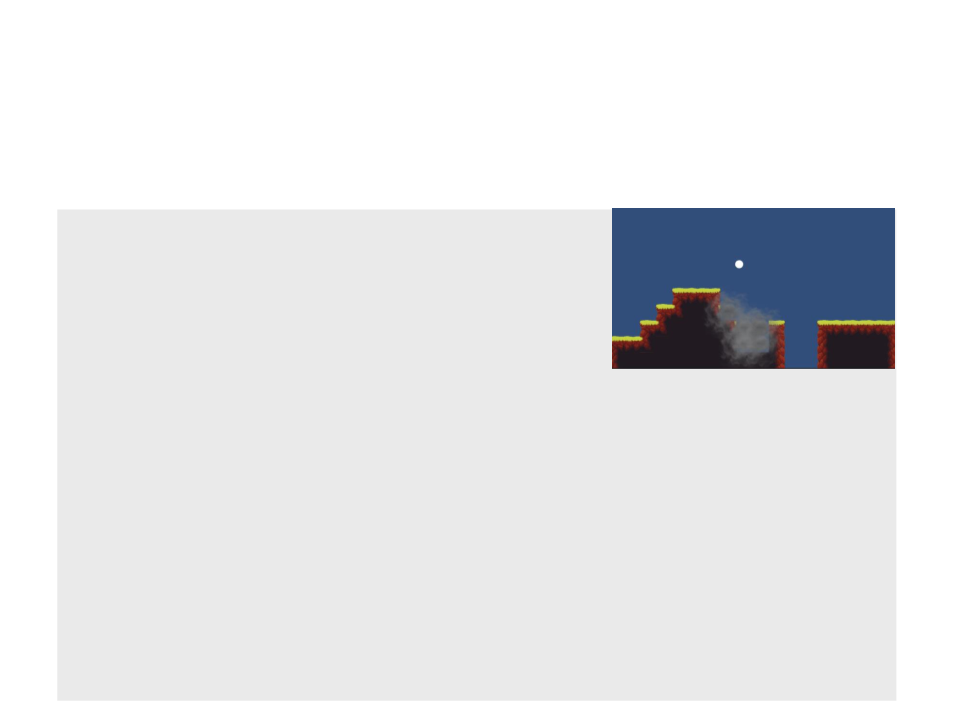
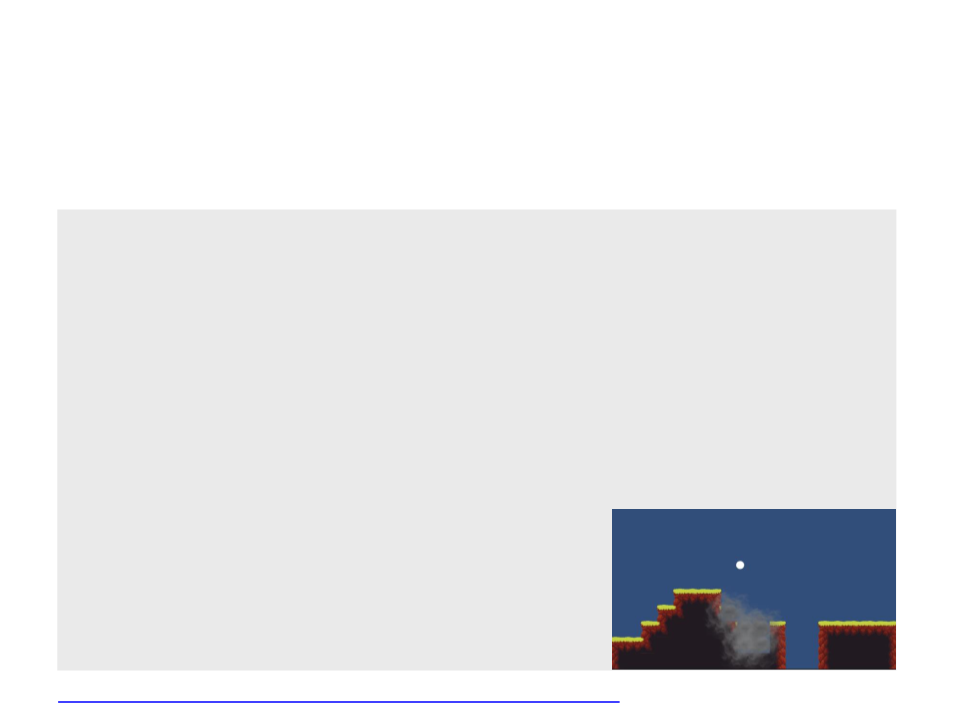
Scripting – Accessing Tiles
•
Example 2: Create a new tile on collision (bomb smoke).
public class Bomb : MonoBehaviour
{
public Tile explosionTile;
private Tilemap hitLayer;
private void Start()
{
hitLayer = GameObject.FindGameObjectWithTag("HitLayer").
GetComponent<Tilemap>();
}
private void OnCollisionEnter2D(Collision2D collision)
{
bool explode = false;
Tilemap tilemap = collision.gameObject.GetComponent<Tilemap>();
if (tilemap)
{
Vector3 hitPosition = Vector3.zero;
...
Scripting – Accessing Tiles
•
Example 2: Create a new tile on collision (bomb smoke).
...
foreach (ContactPoint2D hit in collision.contacts)
{
hitPosition.x = hit.point.x - 0.01f * hit.normal.x;
hitPosition.y = hit.point.y - 0.01f * hit.normal.y;
tilemap.SetTile(hitLayer.WorldToCell(hitPosition), null);
hitLayer.SetTile(hitLayer.WorldToCell(hitPosition),
explosionTile);
explode = true;
}
}
if (explode)
{
Destroy(gameObject);
}
}
}

Exercise 1
1
) Create a small level for a platform game using tile maps and
implement the following tasks:
a) Implement the camera movement;
b) Respawn the player at the beginning of the level when he falls off the
platforms;
c) Allow the player to drop bombs that explode and destroy the tiles
around.
•
The bomb must explode after 3 seconds.
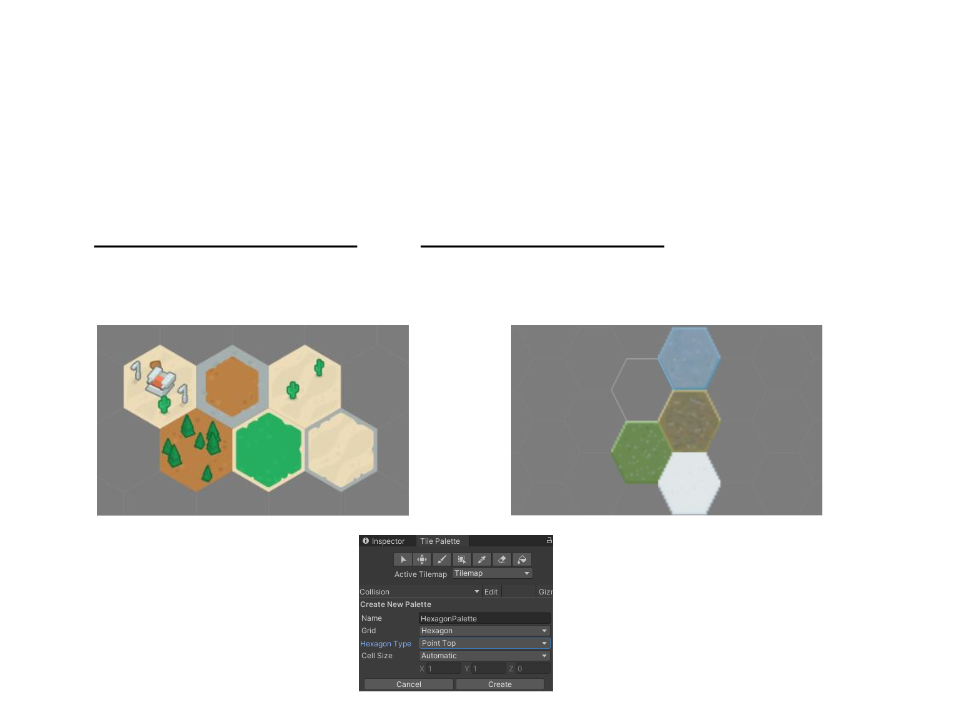
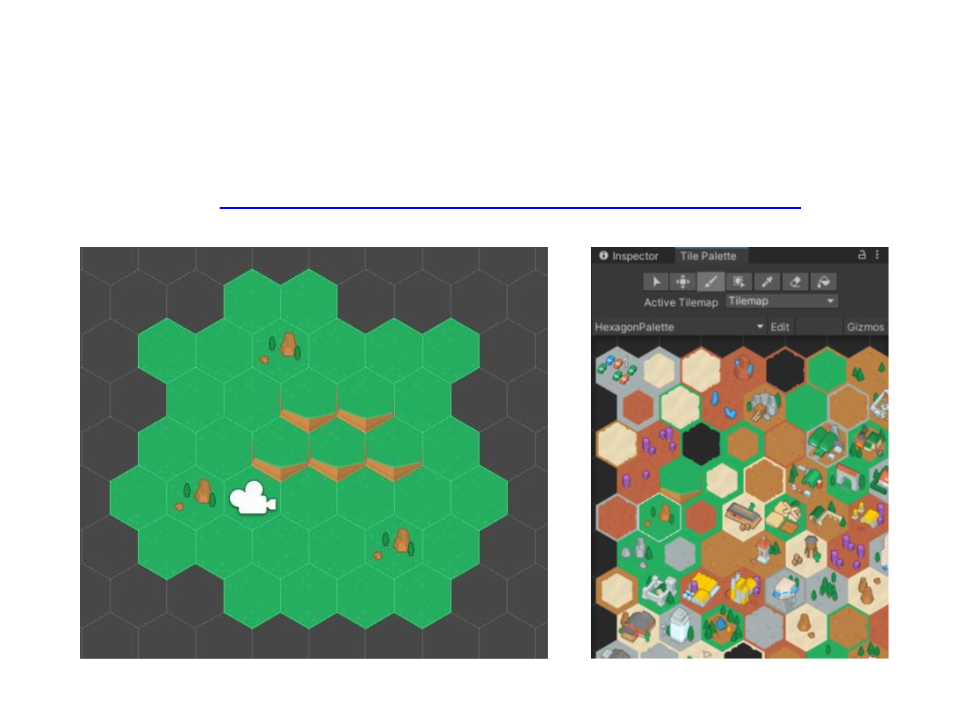
Hexagonal Tilemaps
•
In addition to regular Tilemaps, Unity provides both
Hexagonal Point Top and Hexagonal Flat Top Tilemaps.
Hexagonal Flat Top
Hexagonal Point Top
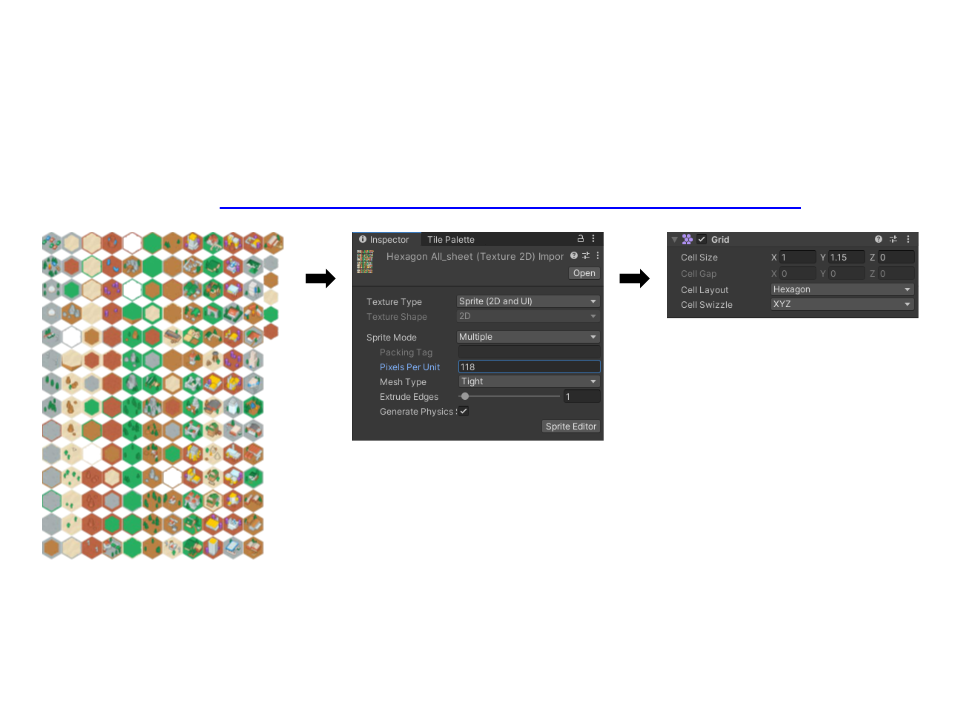
Hexagonal Tilemaps
•
Example: https://www.kenney.nl/assets/hexagon-pack
Hexagonal Tilemaps
•
Example: https://www.kenney.nl/assets/hexagon-pack

Scripting – Hexagonal Character Movement
•
Example 3: Character movement in a hexagonal tilemap (+ pathfinding)
–
–
–
Character sprites: https://opengameart.org/content/zombie-sprites
Import and slice sprite, and then create animation clips for idle and walk (all directions).
Create a State Machine to control the animations:
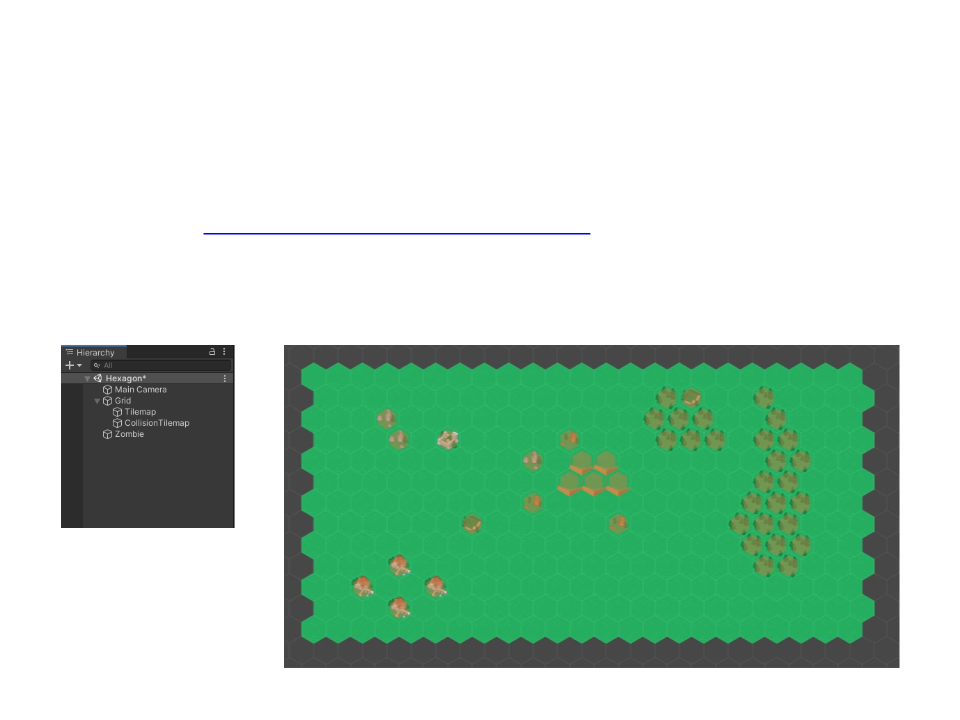
Scripting – Hexagonal Character Movement
•
Example 3: Character movement in a hexagonal tilemap (+ pathfinding)
–
Tileset: https://www.kenney.nl/assets/hexagon-pack
–
Create the level: Tilemap and Collision Tilemap

Scripting – Hexagonal Character Movement
•
Example 3: Character movement in a hexagonal tilemap (+ pathfinding)
public class Pathfinding{
float Heuristic(Vector3Int w1, Vector3Int w2){
...
}
List<Vector3Int> ReconstructPath(Dictionary<Vector3Int, Vector3Int>
cameFrom, Vector3Int current, Vector3Int start){
...
}
List<Vector3Int> GetNeighbors(Tilemap tilemap, Vector3Int node){
..
.
}
public List<Vector3Int> FindPath(Tilemap tilemap, Vector3Int start,
Vector3Int goal){
...
}
}

Scripting – Hexagonal Character Movement
•
Example 3: Character movement in a hexagonal tilemap (+ pathfinding)
public class HexagonalPlayerController : MonoBehaviour
{
public Tilemap collisionTilemap;
public Tilemap worldTilemap;
public float moveSpeed = 2.5f;
private Vector3 currentDestination = Vector3.zero;
private Pathfinding pathfinding;
private List<Vector3Int> currentPath = null;
private int pathIndex = 0;
private Animator animator;
void Start()
{
currentDestination = collisionTilemap.CellToWorld(collisionTilemap.
WorldToCell(transform.position));
pathfinding = new Pathfinding();
animator = GetComponent<Animator>();
}

Scripting – Hexagonal Character Movement
•
Example 3: Character movement in a hexagonal tilemap (+ pathfinding)
private void UpdateAnimation(){
int direction = 0;
if (currentPath != null){
float angle = Vector3.Angle(currentDestination – transform.position,
transform.right);
if (angle < 10)
direction = 4; //right
else if ((angle > 170) && (angle < 190))
direction = 1; //left
else if ((angle > 10) && (angle < 90) && (transform.position.y <
currentDestination.y))
direction = 3; //top right
else if ((angle > 90) && (angle < 170) && (transform.position.y <
currentDestination.y))
direction = 2; //top left
else if ((angle > 90) && (angle < 170) && (transform.position.y >
currentDestination.y))
direction = 6; //bottom left
else if ((angle < 90) && (transform.position.y > currentDestination.y))
direction = 5; //bottom right
}
animator.SetInteger("Direction", direction);
}

Scripting – Hexagonal Character Movement
•
Example 3: Character movement in a hexagonal tilemap (+ pathfinding)
void Update(){
if ((Input.GetMouseButton(0)) && (currentPath == null)){
Vector2 screenPos = Input.mousePosition;
Vector3 worldPos = Camera.main.GetComponent<Camera>().
ScreenToWorldPoint(screenPos);
TileBase tile = collisionTilemap.GetTile(collisionTilemap.
WorldToCell(worldPos));
if (tile == null){
currentPath = pathfinding.FindPath(collisionTilemap,
collisionTilemap.WorldToCell(transform.position),
collisionTilemap.WorldToCell(worldPos));
if (currentPath.Count > 0){
pathIndex = 0;
currentDestination = collisionTilemap.
CellToWorld(currentPath[pathIndex]);
UpdateAnimation();
}
}
else{
currentDestination = Vector3.zero;
}
}
...
Scripting – Hexagonal Character Movement
•
Example 3: Character movement in a hexagonal tilemap (+ pathfinding)
if ((currentPath != null) && (currentPath.Count > 0)){
if (pathIndex < currentPath.Count){
Vector3 targetPosition = new Vector3(currentDestination.x,
currentDestination.y, transform.position.z);
transform.position = Vector3.MoveTowards(transform.position,
targetPosition, moveSpeed * Time.deltaTime);
if (Vector3.Distance(targetPosition,transform.position)<0.05){
pathIndex++;
if (pathIndex < currentPath.Count){
currentDestination = collisionTilemap.
CellToWorld(currentPath[pathIndex]);
UpdateAnimation();
}
else{
currentPath = null;
UpdateAnimation();
}
}
}
else{
currentPath = null;
UpdateAnimation();
}
}}}

Exercise 2
2
) Change the code of hexagonal character movement example
to use keyboard input to move the zombie character.
–
The movement must follow the hexagonal directions of the tiles.
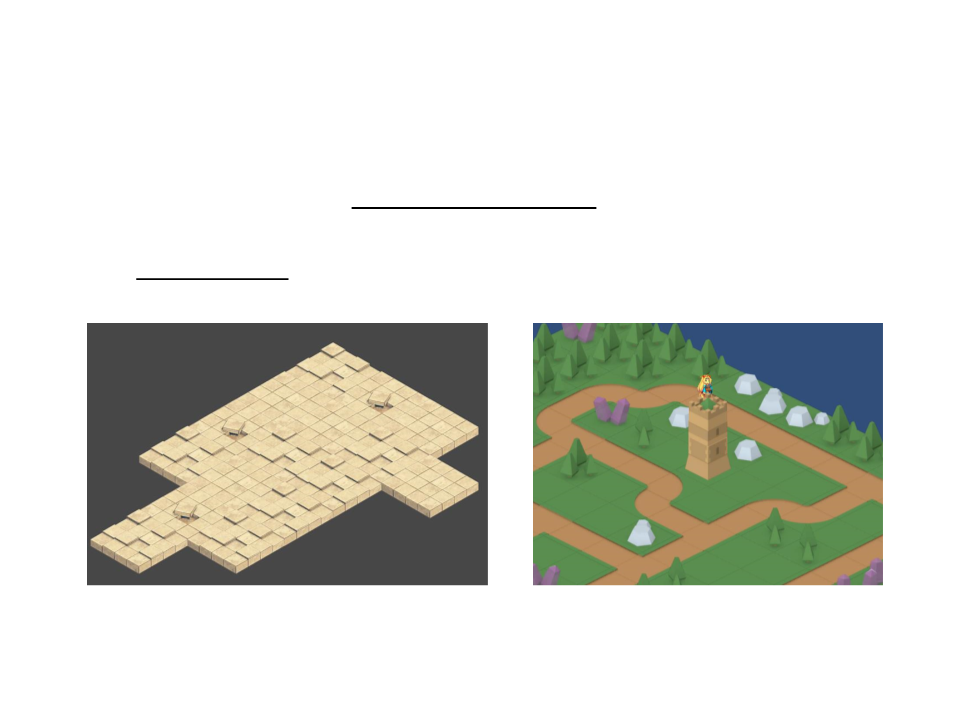
Isometric Tilemaps
•
Unity also supports Isometric Tilemaps.
–
The isometric perspective displays all three X, Y, and Z axes, adding a
pseudo-depth to a Tilemap.
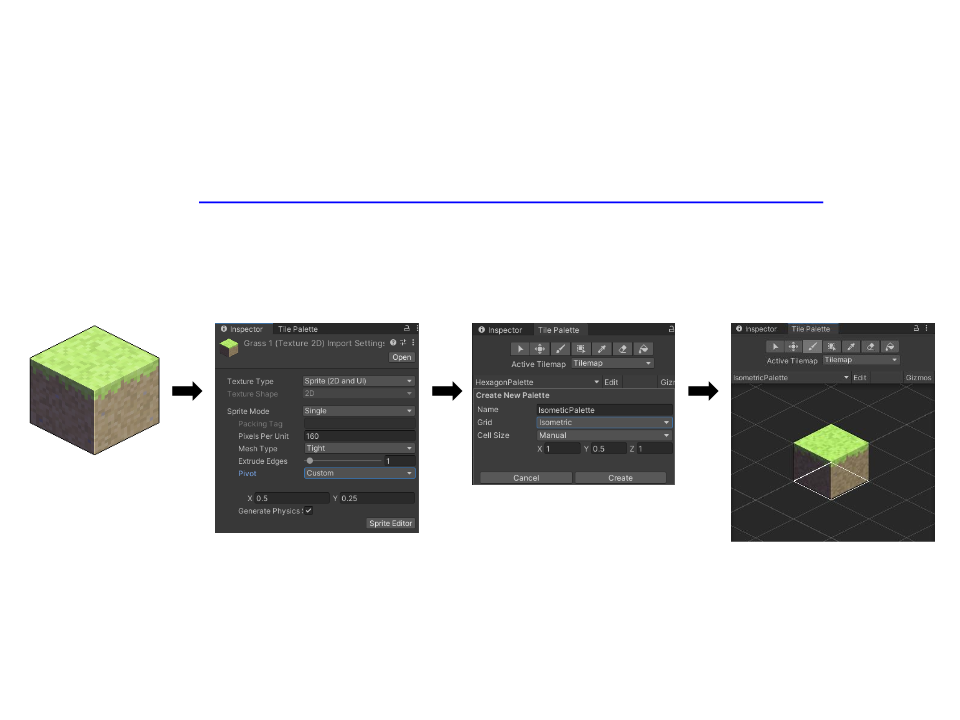
Isometric Tilemaps
•
Example: https://shallow-lagoon.itch.io/mega-isometric-block-pack
1.
Prepare Sprites for the Isometric Tilemap and create a Tile Pallete.
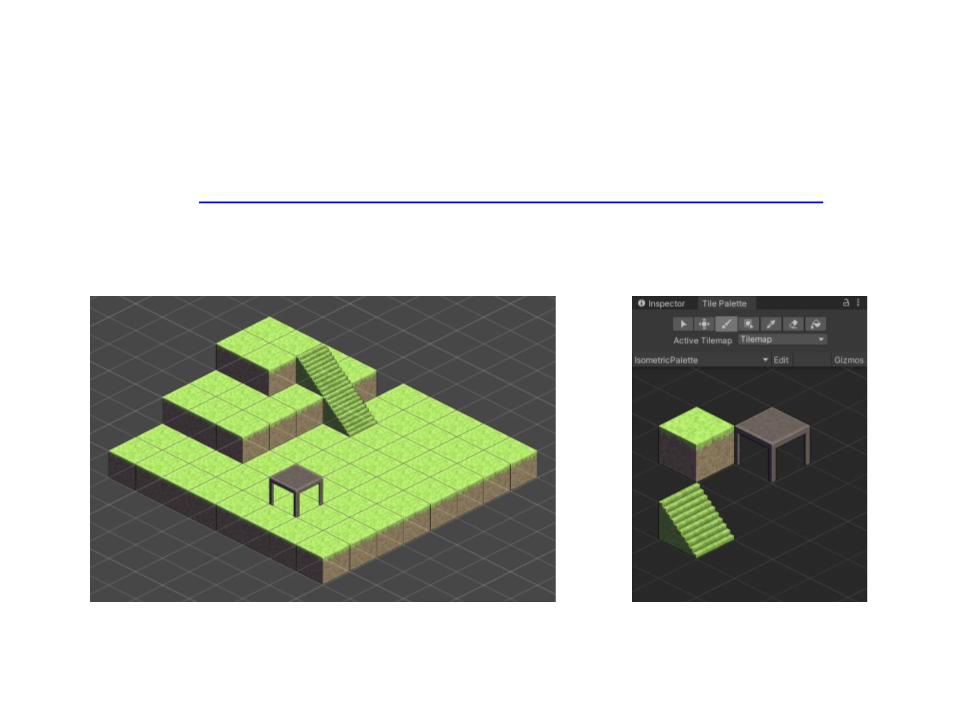
Isometric Tilemaps
•
Example: https://shallow-lagoon.itch.io/mega-isometric-block-pack

Further Reading
•
Unity User Manual, Available at: https://docs.unity3d.com/2020.1/
Documentation/Manual/
–
2D
•
•
•
•
•
•
•
•
Tilemap Grid
Tilemap Renderer
Tile Assets
Tile Palette
Hexagonal Tilemaps
Isometric Tilemaps
Painting on Tilemaps
Tilemap Collider 2D
•
Books
–
Jeremy G. (2017). Introduction to Game Design, Prototyping, and
Development: from the Concept to Playable Game - with Unity and C# (2nd
ed.). Boston, MA: Addison-Wesley Professional. ISBN: 978-0134659862
–
Hocking, J. (2018). Unity in Action: Multiplatform Game Development in C#
(2nd ed.). Shelter Island, NY: Manning Publications. ISBN: 978-1617294969