

Game Frameworks
Lecture 05: Sprites and Animations in Unity
Edirlei Soares de Lima
<edirlei.lima@universidadeeuropeia.pt>
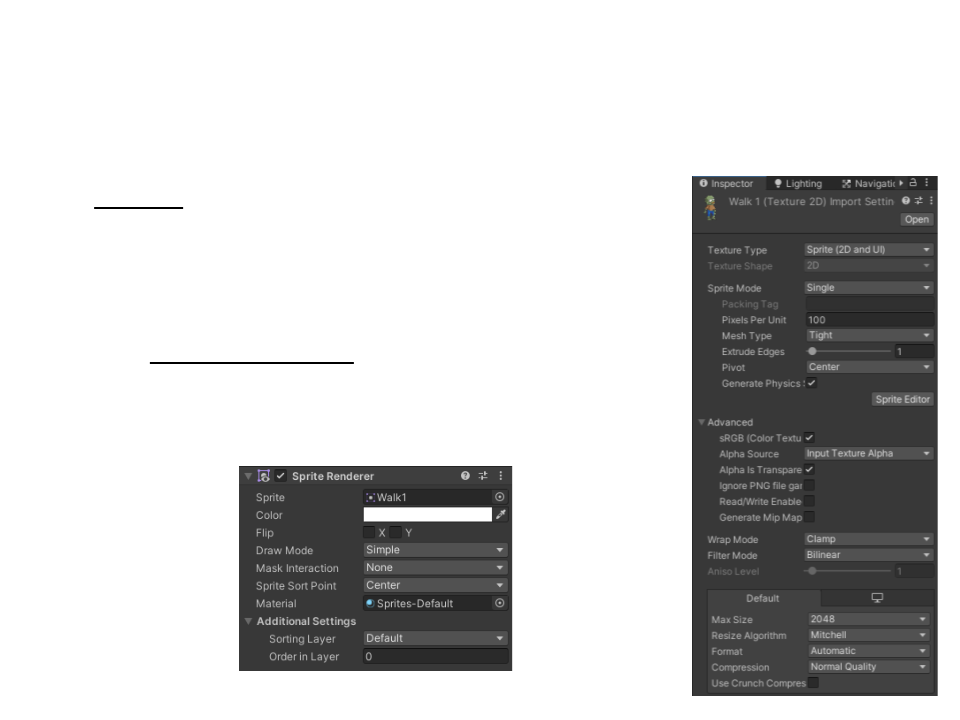
Unity – Sprites
•
•
Sprites are 2D Graphic objects (images).
–
If the project mode is set to 2D, all imported
images are automatically set as a Sprite.
The Sprite Renderer component renders the
Sprite and controls how it visually appears in
a Scene.
Unity – Sprites
•
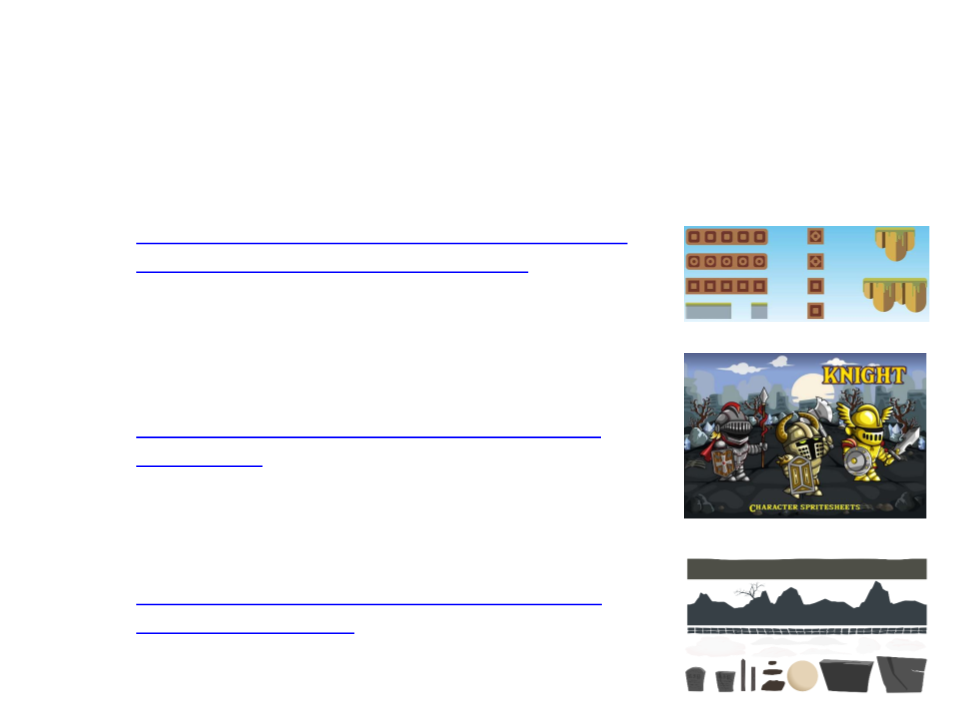
Assets for this class:
https://assetstore.unity.com/packages/2d/environ
ments/2d-platformerassetspack-117179
–
•
Important: import only the sprites folder “2DPlatformerPack”
–
–
https://free-game-assets.itch.io/free-2d-knight-
https://opengameart.org/content/seamless-2d-
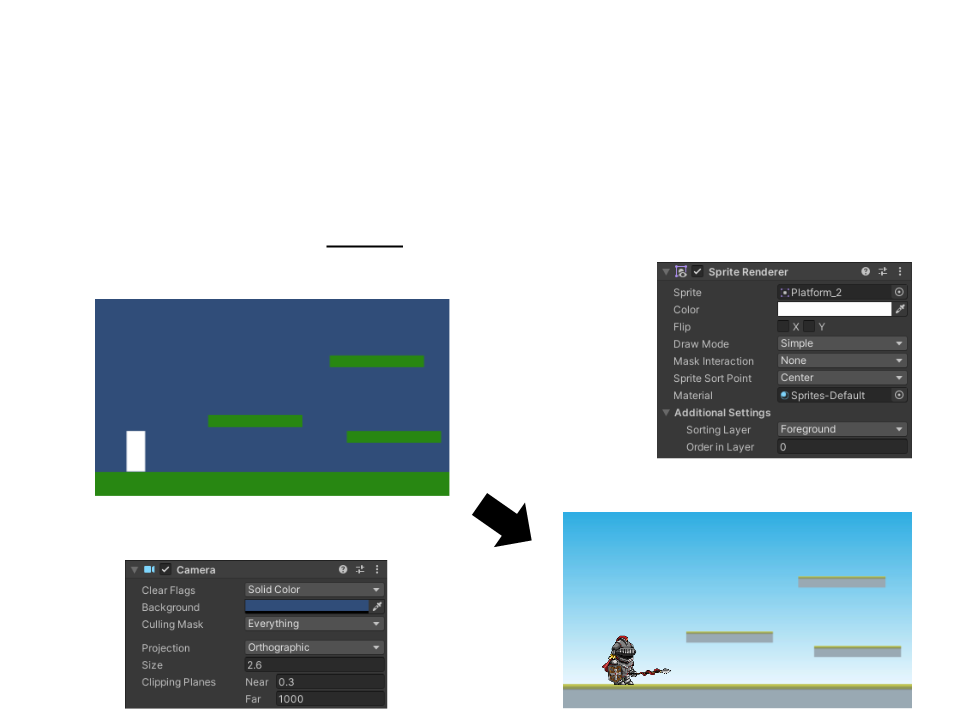
Replace Placeholder Sprites
•
To change a placeholder sprite, click on it in the Scene View
and then edit the Sprite property in the Sprite Renderer
component.
–
Adjust camera size:
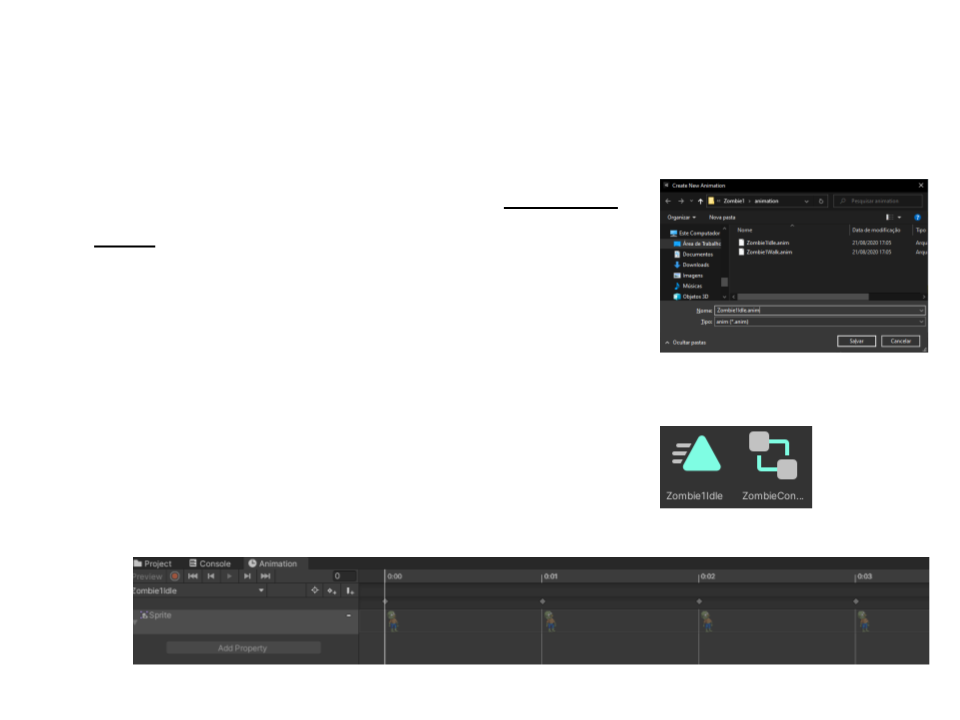
Sprite Animations
•
To create a new animation clip, drag and
drop the animation sprites into the scene.
–
Save the animation clip.
• The sprite can be removed from the scene (the
animation will be assigned to the existing player
sprite).
–
An “Animation Clip” and an “Animation
Controller” will be created.
Sprite Animations
•
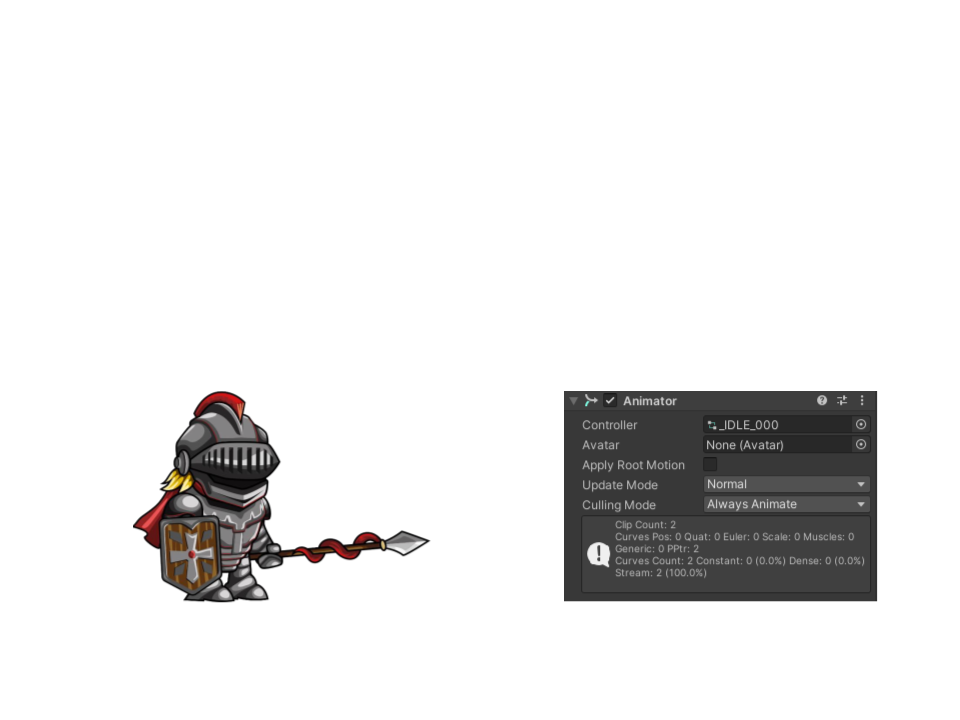
To assign the animation to the existing player sprite, add an
“Animator” component to the Game Object.
–
Select the Animation Controller previously created in the Controller
option.
•
Then, test the animation playing the game.
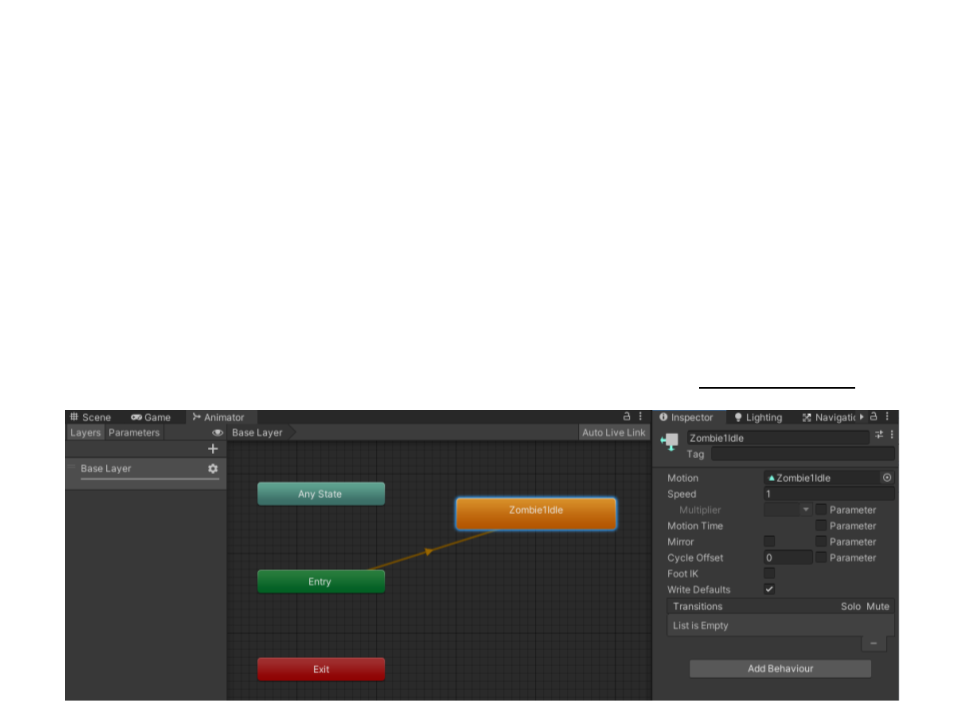
Animator Controller
•
An Animator Controller can arrange and maintain a set of
Animation Clips and associated Animation Transitions.
–
Even sprites that have a single Animation Clip must use an Animator
Controller.
–
The controller has references to the animation clips and manages the
various animation states and the transitions using a State Machine.
Animation State Machines
•
•
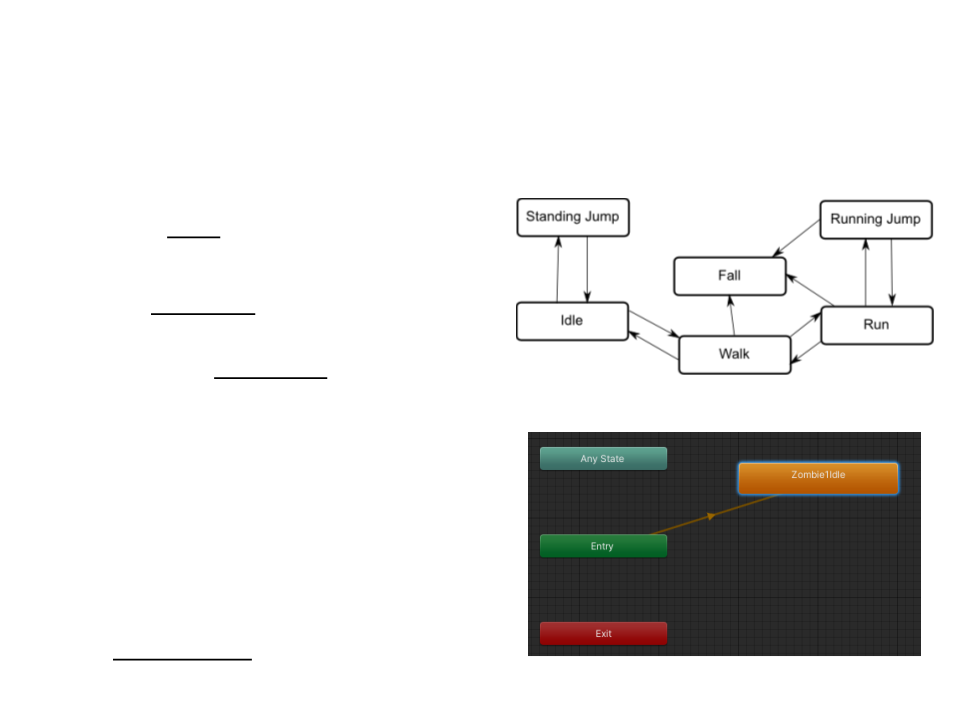
Actions (animations) are associated
with a state.
Each transition leads from one state
to another, and each has a set of
associated conditions.
•
•
When the conditions of a transition
are met, then the machine changes
state to the transition’s target state.
Each character/object is controlled
by one state machine and they have
a current state.
Animation State
•
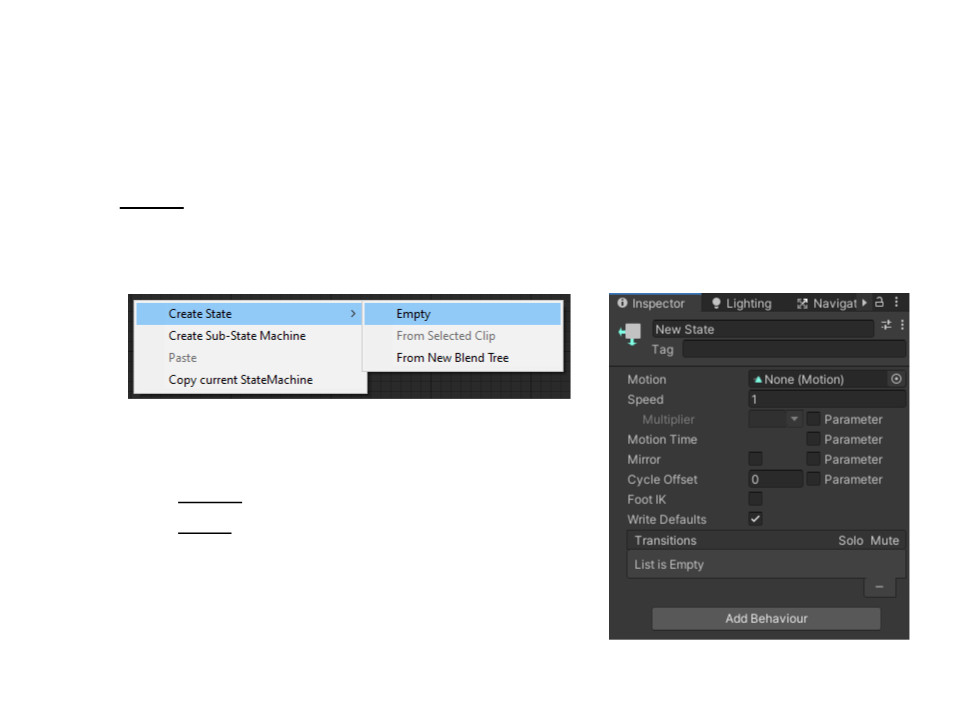
A state represents an animation.
–
Each state contains an individual animation sequence which will play
while the character is in that state.
–
Main properties:
•
Motion: animation clip assigned to the state.
•
Speed: default speed of the animation.
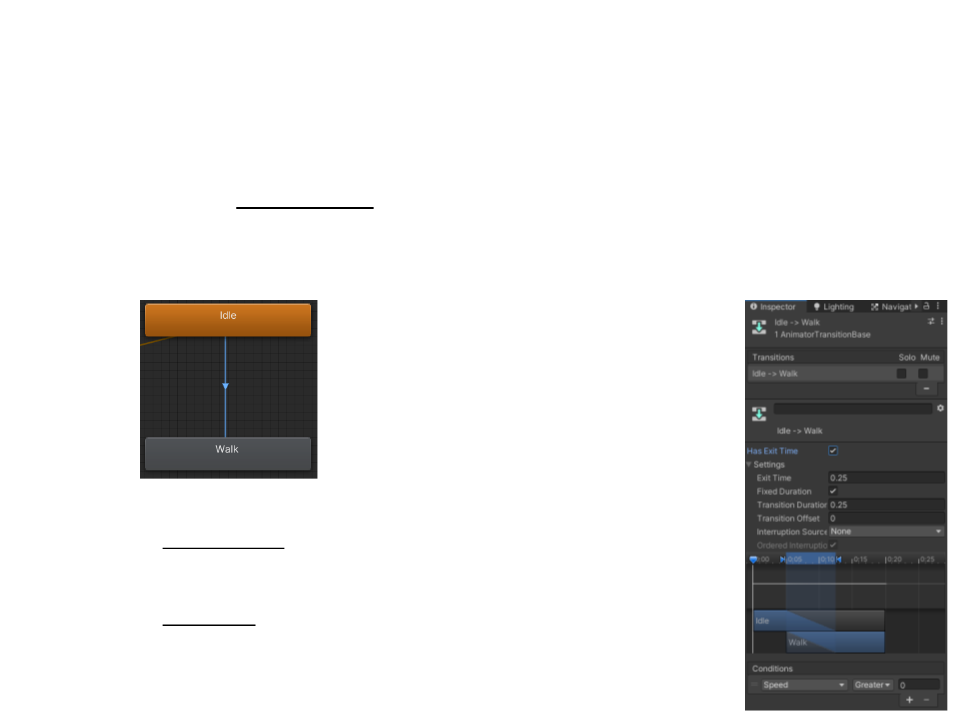
Animation Transitions
•
Animation transitions allow the state machine to switch from
one animation state to another.
–
The transition defines under what conditions it should occur.
–
Main properties:
•
Has Exit Time: defines that transition that does not rely on a
parameter. Instead, it relies on the normalized time of the
state.
•
Conditions: defined by a parameter, a conditional predicate,
and parameter value.
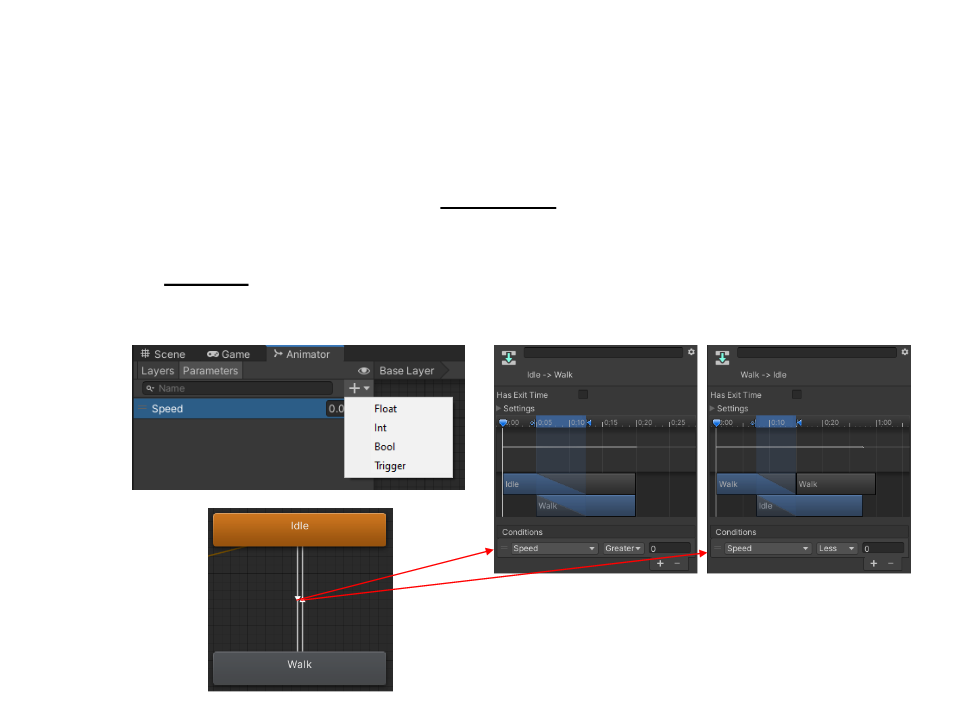
Animation Parameters
•
Animation Parameters are variables that are defined within an
Animator Controller that can be accessed and assigned values
from scripts.
–
This is how a script can control or affect the flow of the state machine.

Animation – Scripting
•
Parameters can have their values assigned from a script using
functions in the Animator class: SetFloat, SetInteger, SetBool,
SetTrigger and ResetTrigger.
public class PlayerMovement : MonoBehaviour{
...
private Animator animator;
private void Start(){
...
animator = GetComponent<Animator>();
}
void FixedUpdate(){
float horizontalInput = Input.GetAxis("Horizontal");
...
if (horizontalInput != 0){
animator.SetFloat("Speed", Mathf.Abs(rigidBody.velocity.x));
}
else{
animator.SetFloat("Speed", -1);
}
}
}
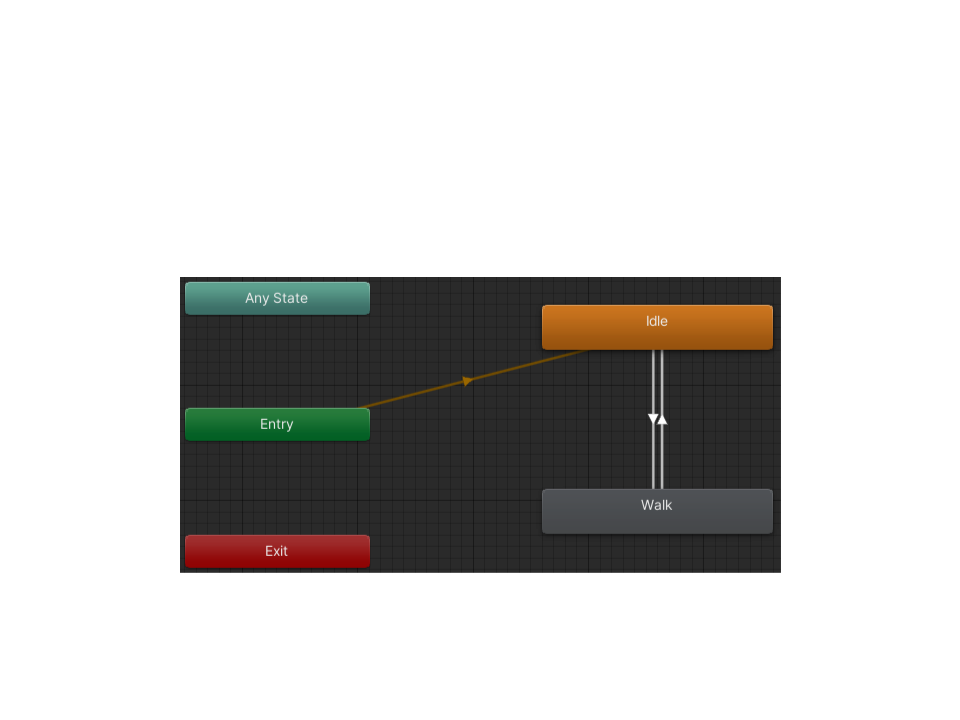
Animation State Machines
•
Animation state machine for the zombie character (idle and
walk):
Exercise 1
1
) Continue the implementation of the example by adding the
jump animation.
–
–
–
Create the jump state in the animation state machine.
Create the necessary transitions and parameters.
Modify the script of the player movement to play the animation.
Hints:
•
The jump animation should not be played in a loop (loop time parameter in the
animation clip).
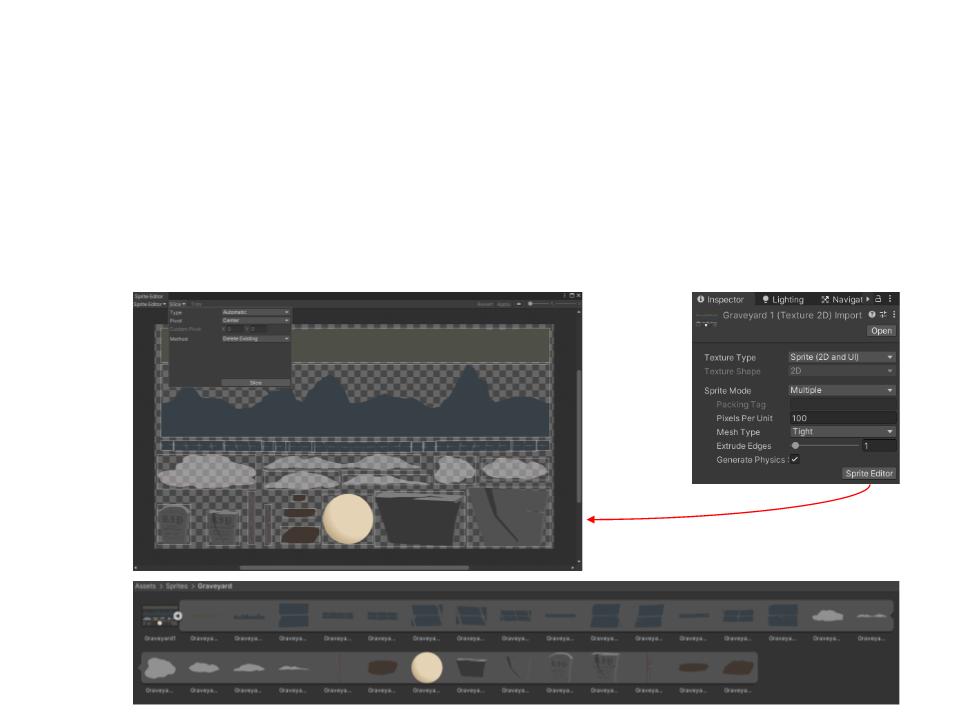
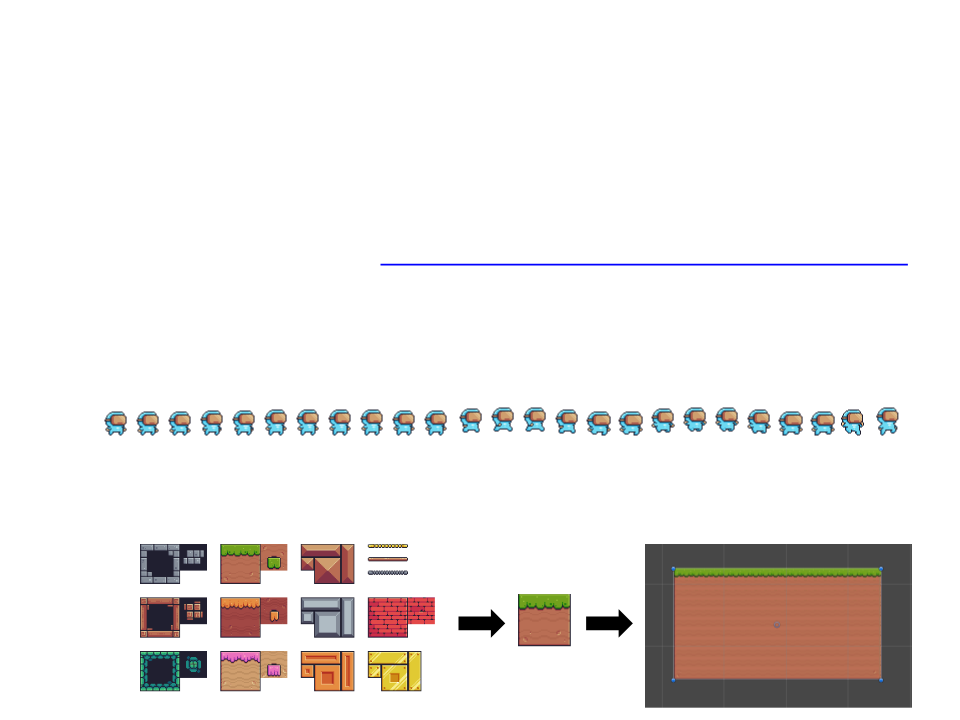
Sprite Editor – Automatic Slicing
•
Sometimes, a single image contains several related sprites.
–
Unity makes it easy to extract elements from a composite image with
the Sprite Editor.
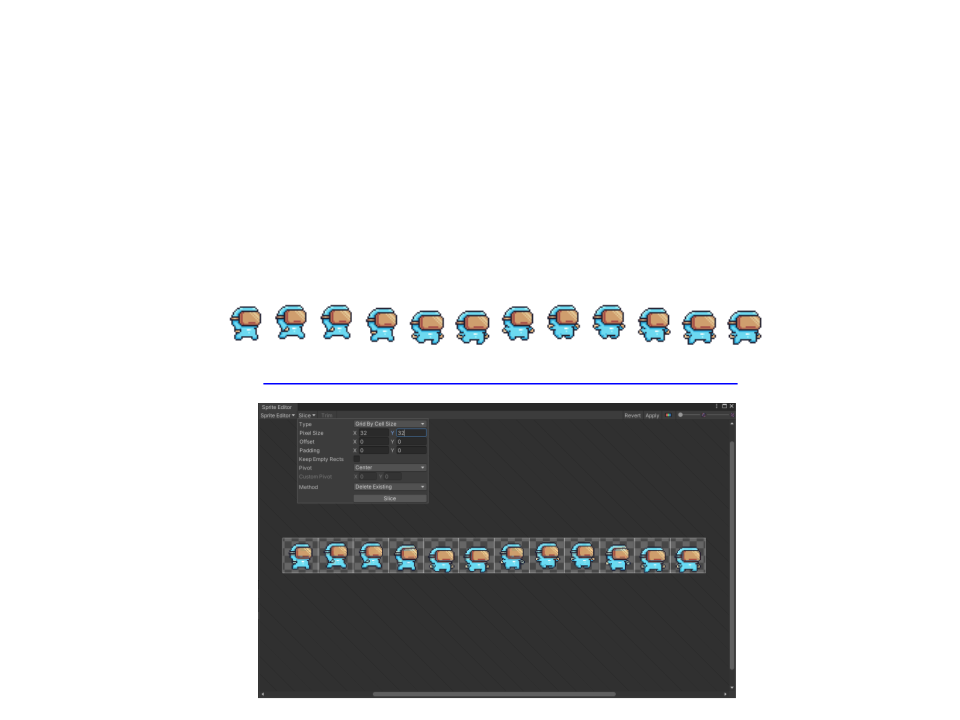
Sprite Editor – Grid Slicing
•
Sometimes, a single image contains several related sprites.
–
Unity makes it easy to extract elements from a composite image with
the Sprite Editor.
https://pixelfrog-assets.itch.io/pixel-adventure-1
Sprite Editor – 9-Slicing
•
•
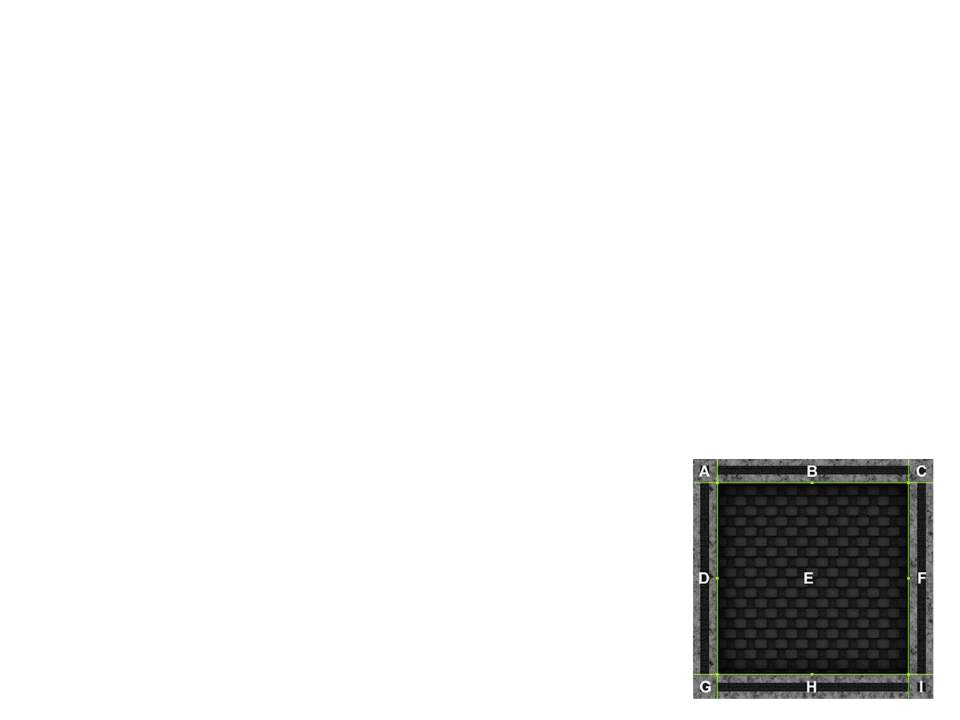
9-slicing is a 2D technique that allows the reuse of an image at
various sizes without needing to prepare multiple Assets.
–
It involves splitting the image into nine portions, so that when the
Sprite is resized, the Sprite maintains the same proportion.
–
This is useful when creating patterns, such as walls or floors in a 2D
environment.
Example:
•
•
•
•
The four corners (A, C, G and I) do not change in size.
The B and H sections stretch or tile horizontally.
The D and F sections stretch or tile vertically.
The E section stretches or tiles both horizontally and
vertically.
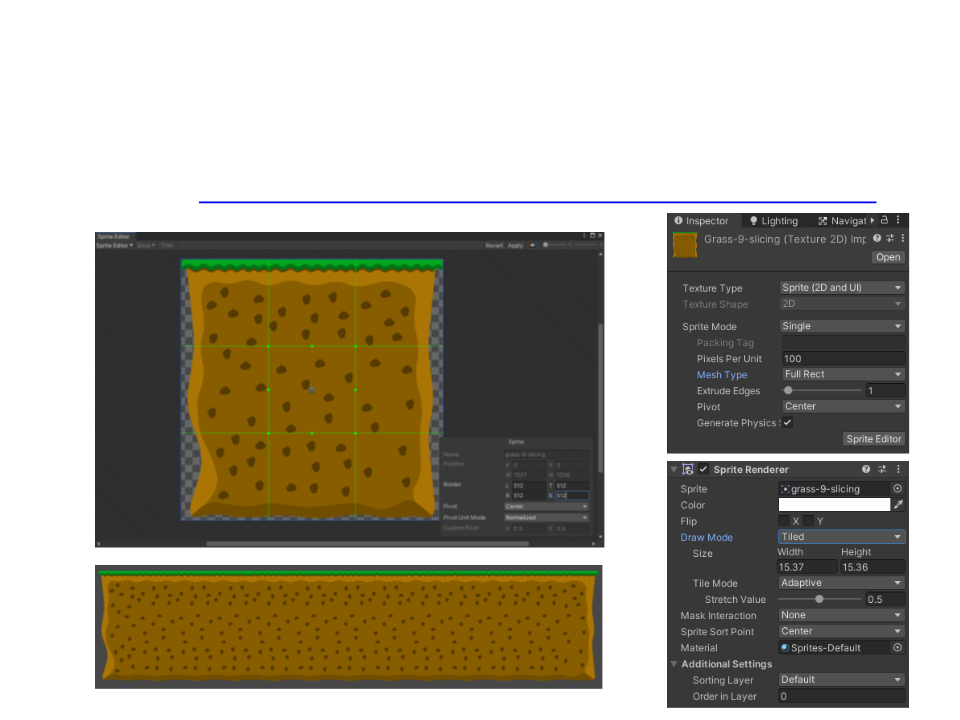
Sprite Editor – 9-Slicing
•
Example: https://edirlei.com/aulas/gameframeworks/grass-9-slicing.png
Exercise 2
2
) Use the Pixel Adventure pack to create a small level and an
animated character controlled by the player.
–
–
Pixel Adventure Pack: https://pixelfrog-assets.itch.io/pixel-adventure-1
The player character must have the following animations: idle, run, jump,
and fall (use the Virtual Guy sprites).
–
Use the 9-slicing technique with the tileset included in the pack to create
the level (hint: each sprite to be sliced must be saved as an individual file).

Further Reading
•
Unity User Manual, Available at: https://docs.unity3d.com/2020.1/
Documentation/Manual/
–
2D
•
•
•
•
•
•
•
Sprites
Sprite Renderer
Sprite Creator
Sprite Editor
9-slicing Sprites
Sprite Masks
Sprite Atlas
•
Books
–
Jeremy G. (2017). Introduction to Game Design, Prototyping, and
Development: from the Concept to Playable Game - with Unity and C# (2nd
ed.). Boston, MA: Addison-Wesley Professional. ISBN: 978-0134659862
–
Hocking, J. (2018). Unity in Action: Multiplatform Game Development in C#
(2nd ed.). Shelter Island, NY: Manning Publications. ISBN: 978-1617294969