
Distributed Programming
Lecture 04 - Unreal Engine and Network
Communication
Edirlei Soares de Lima
<edirlei.lima@universidadeeuropeia.pt>
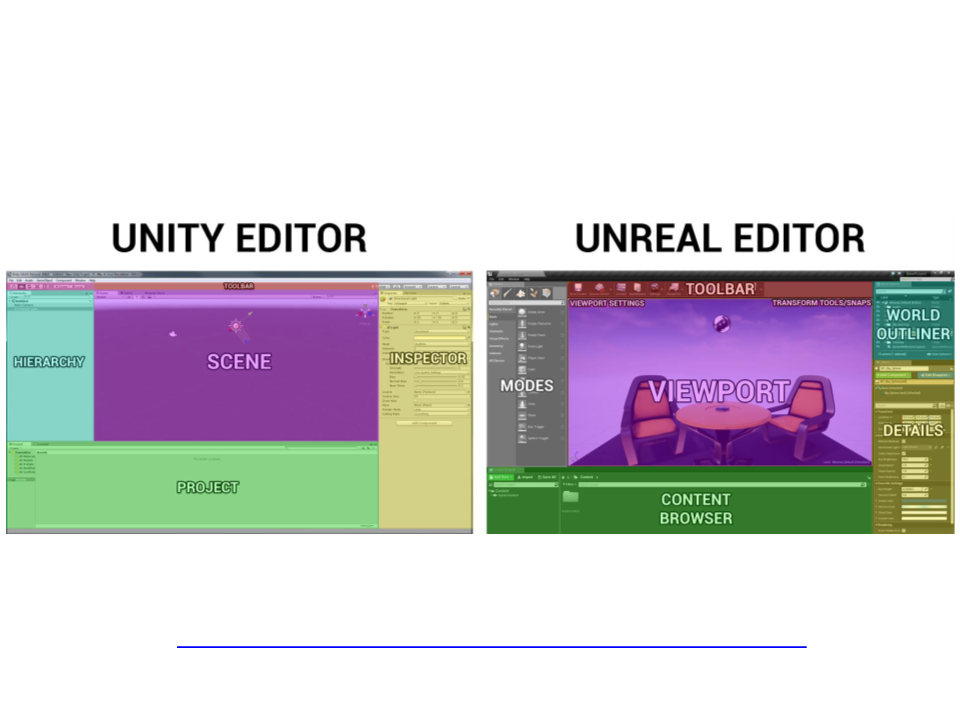
Editor – Unity vs. Unreal
Recommended reading: Unreal Engine 4 For Unity Developers
https://docs.unrealengine.com/en-us/GettingStarted/FromUnity
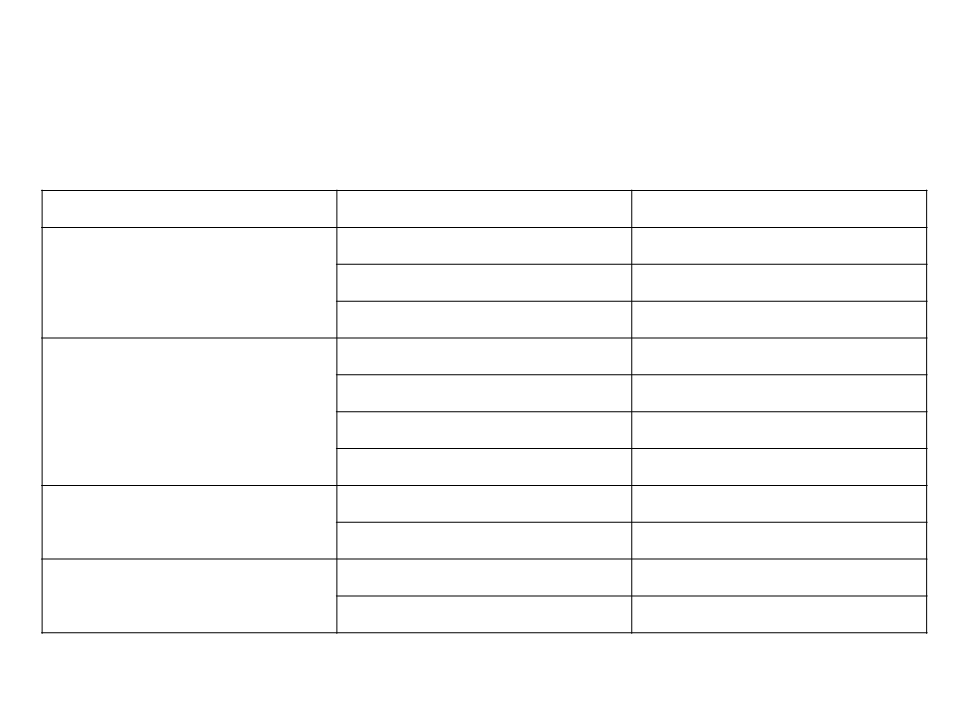
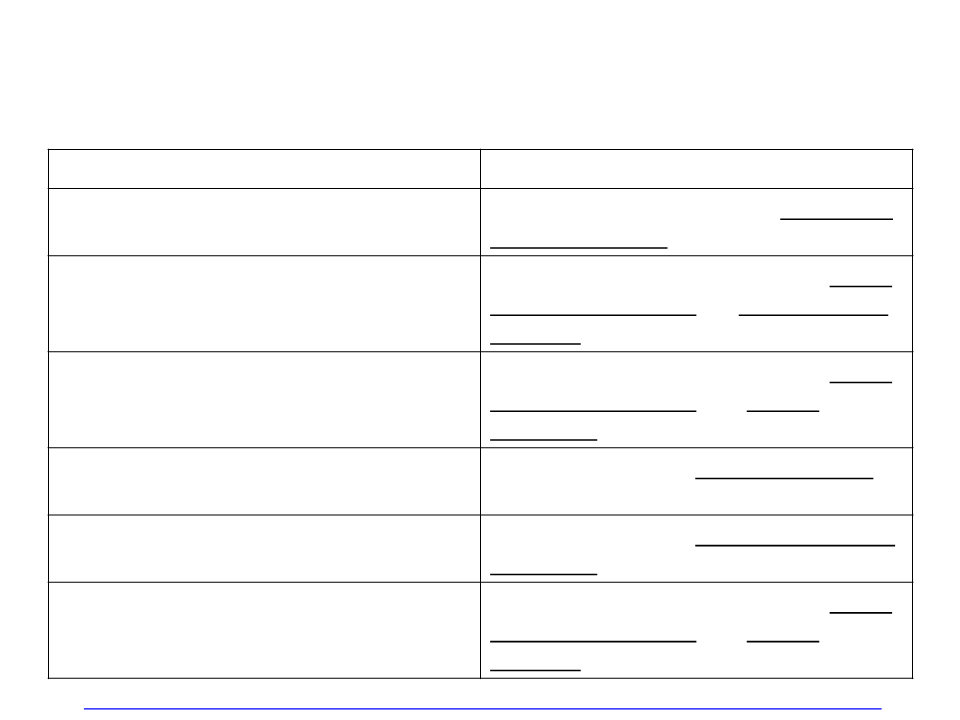
Glossary – Unity vs. Unreal
Category
Unity
Component
GameObject
Prefab
Hierarchy Panel
Inspector
Project Browser
Scene View
Mesh
Skinned Mesh
Shader
Unreal Engine
Component
Actor, Pawn
Blueprint Class
World Outliner
Details Panel
Content Browser
Viewport
Gameplay Types
Editor UI
Static Mesh
Skeletal Mesh
Material
Meshes
Materials
Material
Material Instance

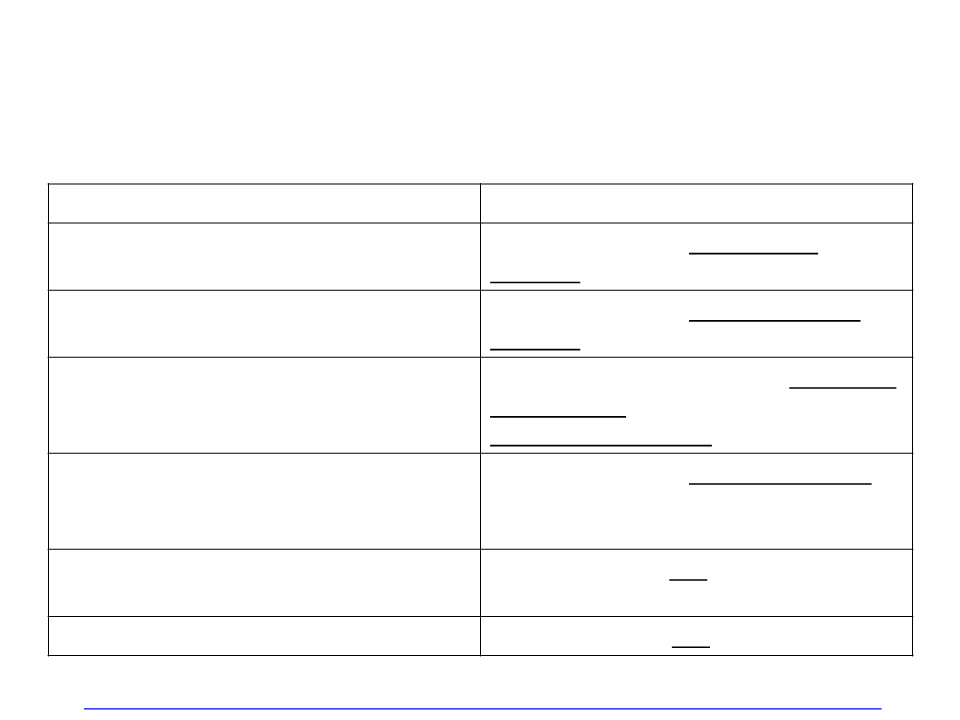
Glossary – Unity vs. Unreal
Category
Effects
Game UI
Unity
Particle Effect
UI
Unreal Engine
Effect, Particle, Cascade
UMG
Skeletal Animation
System
Animation
Animation
2
D
Sprite Editor
C#
Script
Raycast
Rigid Body
Paper2D
C++
Blueprint
Line Trace, Shape Trace
Collision, Physics
Programming
Physics
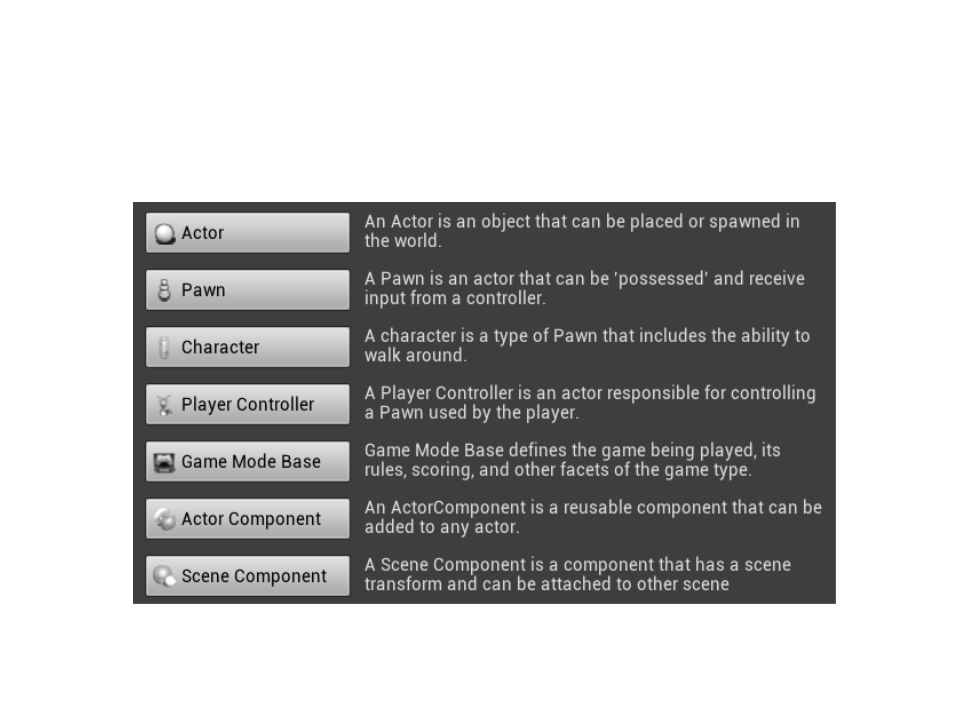
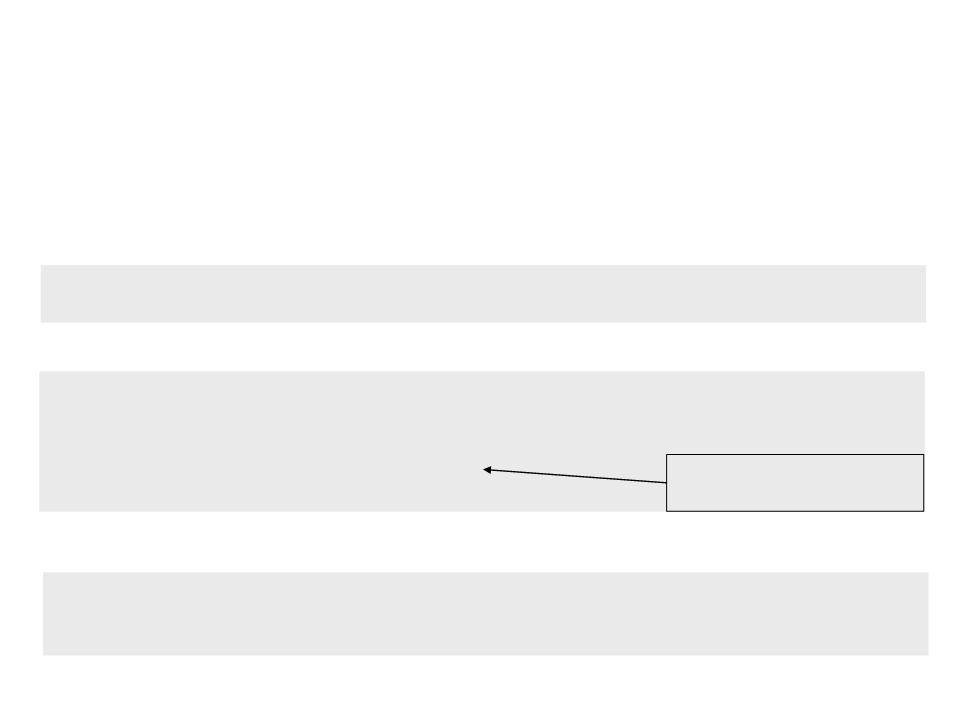
Unreal Engine – Main Classes

Unreal Engine – Main Classes
UObject
AActor
UActorComponent
AGameModeBase
AController
ALight
APawn
USceneComponent
AAIController APlayerController
ADirectionalLight
ACharacter
UCameraComponent
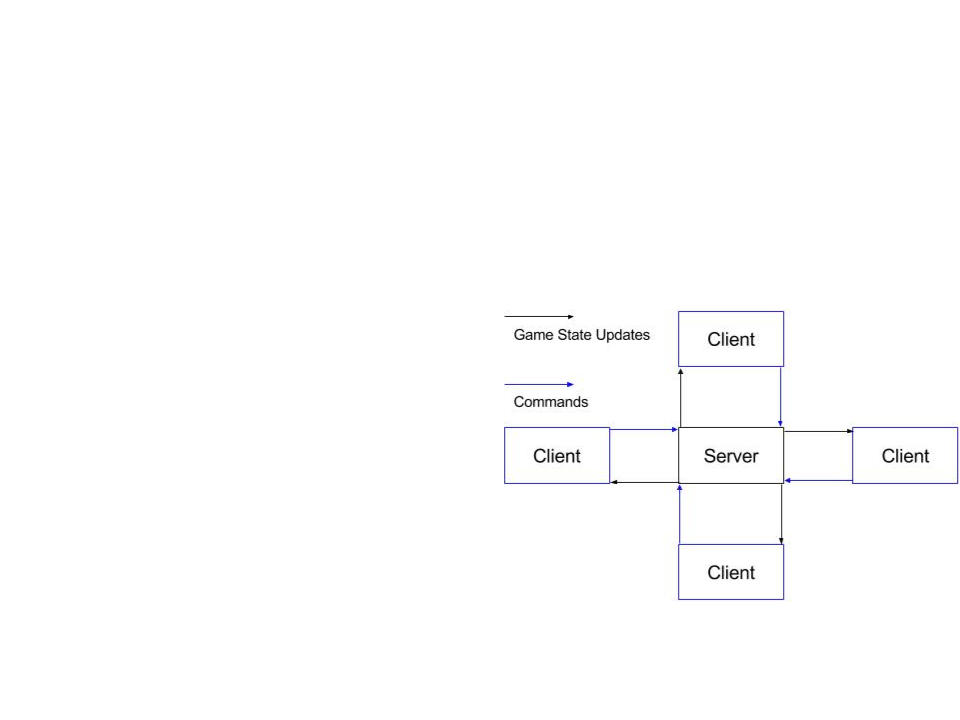
Multiplayer in Unreal Engine
•
The Unreal Engine is built with multiplayer gaming in mind.
–
Is very easy to extend a single player experience to multiplayer.
–
Even single-player games, use the networking architecture.
•
•
The engine is based on a client-server model.
–
The server is authoritative and makes sure all connected clients are
continually updated.
Actors are the main element that the server uses to keep
clients up to date.
–
The server sends information about the actors to clients;
–
Clients have an approximation of each actor and the server maintains
the authoritative version.
Multiplayer in Unreal Engine
•
The server is in charge of driving the flow of gameplay.
•
It handles network connections,
notifies clients when gameplay
starts and ends, when is time to
travel to a new map, along with
actor replication updates.
•
Only the server contains a valid
copy of the GameMode actor.
Clients contain only an approximate
copy of the actors, and can use it as
a reference to know the general
state of the game.
Multiplayer in Unreal Engine
•
Network Modes:
–
Standalone: the server runs on a local machine and not accept clients
from remote machines. Is used for single-player games.
–
Dedicated Server: the server has no local players and can run more
efficiently by discarding sound, graphics, user input, and other player-
oriented features. Is used for multiplayer games hosted on a trusted
and reliable server where high-performing are needed.
–
–
ListenServer: is a server that hosts a local player, but is open to
connections from remote players as well. Is good for games where users
can set up and play their own games without a third-party server.
Client: the machine is a client that can connect to a dedicated or listen
server, and therefore will not run server-side logic.
Multiplayer in Unreal Engine
•
The core element of the networking process in Unreal Engine
is Actor Replication.
–
The server maintains a list of actors and updates the client periodically
so that the client can have a close approximation of each actor (that is
marked to be replicated).
•
•
Actors are updated in two main ways:
–
Property updates;
–
RPCs (Remote Procedure Calls).
Properties are replicated automatically (any time they change)
and RPCs are only replicated when executed.
Property Replication
•
•
Example of property to be replicated: actor's health.
Each actor maintains a list of properties that can be marked
for replication to clients.
–
–
–
Whenever the value of the variable changes on the server side, the
server sends the client the updated value.
Property updates only come from the server (i.e.: the client will never
send property updates to the server).
Some properties replicate by default (e.g.: Location, Rotation, etc.).
•
Actor property replication is reliable.
Property Replication
•
Replicate a property:
1
. Set the replicated keyword:
UPROPERTY(replicated)
float health;
2
. Implement the GetLifetimeReplicatedProps function:
void MyClass::GetLifetimeReplicatedProps(TArray<FLifetimeProperty>&
OutLifetimeProps) const{
Super::GetLifetimeReplicatedProps(OutLifetimeProps);
DOREPLIFETIME(MyClass, health);
Default replication rule:
}
replicates to all clients
3
. Enable replication in the constructor method:
SetReplicates(true);
Remote Procedure Calls (RPCs)
•
•
Example of RPC: a function to spawn an explosion to each
client at a certain location.
RPCs are functions that are called locally, but executed
remotely on another machine.
–
Primary use: to do unreliable gameplay events that are temporary or
cosmetic in nature.
–
E.g.: play sounds, spawn particles, or do other temporary effects that
are not crucial to the Actor functioning.
•
By default, RPCs are unreliable. To be reliable, an especial
keyword (Reliable) must be used in the definition of the RPC.

Remote Procedure Calls (RPCs)
•
Defining an RPC:
–
–
–
To declare a function as an RPC that will be called on the server, but
executed on the client:
UFUNCTION(Client)
void ClientRPCFunction();
To declare a function as an RPC that will be called on the client, but
executed on the server:
UFUNCTION(Server)
void ServerRPCFunction();
To declare a function as an RPC that will be called from the server, and
then executed on the server and on all connected clients:
UFUNCTION(NetMulticast)
void MulticastRPCFunction();

RPC Validation
•
•
The validation function for an RPC allows the detection of bad
parameters or cheating:
–
It can notify the system to disconnect the client who initiated the call.
Example:
UFUNCTION(Server, WithValidation)
void SomeRPCFunction(int32 AddHealth);
bool SomeRPCFunction_Validate(int32 AddHealth){
if (AddHealth > MAX_ADD_HEALTH){
return false;
}
return true;
}
void SomeRPCFunction_Implementation(int32 AddHealth){
Health += AddHealth;
}
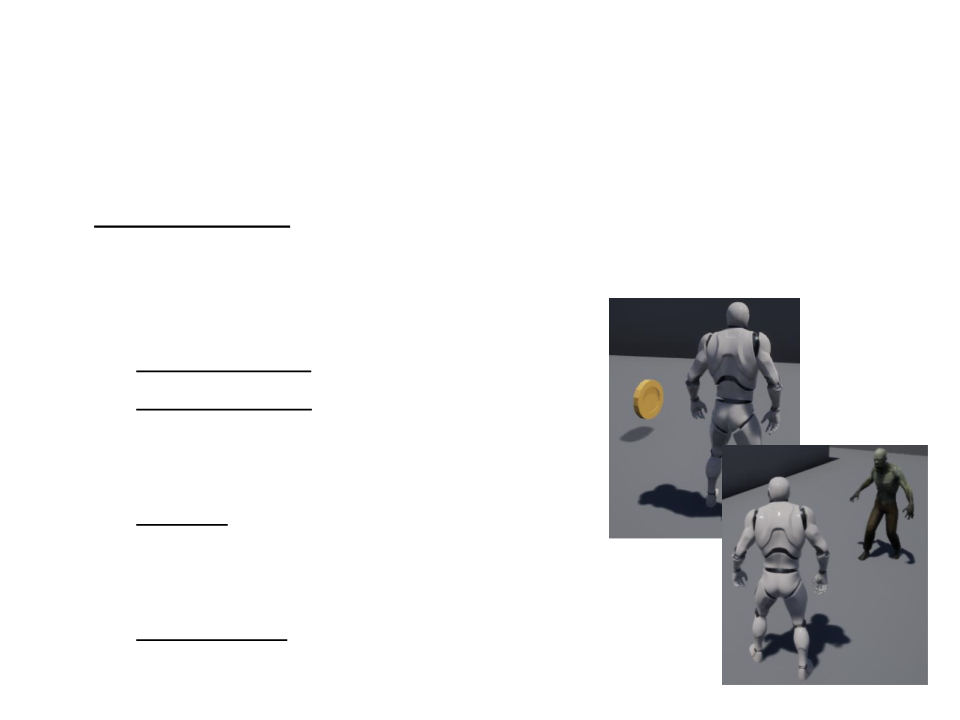
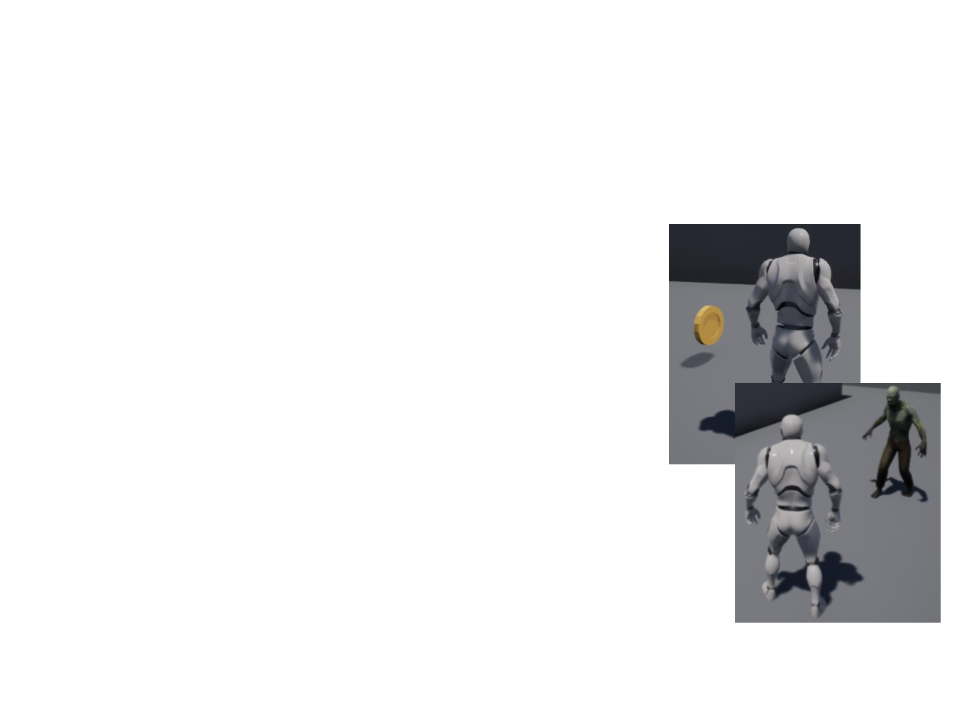
Prototype Game
•
•
Concept: a cooperative multiplayer game where players must
collect all coins and then go to a specific location to complete
the level.
Gameplay elements:
–
Player character (walk, jump, crouch);
–
Collectible coins: after collecting all coins,
the player must go the “level complete” area
to finish the level.
–
Enemies (zombies): patrol the level and
attack the player. If the enemy touches the
player, is game over;
–
GUI messages: number of remaining coins,
game over, and level completed messages;
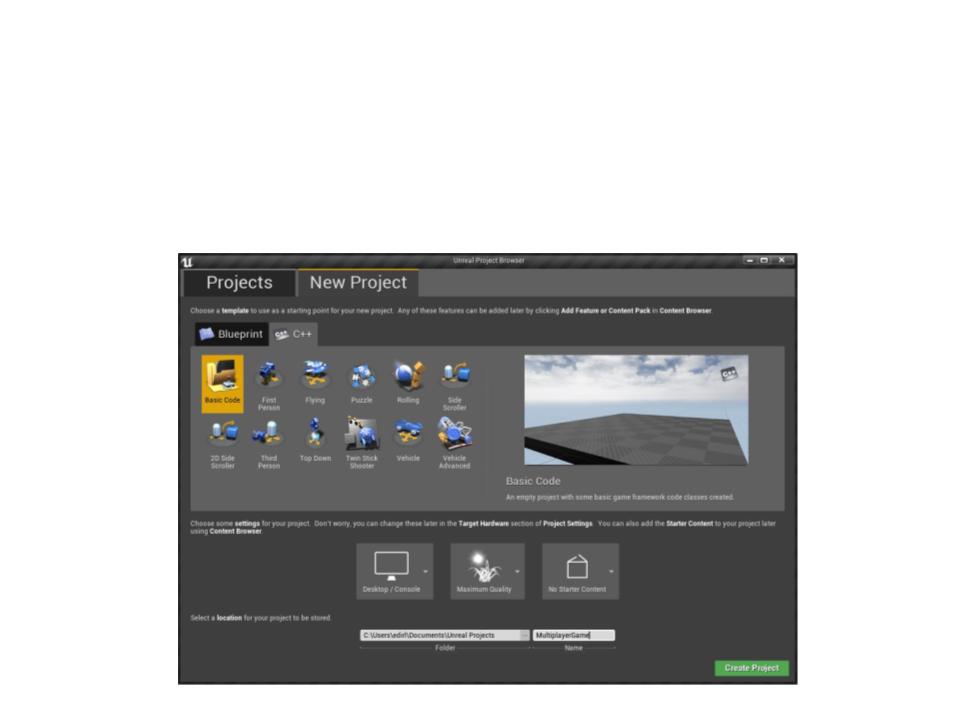
Multiplayer Game
•
Create a new C++ empty project:
Multiplayer Game
•
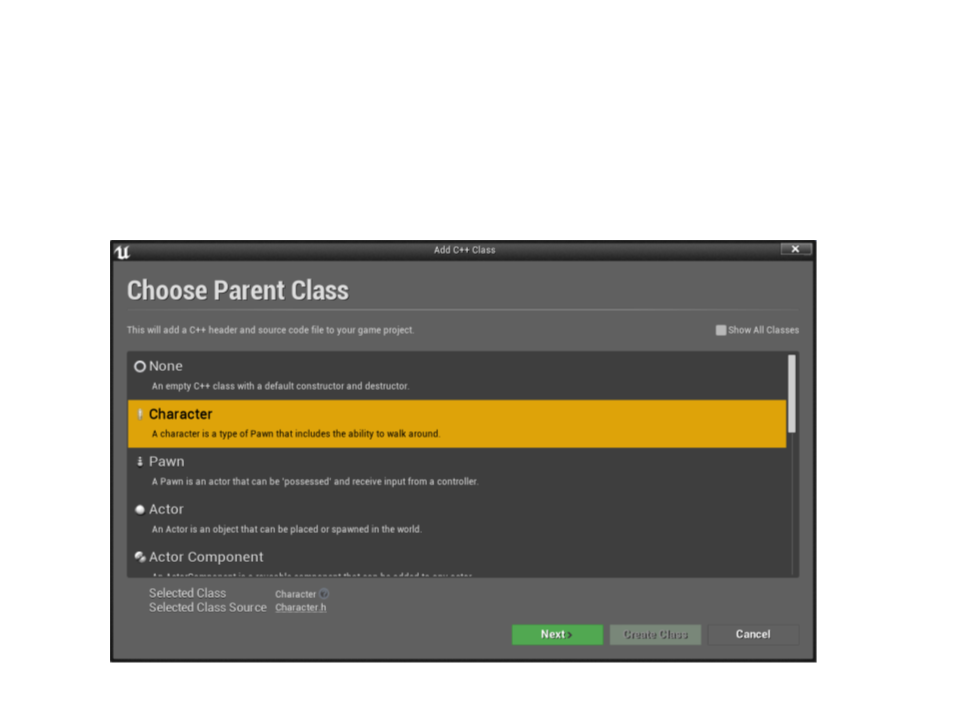
Create a new character class:

Multiplayer Game
•
Implement the character movement:
protected:
void MoveForward(float value);
void MoveRight(float value);
MyCharacter.h
void AMyCharacter::MoveForward(float value){
AddMovementInput(GetActorForwardVector(), value);
MyCharacter.cpp
}
void AMyCharacter::MoveRight(float value){
AddMovementInput(GetActorRightVector(), value);
}
void AMyCharacter::SetupPlayerInputComponent(UInputComponent*
PlayerInputComponent){
Super::SetupPlayerInputComponent(PlayerInputComponent);
PlayerInputComponent->BindAxis("MoveForward", this,
&
AMyCharacter::MoveForward);
PlayerInputComponent->BindAxis("MoveRight", this,
AMyCharacter::MoveRight);
&
}
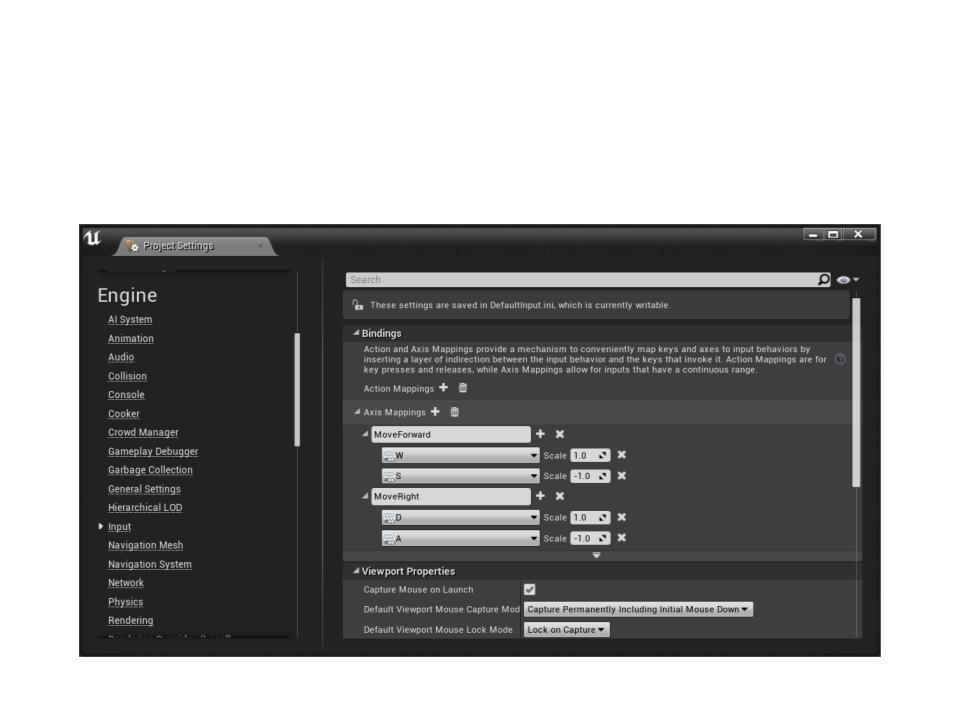
Multiplayer Game
•
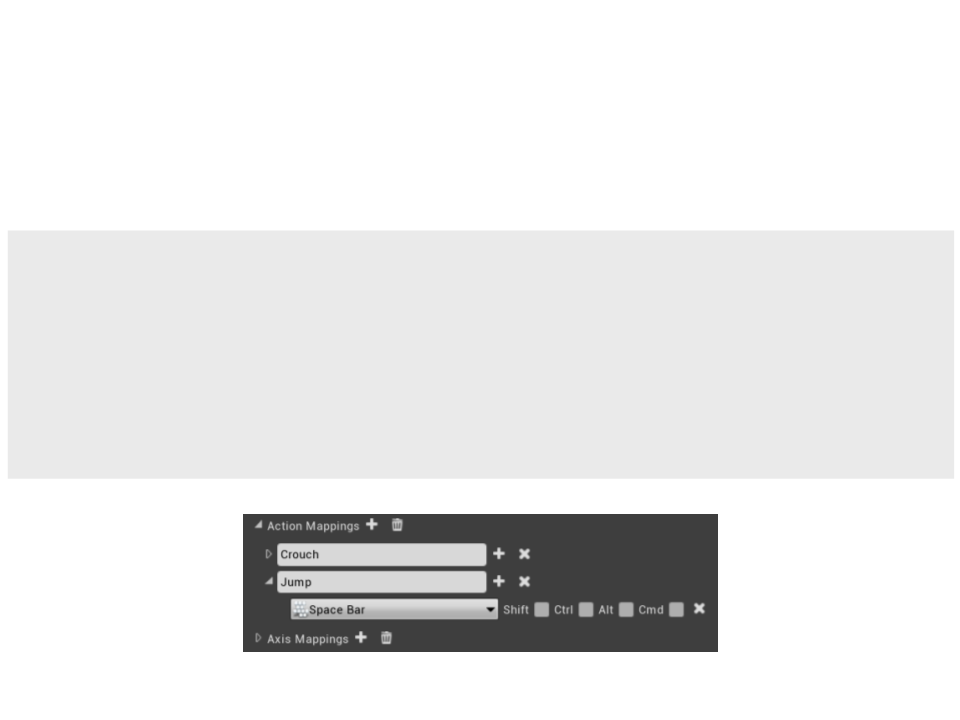
Setup the axis keys in the project settings:
Multiplayer Game
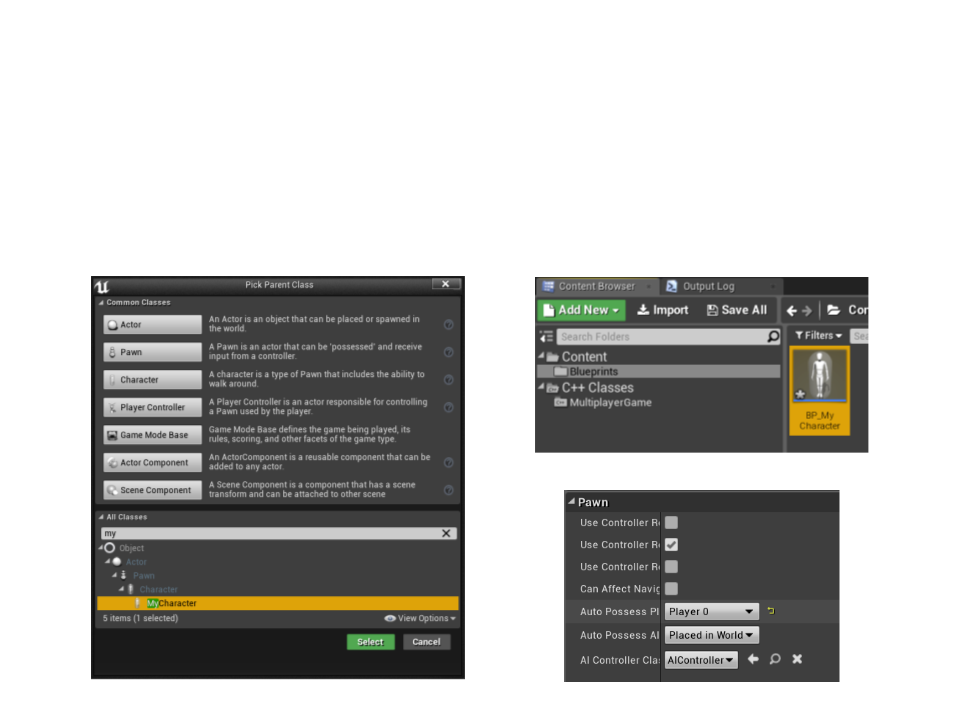
•
Create a blueprint for the character class and test the player
movement in the level:
Multiplayer Game
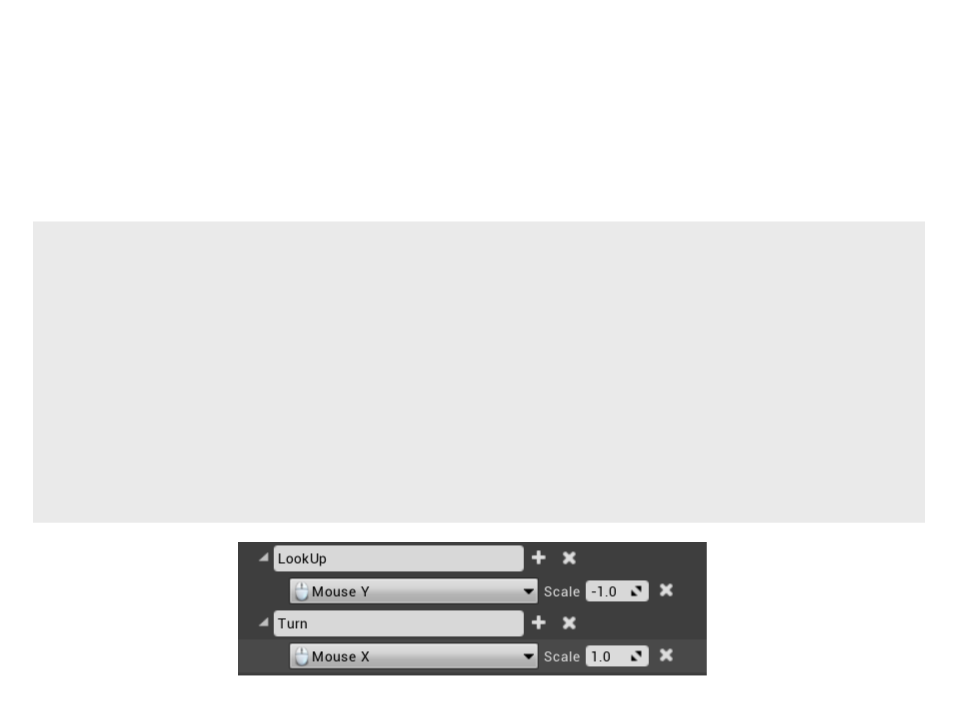
•
Implement the camera movement and setup the axis keys:
MyCharacter.cpp
void AMyCharacter::SetupPlayerInputComponent(UInputComponent*
PlayerInputComponent){
.
..
PlayerInputComponent->BindAxis("LookUp", this,
&AMyCharacter::AddControllerPitchInput);
PlayerInputComponent->BindAxis("Turn", this,
&AMyCharacter::AddControllerYawInput);
}

Multiplayer Game
•
Create a 3rd person camera and a spring arm components in
the character class:
MyCharacter.h
protected:
UPROPERTY(VisibleAnywhere, BlueprintReadOnly, Category = "Components")
class UCameraComponent * CameraComponent;
UPROPERTY(VisibleAnywhere, BlueprintReadOnly, Category = "Components")
class USpringArmComponent * SpringArmComponent;
AMyCharacter::AMyCharacter(){
PrimaryActorTick.bCanEverTick = true;
MyCharacter.cpp
SpringArmComponent = CreateDefaultSubobject<USpringArmComponent>
"SpringArm Component");
(
SpringArmComponent->bUsePawnControlRotation = true;
SpringArmComponent->SetupAttachment(RootComponent);
CameraComponent = CreateDefaultSubobject<UCameraComponent>
(
"Camera Component");
CameraComponent->SetupAttachment(SpringArmComponent);
}
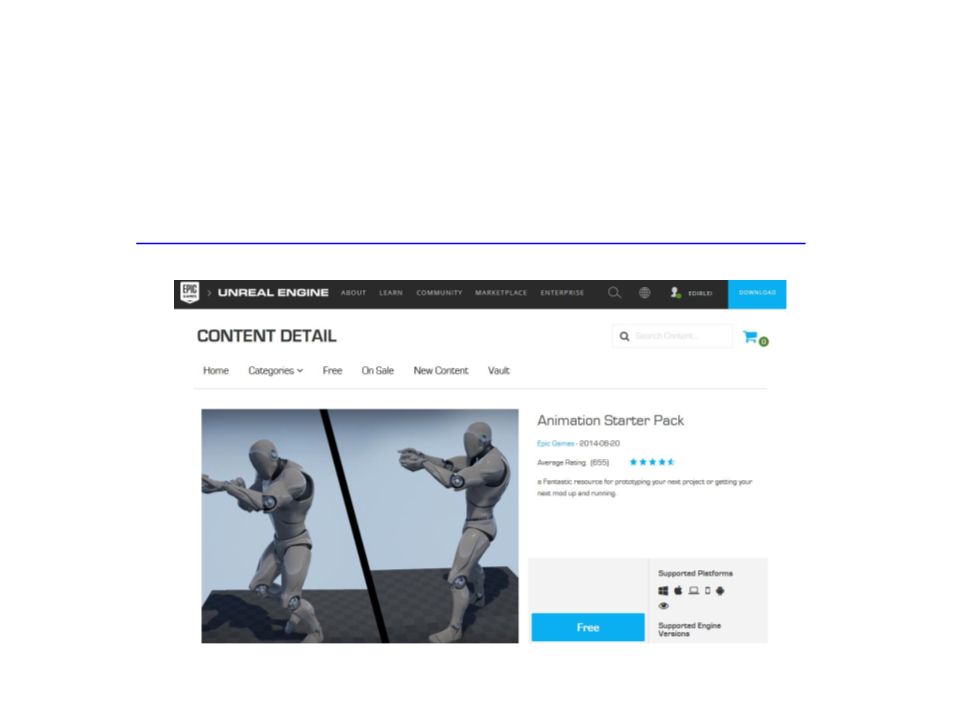
Multiplayer Game
•
Download and import the Animation Starter Pack:
–
https://www.unrealengine.com/marketplace/animation-starter-pack
Multiplayer Game
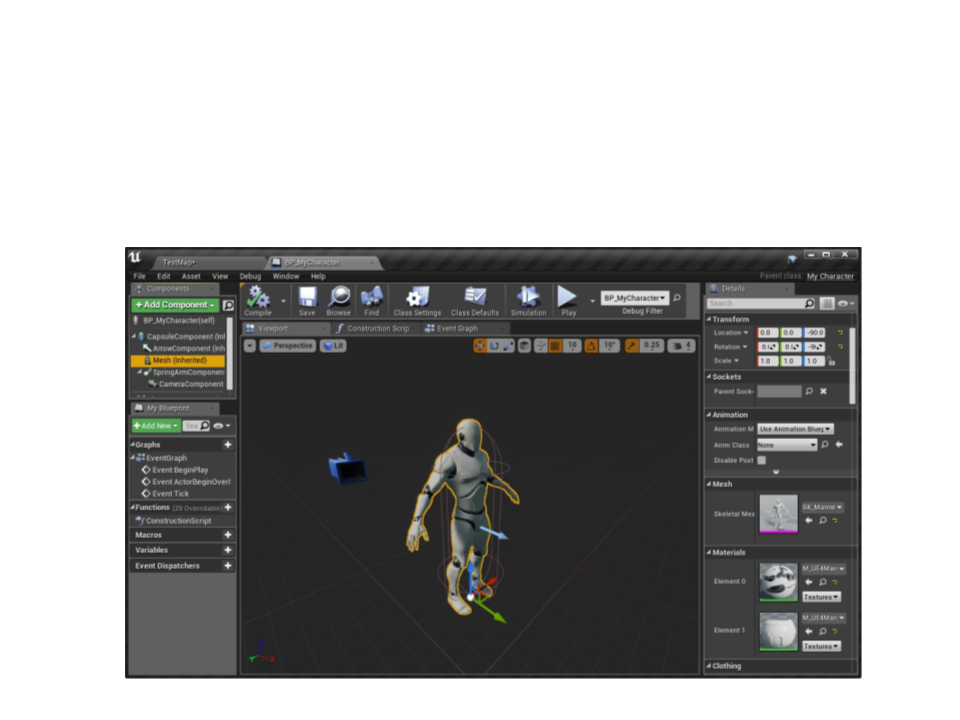
•
Add and setup the model mesh in the character blueprint:
Multiplayer Game
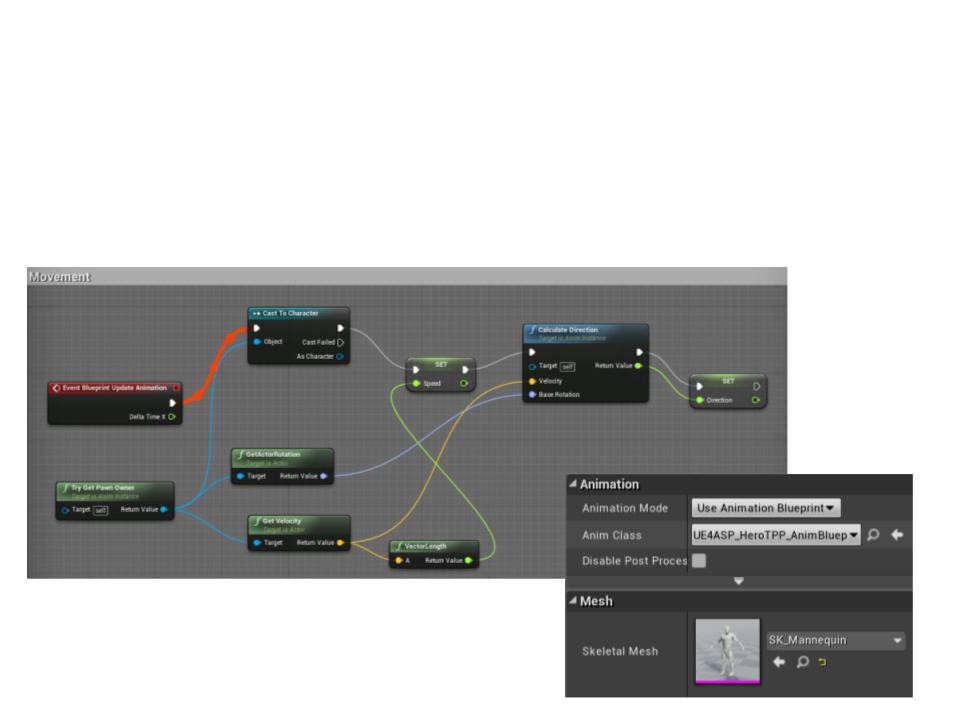
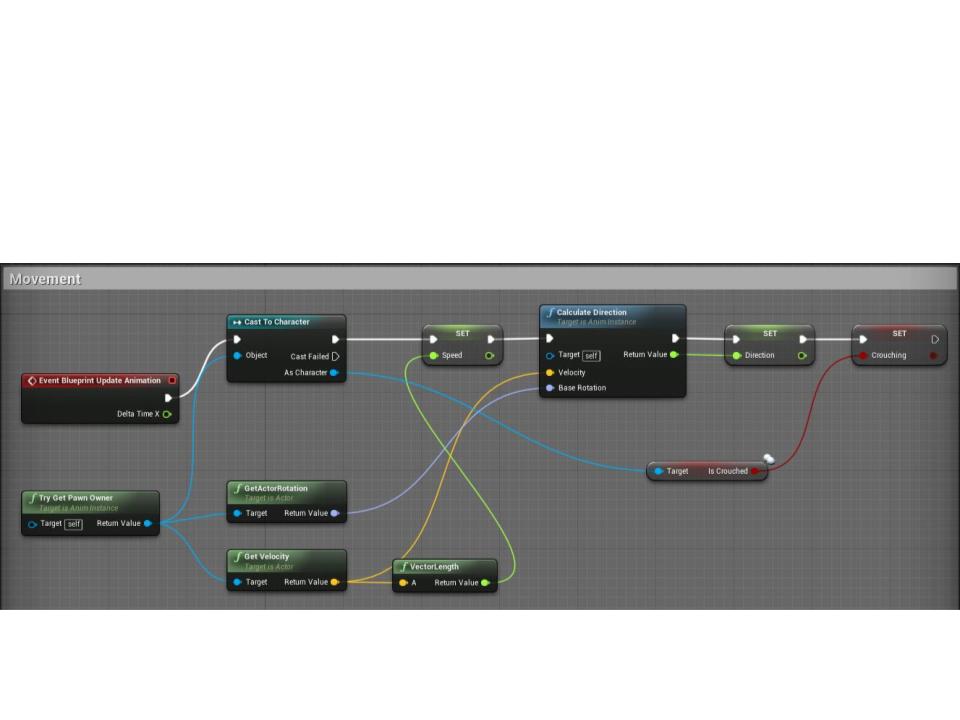
•
Clear the animation blueprint (UE4ASP_HeroTPP_AnimBlueprint)
and setup the animation in the character blueprint.

Multiplayer Game
•
Implement the crouch action:
protected:
...
MyCharacter.h
void BeginCrouch();
void EndCrouch();
void AMyCharacter::BeginCrouch(){
Crouch();
}
MyCharacter.cpp
void AMyCharacter::EndCrouch(){
UnCrouch();
}
AMyCharacter::AMyCharacter(){
.
..
GetMovementComponent()->GetNavAgentPropertiesRef().bCanCrouch = true;
}
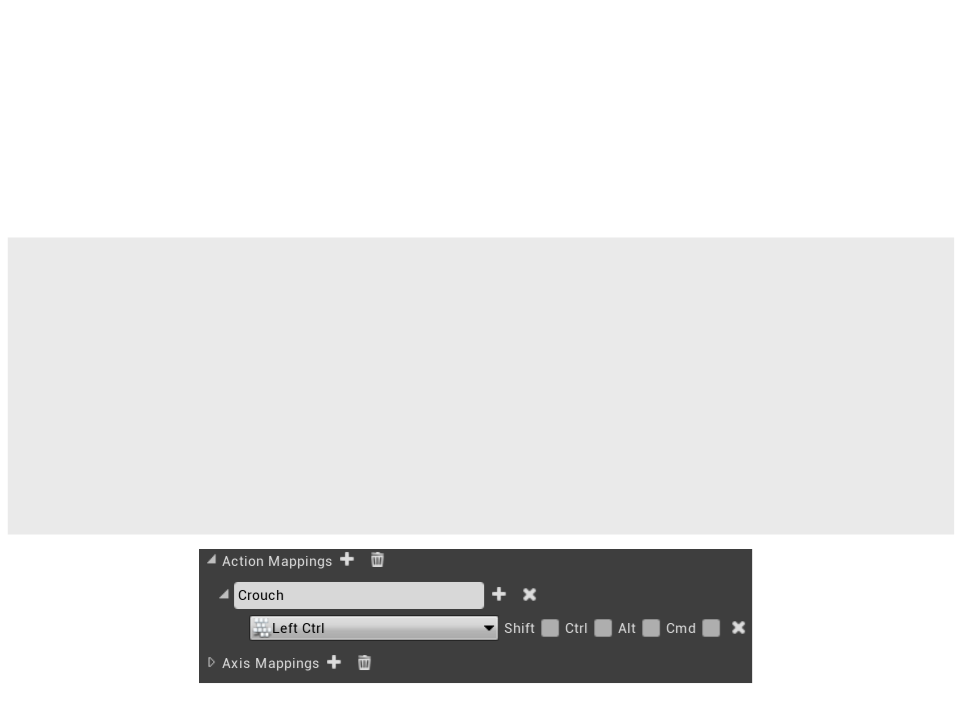
Multiplayer Game
•
Implement the crouch action:
MyCharacter.cpp
void AMyCharacter::SetupPlayerInputComponent(UInputComponent*
PlayerInputComponent){
.
..
PlayerInputComponent->BindAction("Crouch", IE_Pressed, this,
AMyCharacter::BeginCrouch);
PlayerInputComponent->BindAction("Crouch", IE_Released, this,
AMyCharacter::EndCrouch);
&
&
}
Multiplayer Game
•
Set the crouch variable in the animation blueprint:
Multiplayer Game
•
Implement the jump action:
MyCharacter.cpp
void AMyCharacter::SetupPlayerInputComponent(UInputComponent*
PlayerInputComponent){
.
..
PlayerInputComponent->BindAction("Jump", IE_Pressed, this,
&AMyCharacter::Jump);
}

Multiplayer Game
•
Implement the jump action:
Multiplayer Game
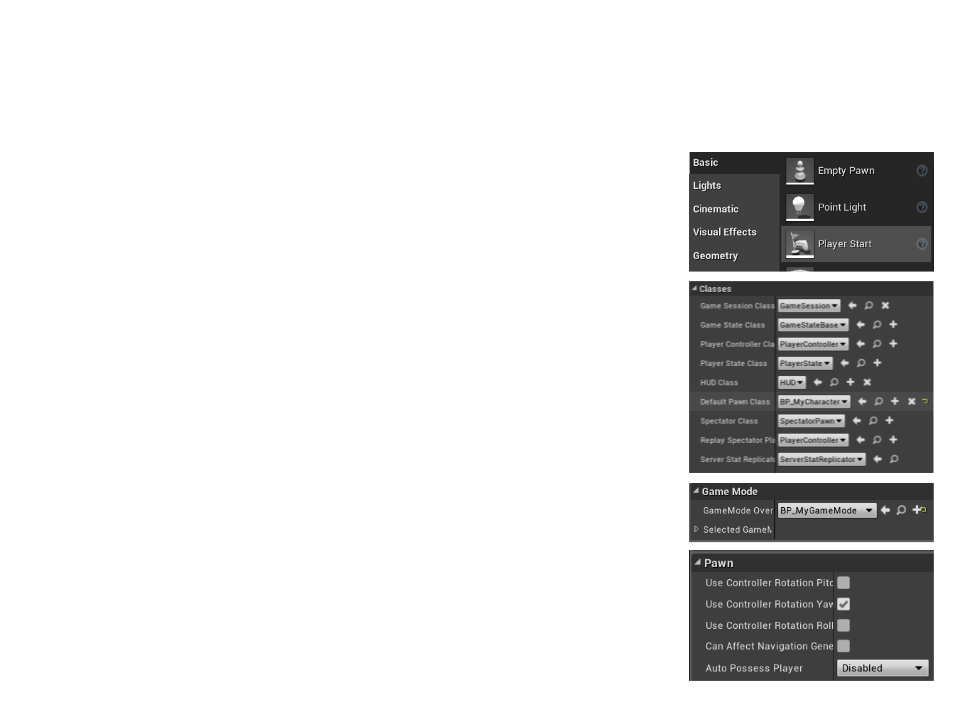
•
Setup the game to be played in multiplayer:
1
2
3
4
. Delete the character from the map and add two
or more “Player Start” actors to the map.
. Create a new Game Mode blueprint and set our
character blueprint as default pawn class.
. Set the new Game Mode as the Game Mode for
the map in the World Settings.
. Disable the auto possess option in the character
blueprint.
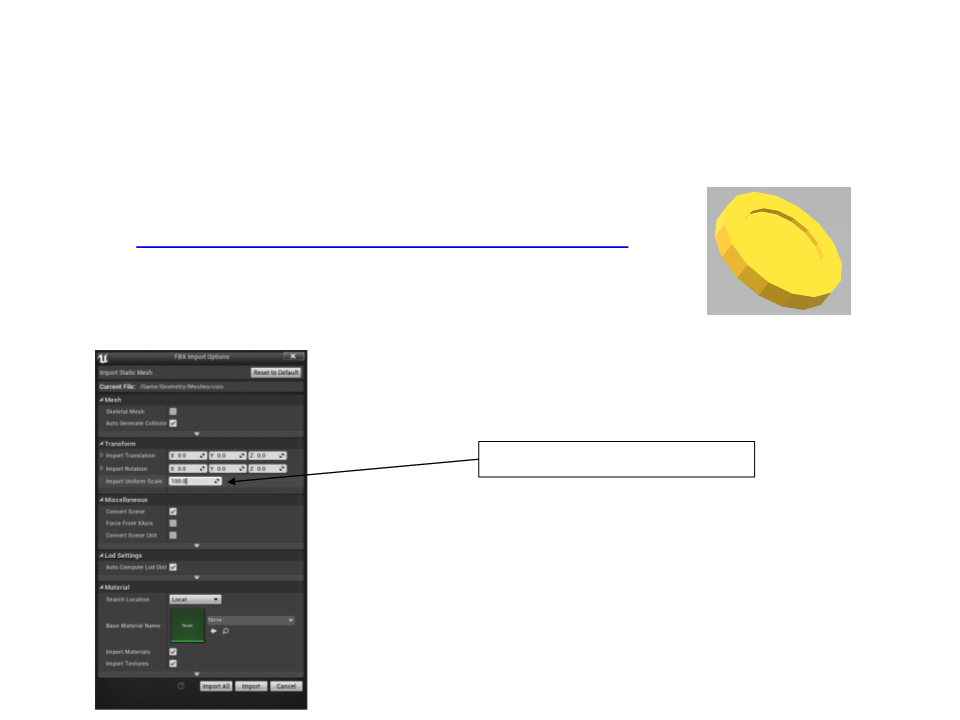
Collectible Coin
•
•
Low poly coin model:
–
http://www.inf.puc-rio.br/~elima/dp/coin.fbx
Importing the FBX model: drag and drop
Import Uniform Scale = 100.0
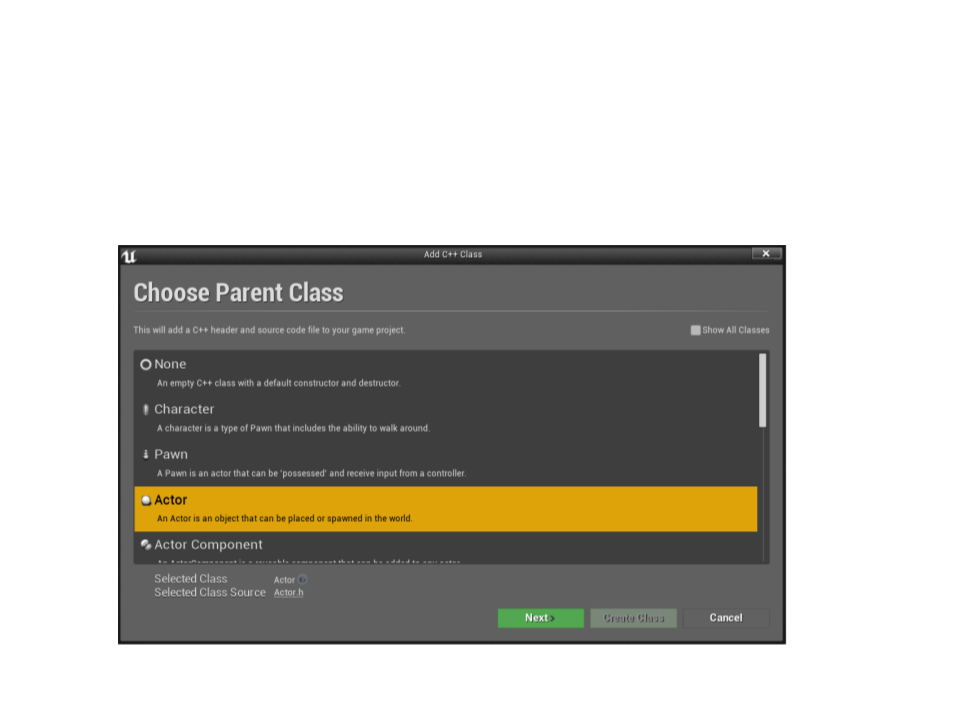
Collectible Coin
•
Create a new C++ class: CollectibleCoin

CollectibleCoin.h
#pragma once
#
#
#
include "CoreMinimal.h"
include "GameFramework/Actor.h"
include "CollectibleCoin.generated.h"
UCLASS()
class MYFIRSTGAME_API ACollectibleCoin : public AActor
{
GENERATED_BODY()
public:
// Sets default values for this actor's properties
ACollectibleCoin();
protected:
/ Called when the game starts or when spawned
virtual void BeginPlay() override;
/
public:
// Called every frame
virtual void Tick(float DeltaTime) override;
}
;

CollectibleCoin.cpp
#include "CollectibleCoin.h"
// Sets default values
ACollectibleCoin::ACollectibleCoin()
{
// Set this actor to call Tick() every frame.
PrimaryActorTick.bCanEverTick = true;
}
/
/ Called when the game starts or when spawned
void ACollectibleCoin::BeginPlay()
{
Super::BeginPlay();
}
// Called every frame
void ACollectibleCoin::Tick(float DeltaTime)
{
Super::Tick(DeltaTime);
}

Collectible Coin
•
Next step: define the structure of the collectible coin:
CollectibleCoin.h
.
..
protected:
UPROPERTY(VisibleAnywhere, Category = "Components")
UStaticMeshComponent* MeshComponent;
UPROPERTY(VisibleAnywhere, Category = "Components")
USphereComponent* SphereComponent;
virtual void BeginPlay() override;
.
..

Collectible Coin
•
Next step: define the structure of the collectible coin:
.
..
CollectibleCoin.cpp
ACollectibleCoin::ACollectibleCoin()
{
PrimaryActorTick.bCanEverTick = true;
MeshComponent = CreateDefaultSubobject<UStaticMeshComponent>
(
"Mesh Component");
MeshComponent->SetupAttachment(RootComponent);
SphereComponent = CreateDefaultSubobject<USphereComponent>
("Sphere Component");
SphereComponent->SetupAttachment(MeshComponent);
SetReplicates(true);
}
.
..
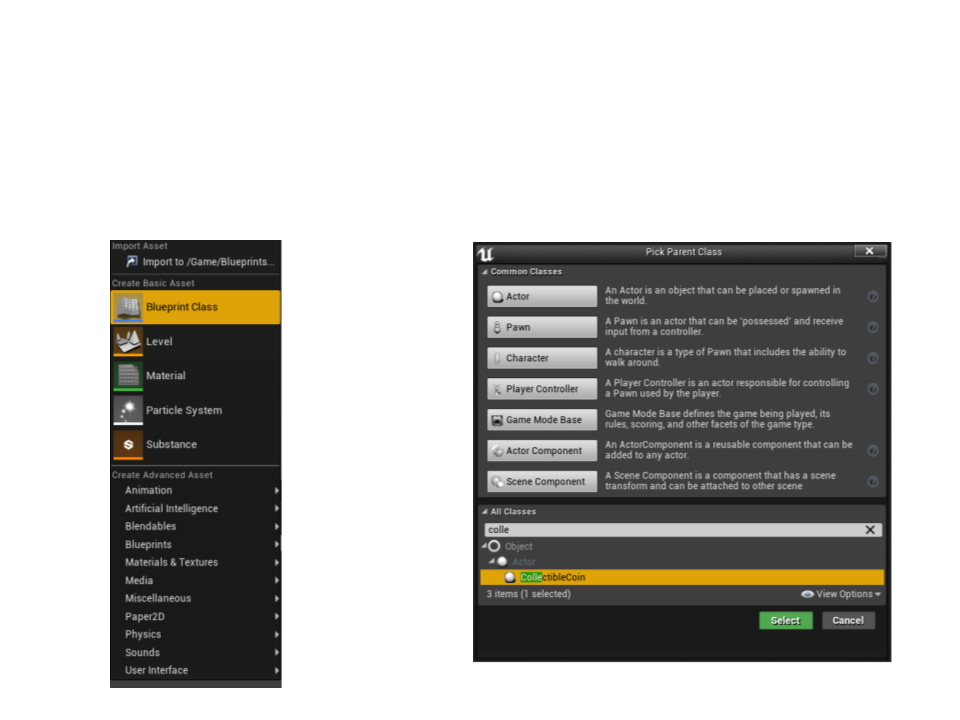
Collectible Coin
•
Next step: create a Blueprint Class for the collectible coin:
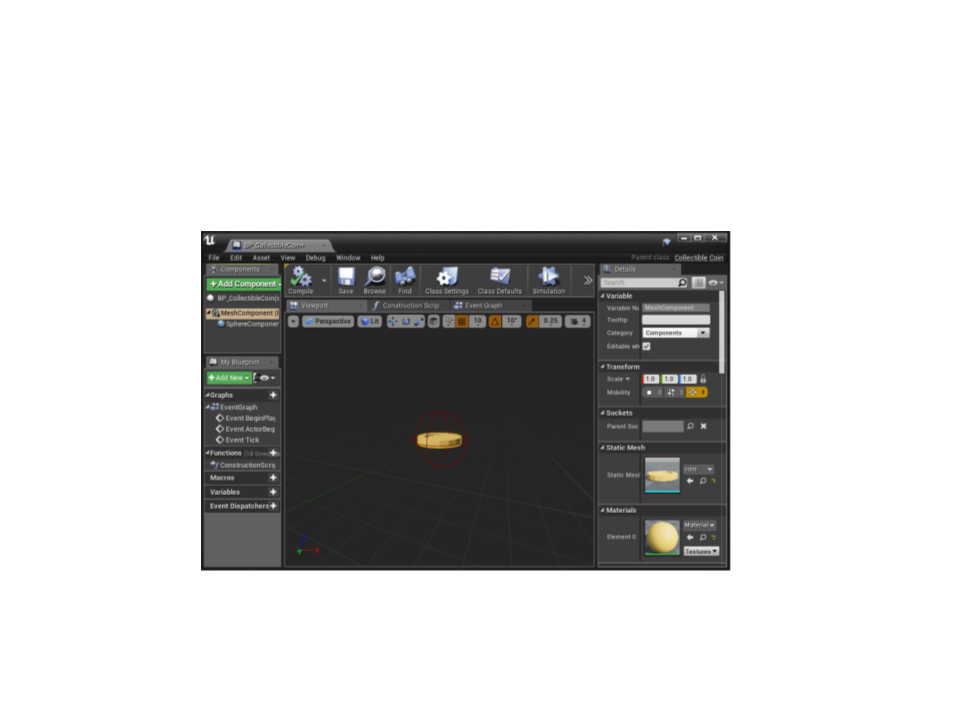
Collectible Coin
•
In the Blueprint editor, select the mesh of the coin:
•
Then, compile the blueprint and place it in the level.

Collectible Coin
•
Rotating the coin in the game:
.
..
CollectibleCoin.h
public:
UPROPERTY(EditAnywhere, Category = "Gameplay")
float RotationSpeed;
.
.
..
..
CollectibleCoin.cpp
void ACollectibleCoin::Tick(float DeltaTime)
{
Super::Tick(DeltaTime);
AddActorLocalRotation(FRotator(RotationSpeed * DeltaTime, 0, 0));
}
.
..

Collectible Coin
•
Destroying the coin when the player collides:
.
..
CollectibleCoin.h
public:
virtual void NotifyActorBeginOverlap(AActor* OtherActor) override;
.
.
..
..
CollectibleCoin.cpp
void ACollectibleCoin::NotifyActorBeginOverlap(AActor* OtherActor)
{
Super::NotifyActorBeginOverlap(OtherActor);
if (HasAuthority()){
if (dynamic_cast<AMyCharacter*>(OtherActor) != nullptr) {
Destroy();
}
}
}
.
..
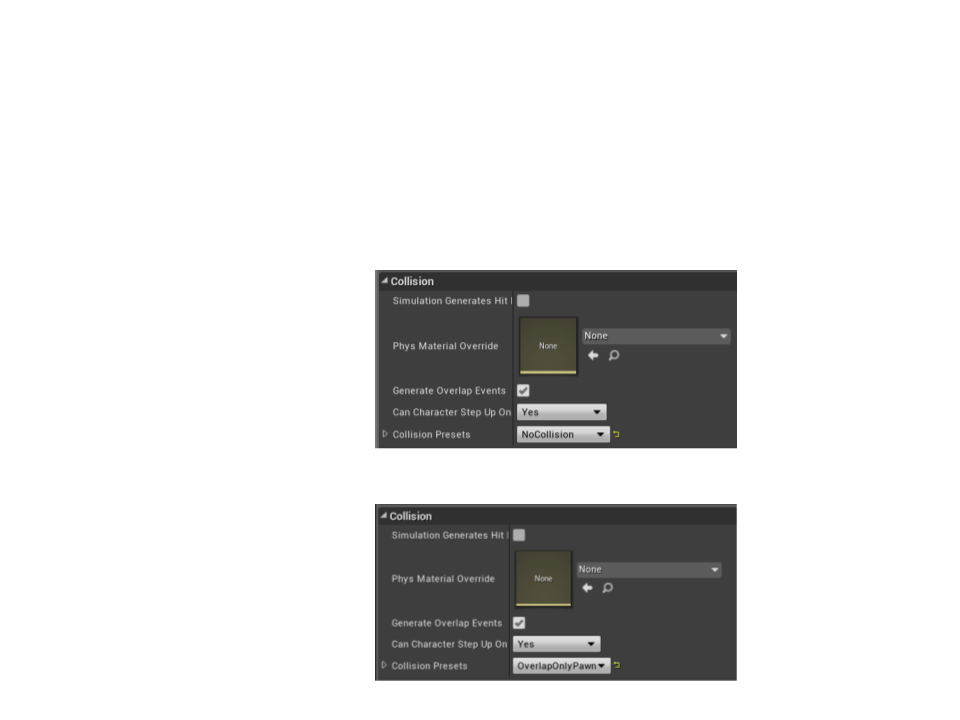
Collectible Coin
•
Setup the collision properties in the blueprint:
–
MeshComponent:
–
SphereComponent:
UProperty Specifiers
Property Tag
Effect
Indicates that this property is visible in all
property windows, but cannot be edited.
VisibleAnywhere
EditAnywhere
Indicates that this property can be edited
by property windows, on archetypes and
instances.
Indicates that this property can be edited
by property windows, but only on
archetypes.
EditDefaultsOnly
This property can be read by Blueprints,
but not modified.
BlueprintReadOnly
BlueprintReadWrite
This property can be read or written from
a Blueprint.
Indicates that this property can be edited
by property windows, but only on
instances, not on archetypes.
EditInstanceOnly
UFunction Specifiers
Function Specifier
Effect
The function can be executed in a
Blueprint or Level Blueprint graph.
BlueprintCallable
The function can be implemented in a
Blueprint or Level Blueprint graph.
BlueprintImplementableEvent
The function is designed to be overridden
by a Blueprint, but also has a default
native implementation.
BlueprintNativeEvent
CallInEditor
The function can be called in the Editor on
selected instances via a button in the
Details Panel.
The function is an RPC (Remote Procedure
Call) service request.
ServiceRequest
ServiceResponse
This function is an RPC service response.

Collectible Coin
•
Spawning a particle system when the player collects the coin:
.
..
CollectibleCoin.h
protected:
...
UPROPERTY(EditDefaultsOnly, Category = "Effects")
UParticleSystem* CollectEffects;
UFUNCTION(NetMulticast, Reliable)
void PlayEffects();
.
..

Collectible Coin
•
Spawning a particle system when the player collects the coin:
#
.
include "Kismet/GameplayStatics.h"
..
CollectibleCoin.cpp
void ACollectibleCoin::NotifyActorBeginOverlap(AActor* OtherActor){
Super::NotifyActorBeginOverlap(OtherActor);
if (HasAuthority()){
if (dynamic_cast<AMyCharacter*>(OtherActor) != nullptr){
PlayEffects();
Destroy();
}
}
}
void ACollectibleCoin::PlayCollectEffects_Implementation(){
UGameplayStatics::SpawnEmitterAtLocation(this, CollectEffects,
GetActorLocation());
}
Collectible Coin
•
Counting the number of coins remaining in the level:
–
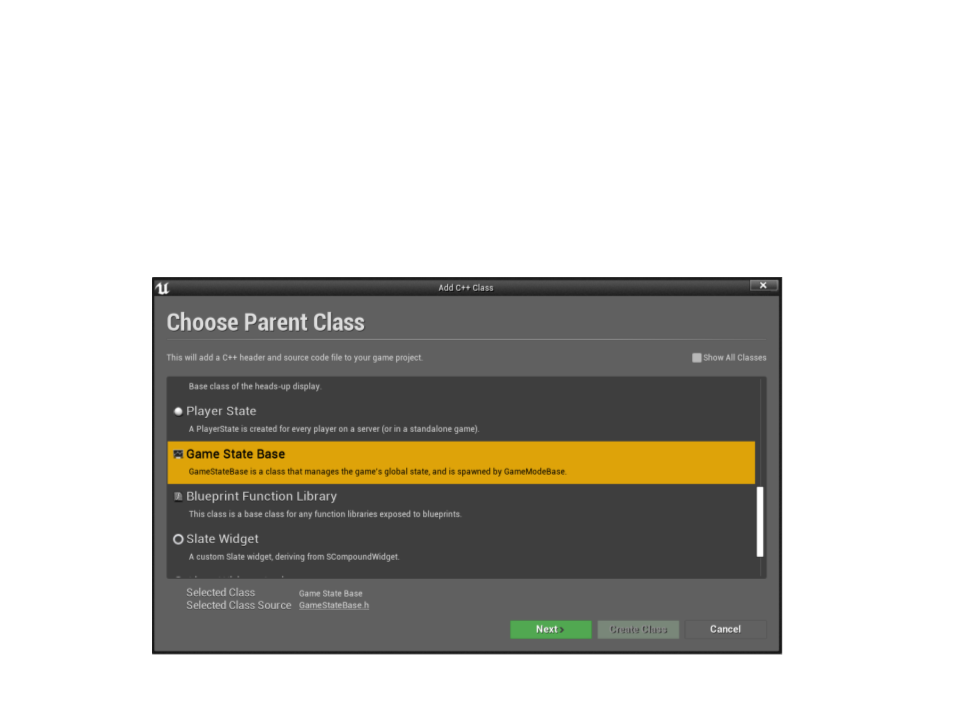
Create new C++ Game State class:

Collectible Coin
•
Counting the number of coins remaining in the level:
public:
AMyGameStateBase();
MyGameStateBase.h
void UpdateTotalCoinsInLevel();
UPROPERTY(replicated, BlueprintReadOnly)
int TotalLevelCoins;
AMyGameStateBase::AMyGameStateBase()
{
MyGameStateBase.cpp
UpdateTotalCoinsInLevel();
}
void AMyGameStateBase::GetLifetimeReplicatedProps(
TArray<FLifetimeProperty>& OutLifetimeProps) const {
Super::GetLifetimeReplicatedProps(OutLifetimeProps);
DOREPLIFETIME(AMyGameStateBase, TotalLevelCoins);
}

Collectible Coin
•
Counting the number of coins remaining in the level:
void AMyGameStateBase::UpdateTotalCoinsInLevel(){
TArray<AActor*> FoundCoins;
MyGameStateBase.cpp
UGameplayStatics::GetAllActorsOfClass(GetWorld(),
ACollectibleCoin::StaticClass(), FoundCoins);
TotalLevelCoins = FoundCoins.Num();
}
void ACollectibleCoin::NotifyActorBeginOverlap(AActor * OtherActor)
{
.
..
AMyGameStateBase *gamestate = dynamic_cast<AMyGameStateBase*>(
GetWorld()->GetGameState());
if (gamestate != nullptr){
gamestate->UpdateTotalCoinsInLevel();
}
.
..
}
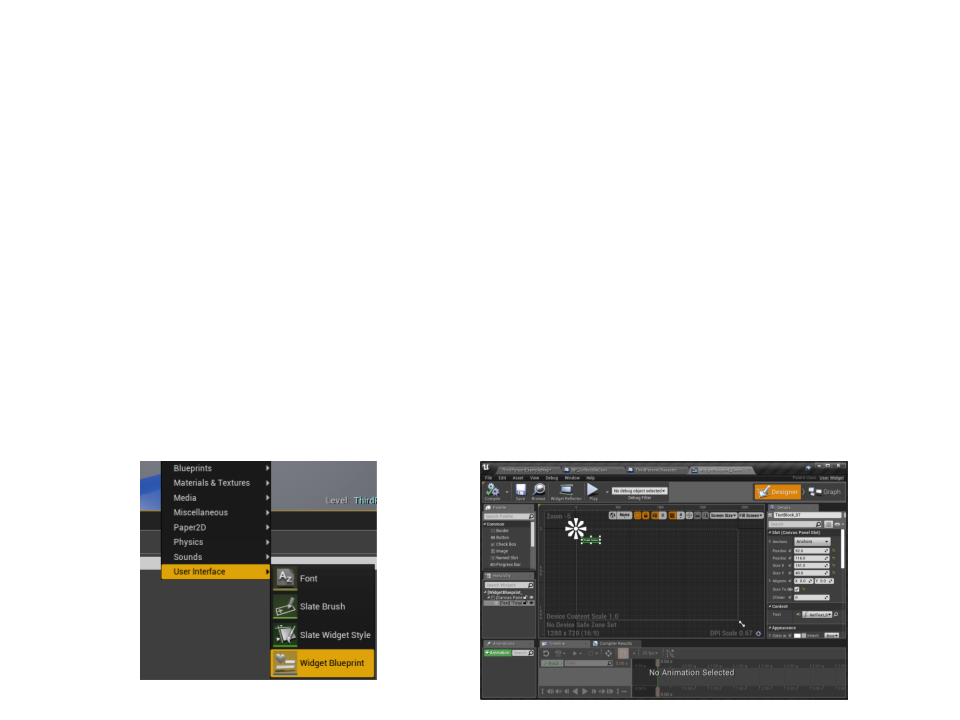
Collectible Coin
•
Displaying the information in the game UI with a Widget
Blueprint:
1
. First, show number of coins remaining in the level;
2
. After collecting all coins in the level, show the message “All coins
collected!!!”.
•
Step 1: create a Widget Blueprint
Collectible Coin
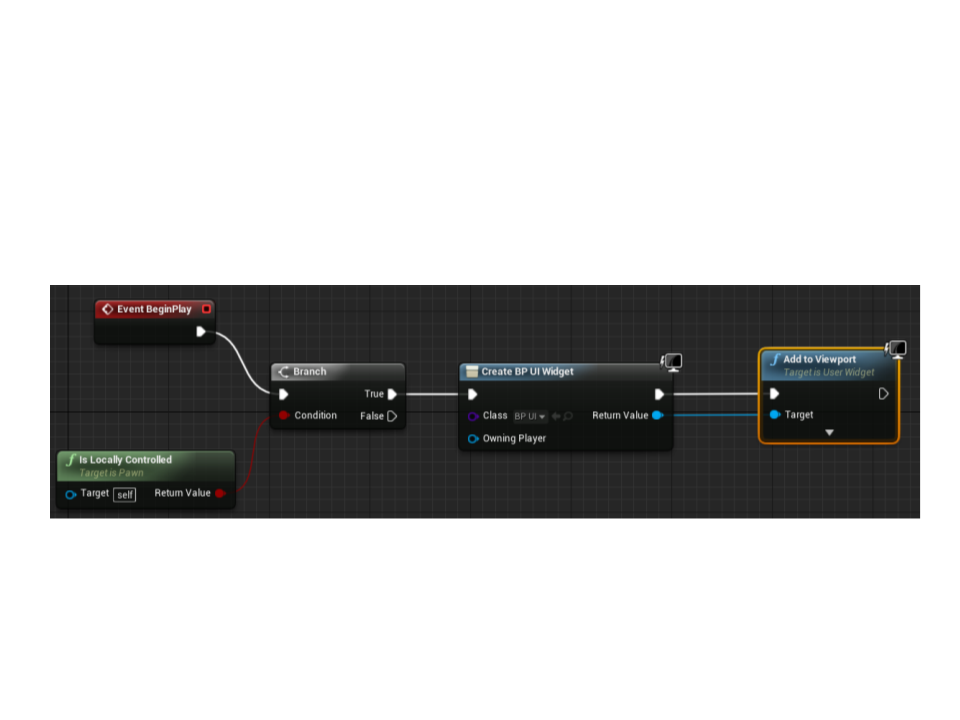
•
Step 2: instantiate the Widget Blueprint in the BeginPlay
event of the MyCharacter blueprint.
Collectible Coin
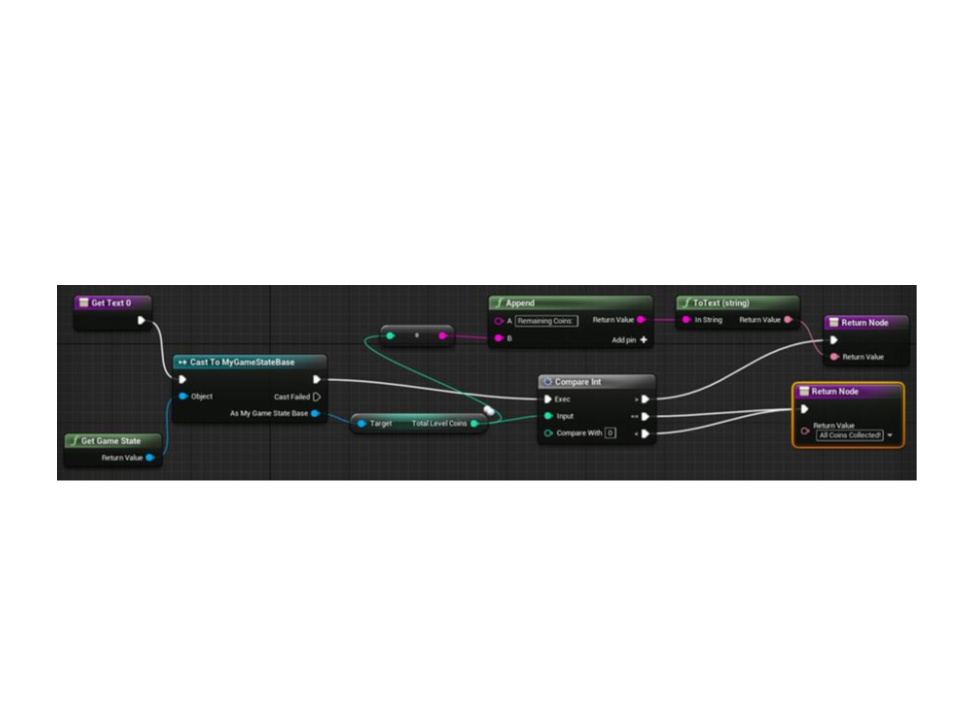
•
Step 3: bind the text value and create the Widget Blueprint
logic.

Level Complete
•
Level complete area: alter collecting all coins, the player
can go to this area to complete the level.
LevelCompleteArea.h
UCLASS()
class MYFIRSTGAME_API ALevelCompleteArea : public AActor
{
.
..
protected:
UPROPERTY(VisibleAnywhere, Category = "Components")
class UBoxComponent* BoxComponent;
virtual void NotifyActorBeginOverlap(AActor* OtherActor) override;
}
;

Level Complete
•
Level complete area: alter collecting all coins, the player
can go to this area to complete the level.
LevelCompleteArea.cpp
ALevelCompleteArea::ALevelCompleteArea()
{
BoxComponent = CreateDefaultSubobject<UBoxComponent>("BoxComponent");
BoxComponent->SetBoxExtent(FVector(200.0f, 200.0f, 200.0f));
BoxComponent->SetCollisionEnabled(ECollisionEnabled::QueryOnly);
BoxComponent->SetCollisionResponseToAllChannels(ECR_Ignore);
BoxComponent->SetCollisionResponseToChannel(ECC_Pawn, ECR_Overlap);
BoxComponent->SetupAttachment(RootComponent);
BoxComponent->OnComponentBeginOverlap.AddDynamic(this,
&ALevelCompleteArea::HandleBeginOverlap);
}

Level Complete
•
Level complete area: alter collecting all coins, the player
can go to this area to complete the level.
LevelCompleteArea.cpp
void ALevelCompleteArea::NotifyActorBeginOverlap(AActor* OtherActor){
Super::NotifyActorBeginOverlap(OtherActor);
if (HasAuthority()){
AMyCharacter *character = dynamic_cast<AMyCharacter*>(OtherActor);
if (character != nullptr){
AMyGameStateBase *gamestate = dynamic_cast<AMyGameStateBase*>(
GetWorld()->GetGameState());
if (gamestate != nullptr){
if (gamestate->TotalLevelCoins == 0){
gamestate->MulticastOnLevelComplete(character, true);
}
}
}
}
}

Level Complete
•
Level complete area: alter collecting all coins, the player
can go to this area to complete the level.
public:
...
MyGameStateBase.h
UFUNCTION(NetMulticast, Reliable)
void MulticastOnLevelComplete(APawn* character, bool succeeded);
UFUNCTION(BlueprintImplementableEvent, Category = "Gameplay Events")
void OnLevelCompleted(APawn* charact, bool succeeded);
MyGameStateBase.cpp
void AMyGameStateBase::MulticastOnLevelComplete_Implementation(
APawn* character, bool succeeded){
OnLevelCompleted(character, succeeded);
}
Level Complete
•
Level complete area: alter collecting all coins, the player
can go to this area to complete the level.
1
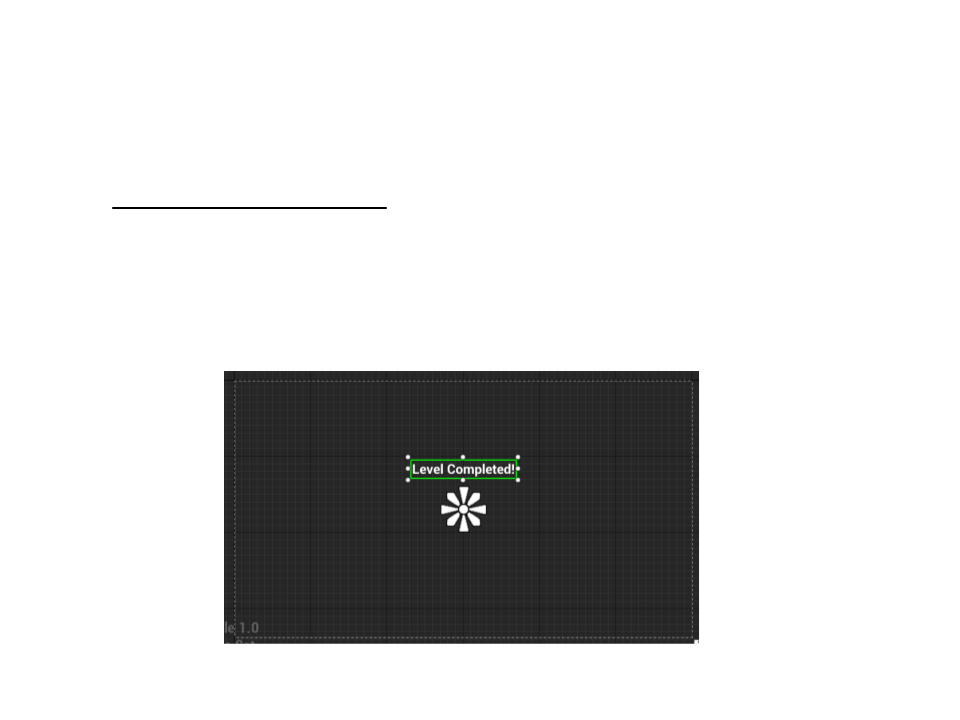
. Create a Widget Blueprint with a “Level Completed!” message;
Level Complete
•
Level complete area: alter collecting all coins, the player
can go to this area to complete the level.
2
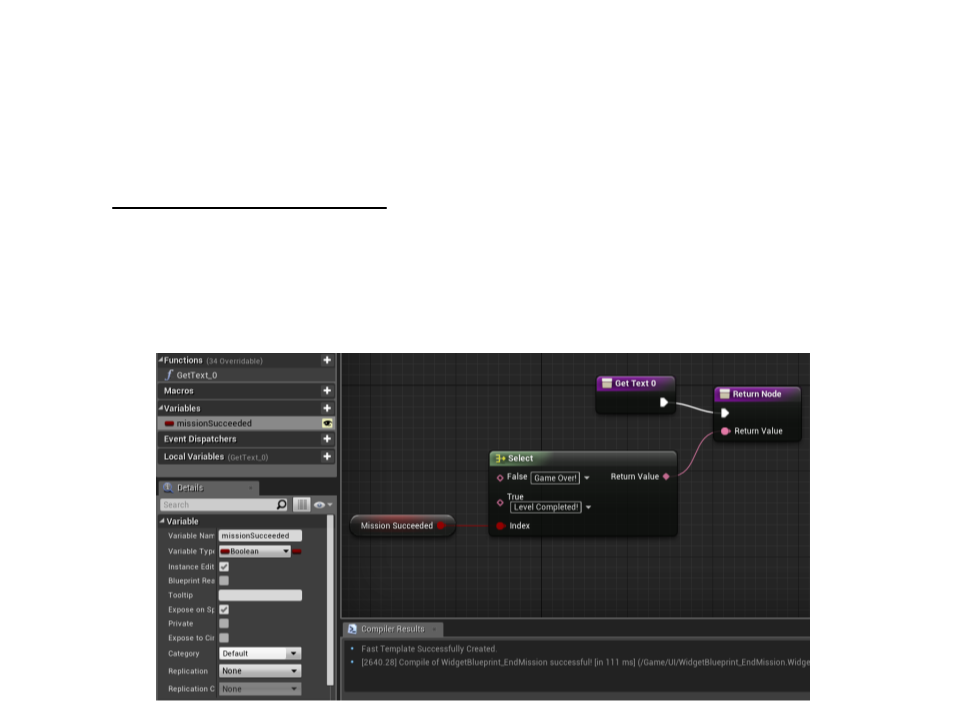
. In the Widget, create a new boolean variable to represent succeeded value
and a blueprint to bind the correct message based on variable value;
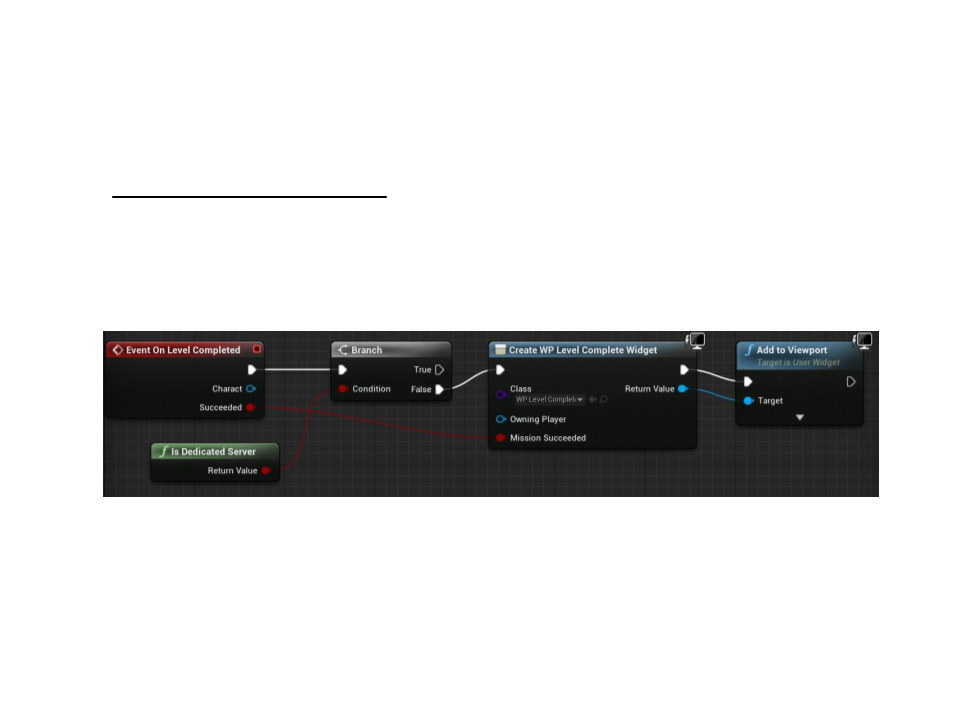
Level Complete
•
Level complete area: alter collecting all coins, the player can go
to this area to complete the level.
2
. Implement the OnLevelCompleted event in the blueprint of the game state:

Level Complete
•
Level complete area: if the player goes to the level complete
area without collecting all coins, a sound notification is played.
protected:
...
LevelCompleteArea.h
UPROPERTY(EditDefaultsOnly, Category = "Sounds")
USoundBase* LevelNotCompletedSound;
void ALevelCompleteArea::NotifyActorBeginOverlap(AActor* OtherActor)
{
.
..
if (gamestate->TotalLevelCoins == 0){
gamestate->MulticastOnLevelComplete(character, true);
}
else{
UGameplayStatics::PlaySound2D(this, LevelNotCompletedSound);
}
.
..
}
Enemies
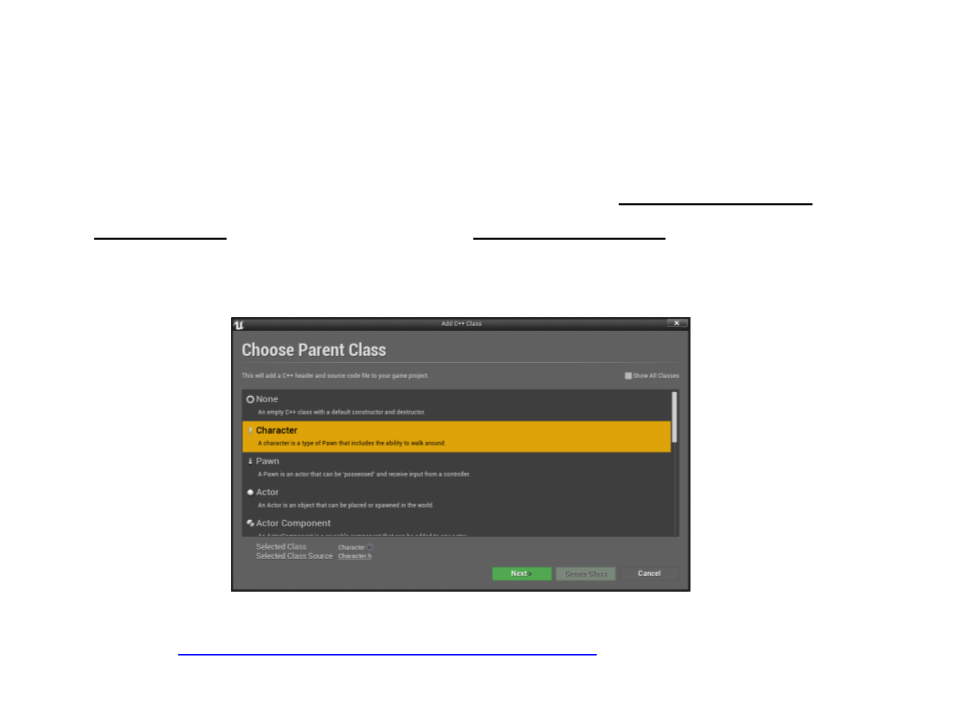
•
Next step: create an enemy with AI that walks between
waypoints. When the enemy sees the player, he follows and
attacks the player.
–
Create new C++ class for the enemy: base class Character
–
Download and import the enemy model:
• http://www.inf.puc-rio.br/~elima/dp/zombie.zip
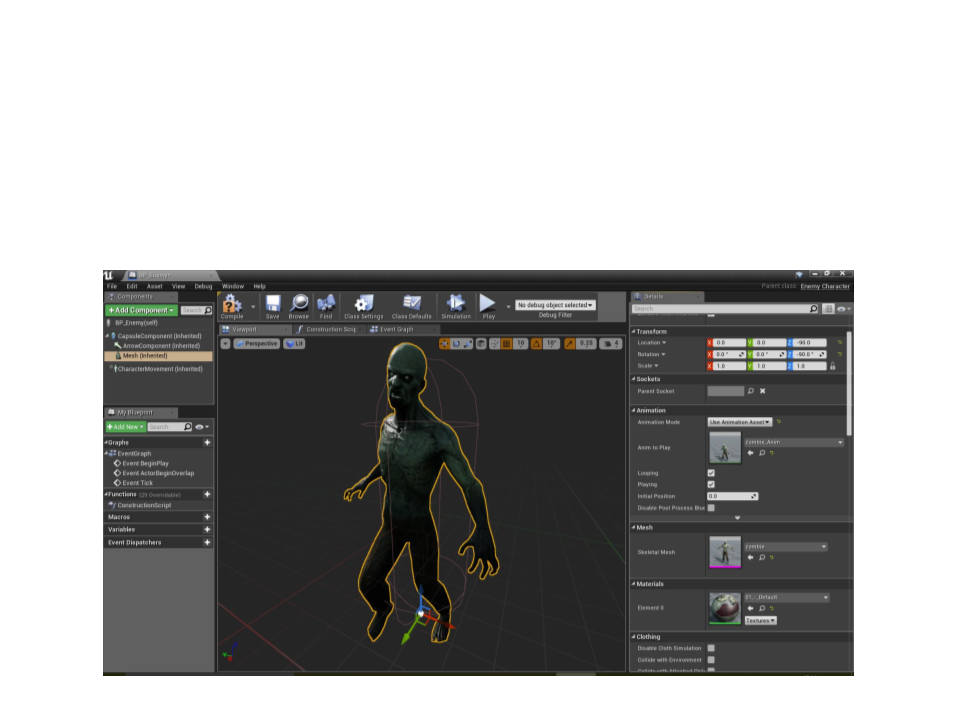
Enemies
•
Next step: create an enemy with AI.
–
Create and setup a blueprint for the new C++ enemy class:
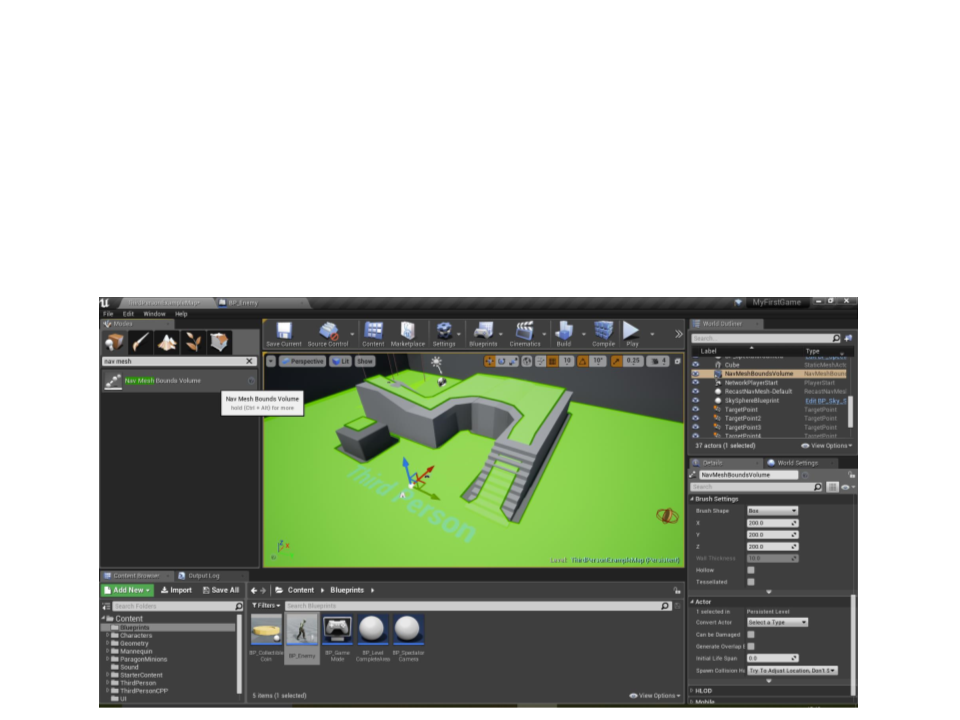
Enemies
•
Next step: create an enemy with AI.
–
Add a Nav Mesh Bounds Volume and resize it so that it fits all of the
walkable space in the level (press P to show the Nav Mesh):
Enemies
•
Next step: create an enemy with AI.
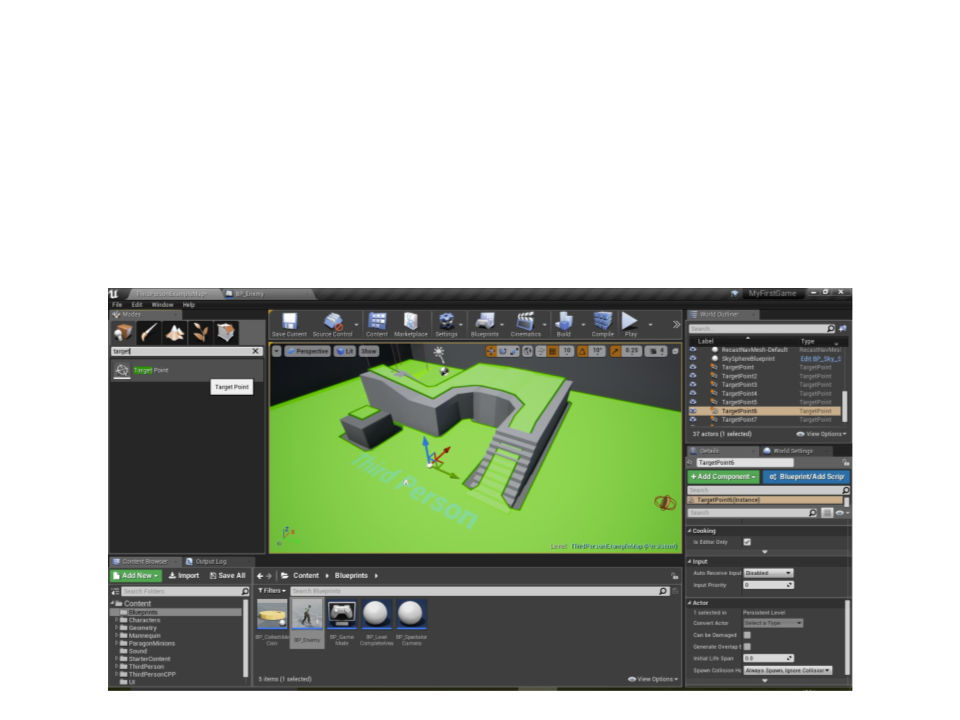
–
Place some waypoints (Target Point) in the level:

Enemies
•
Next step: create an enemy with AI.
.
..
EnemyCharacter.h
protected:
...
TArray<AActor*> Waypoints;
AAIController* AIController;
ATargetPoint* GetRandomWaypoint();
void AIMoveCompleted(FAIRequestID RequestID,
const FPathFollowingResult& Result);
.
..
Important: the AIModule must be included as a public dependency.

Enemies
•
Next step: create an enemy with AI.
void AEnemyCharacter::BeginPlay()
{
EnemyCharacter.cpp
Super::BeginPlay();
UGameplayStatics::GetAllActorsOfClass(GetWorld(),
ATargetPoint::StaticClass(), Waypoints);
AIController = Cast<AAIController>(GetController());
this->bUseControllerRotationYaw = false;
if ((Waypoints.Num() > 0) && (AIController)){
AIController->GetPathFollowingComponent()->
OnRequestFinished.AddUObject(this,
&AMyEnemyCharacter::AIMoveCompleted);
if (HasAuthority())
{
AIController->MoveToActor(GetRandomWaypoint());
}
}
}

Enemies
•
Next step: create an enemy with AI.
ATargetPoint* AEnemyCharacter::GetRandomWaypoint()
{
EnemyCharacter.cpp
int index = FMath::RandRange(0, Waypoints.Num() - 1);
return Cast<ATargetPoint>(Waypoints[index]);
}
void AEnemyCharacter::AIMoveCompleted(FAIRequestID RequestID,
const FPathFollowingResult& Result){
if (Result.IsSuccess() && HasAuthority())
{
if ((Waypoints.Num() > 0) && (AIController))
{
AIController->MoveToActor(GetRandomWaypoint());
}
}
}
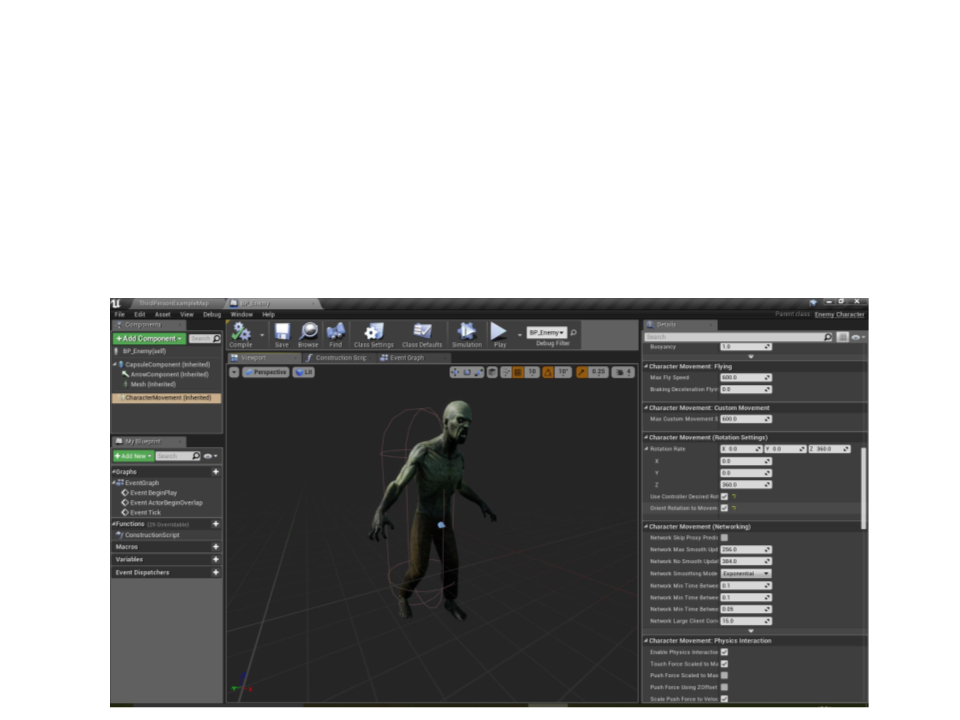
Enemies
•
Next step: create an enemy with AI.
–
Adjust max speed and rotation settings in the CharacterMovement
component:

Enemies
•
Next step: create an enemy with AI.
–
Add a SensingComponent to allow the enemy to see the player:
protected:
..
EnemyCharacter.h
.
UPROPERTY(VisibleAnywhere, Category = "Components")
class UPawnSensingComponent* SensingComponent;
AActor* target;
UFUNCTION()
void SeePlayer(APawn *pawn);
.
..

Enemies
•
Next step: create an enemy with AI.
–
Add a SensingComponent to allow the enemy to see the player:
AEnemyCharacter::AEnemyCharacter()
{
EnemyCharacter.cpp
SensingComponent = CreateDefaultSubobject<UPawnSensingComponent>
"SensingComponent");
(
SensingComponent->OnSeePawn.AddDynamic(this,
AEnemyCharacter::SeePlayer);
SensingComponent->SetSensingUpdatesEnabled(true);
&
}
void AEnemyCharacter::SeePlayer(APawn *pawn){
if (HasAuthority()){
if ((pawn) && (AIController) && (!target)){
target = pawn;
this->GetMesh()->GlobalAnimRateScale = 2.5f;
this->GetCharacterMovement()->MaxWalkSpeed = 150.0f;
AIController->MoveToActor(pawn);
}
}
}

Enemies
•
Next step: create an enemy with AI.
–
Add a SensingComponent to allow the enemy to see the player:
void AEnemyCharacter::Tick(float DeltaTime)
{
EnemyCharacter.cpp
Super::Tick(DeltaTime);
if (HasAuthority())
{
if (target)
{
if (FVector::Dist(GetActorLocation(),
target->GetActorLocation()) > SensingComponent->SightRadius){
this->GetMesh()->GlobalAnimRateScale = 1.0f;
this->GetCharacterMovement()->MaxWalkSpeed = 50;
target = nullptr;
AIController->MoveToActor(GetRandomWaypoint());
}
}
}
}
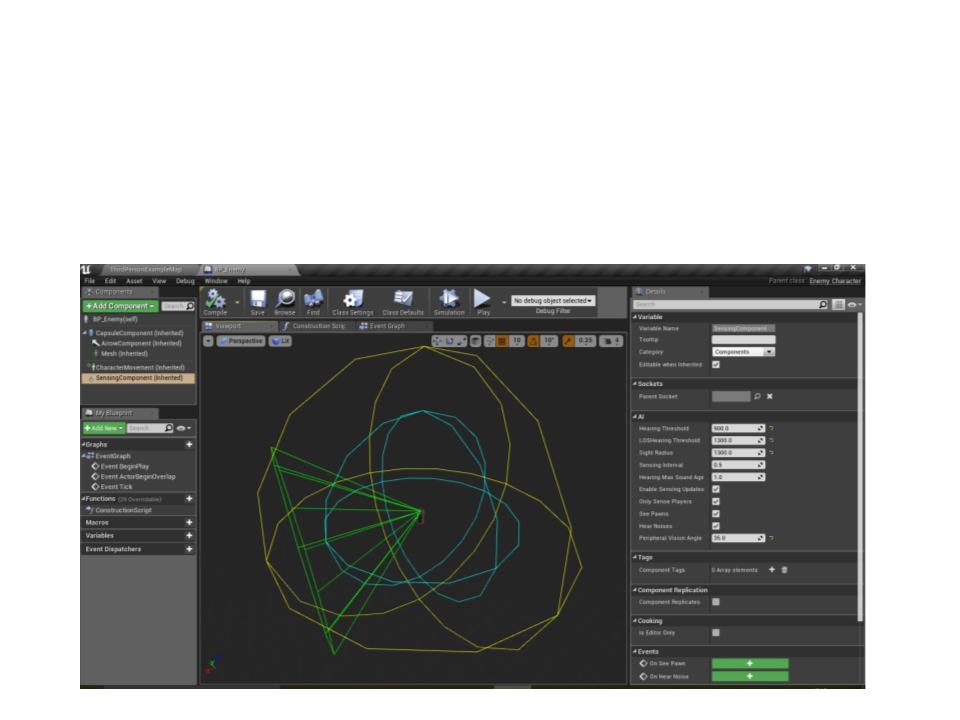
Enemies
•
Next step: create an enemy with AI.
–
Adjust the sight properties in the enemy blueprint:

Enemies
•
Next step: create an enemy with AI.
–
If the enemy gets to the player position, show the game over message:
void AEnemyCharacter::AIMoveCompleted(FAIRequestID RequestID,
const FPathFollowingResult& Result)
{
if (Result.IsSuccess() && HasAuthority()){
if (target) {
AMyCharacter* character = Cast<AMyCharacter>(target);
AMyGameStateBase* gamestate = Cast<AMyGameStateBase>(
GetWorld()->GetGameState());
if ((character) && (gamestate)){
gamestate->MulticastOnLevelComplete(character, false);
}
target = nullptr;
}
if ((Waypoints.Num() > 0) && (AIController)){
AIController->MoveToActor(GetRandomWaypoint());
}
}
}

Enemies
•
Next step: create an enemy with AI.
–
We need to manually synchronize the animation speed with all clients.
–
Solution: create a variable to represent a chasing state and replicate it
to all clients:
protected:
...
EnemyCharacter.h
UPROPERTY(Replicated)
bool isChasing;
EnemyCharacter.cpp
EnemyCharacter.cpp
void AEnemyCharacter::GetLifetimeReplicatedProps(TArray
<FLifetimeProperty>& OutLifetimeProps) const
{
Super::GetLifetimeReplicatedProps(OutLifetimeProps);
DOREPLIFETIME(AEnemyCharacter, isChasing);
}

Enemies
EnemyCharacter.cpp
AEnemyCharacter::AEnemyCharacter(){
.
..
isChasing = false;
SetReplicates(true);
}
void AEnemyCharacter::SeePlayer(APawn *pawn)
{
if ((pawn) && (AIController) && (!target))
{
.
..
isChasing = true;
}
}

Enemies
void AEnemyCharacter::Tick(float DeltaTime){
Super::Tick(DeltaTime);
EnemyCharacter.cpp
if ((target) && (HasAuthority())){
if (FVector::Dist(GetActorLocation(),
target->GetActorLocation()) > SensingComponent->SightRadius){
..
isChasing = false;
.
}
}
if ((isChasing)&& (this->GetMesh()->GlobalAnimRateScale != 2.5f)){
GetMesh()->GlobalAnimRateScale = 2.5f;
GetCharacterMovement()->MaxWalkSpeed = 150.0f;
}
else if (this->GetMesh()->GlobalAnimRateScale != 1.0f){
GetMesh()->GlobalAnimRateScale = 1.0f;
GetCharacterMovement()->MaxWalkSpeed = 50.0f;
}
}
Exercise 1
1) Continue the implementation of the game:
a) Play a sound effect when a coin is collected.
b) Disable the player movement when the level is
completed or when is game over.
c) Improve the level by adding more coins, more
enemies, more waypoints, and adjusting the
position of the coins, enemies and waypoints.
•
Balance the gameplay by adjusting the speed of the
enemies according to the speed of the player.

Further Reading
•
•
Carnall, B. (2016). Unreal Engine 4.X By Example. Packt
Publishing. ISBN: 978-1785885532.
Web Resources:
–
–
–
–
–
Introduction to C++ Programming in UE4 -
https://docs.unrealengine.com/en-US/Programming/Introduction
Coding Standard - https://docs.unrealengine.com/en-
US/Programming/Development/CodingStandard
Gameplay Programming - https://docs.unrealengine.com/en-
us/Programming/UnrealArchitecture
Networking and Multiplayer in Unreal Engine -
Network Guide -