
Computer Graphics
Lecture 09 – Textures and Materials
Edirlei Soares de Lima
<edirlei.lima@universidadeeuropeia.pt>

Materials, Shaders and Textures
•
•
Materials: define how a surface should be rendered, including
references to textures, tiling information, color, etc.
–
The options available depend on which Shader the Material is using.
Shaders: small scripts that contain the mathematical
calculations and algorithms for calculating the color of each
pixel rendered, based on the lighting input and the Material
configuration.
•
Textures: are bitmap images.
–
A Material can contain references to textures, so that the Material’s
Shader can use the textures while calculating the surface color.
–
Textures can also represent other aspects of a Material’s surface such
as its reflectivity or roughness.
Unity Standard Shader
•
Standard Shader: built-in shader with a comprehensive set of
features.
–
–
–
Supports reflection, bump mapping, occlusion mapping, emission,
transparency, shadows, indirect light, etc.
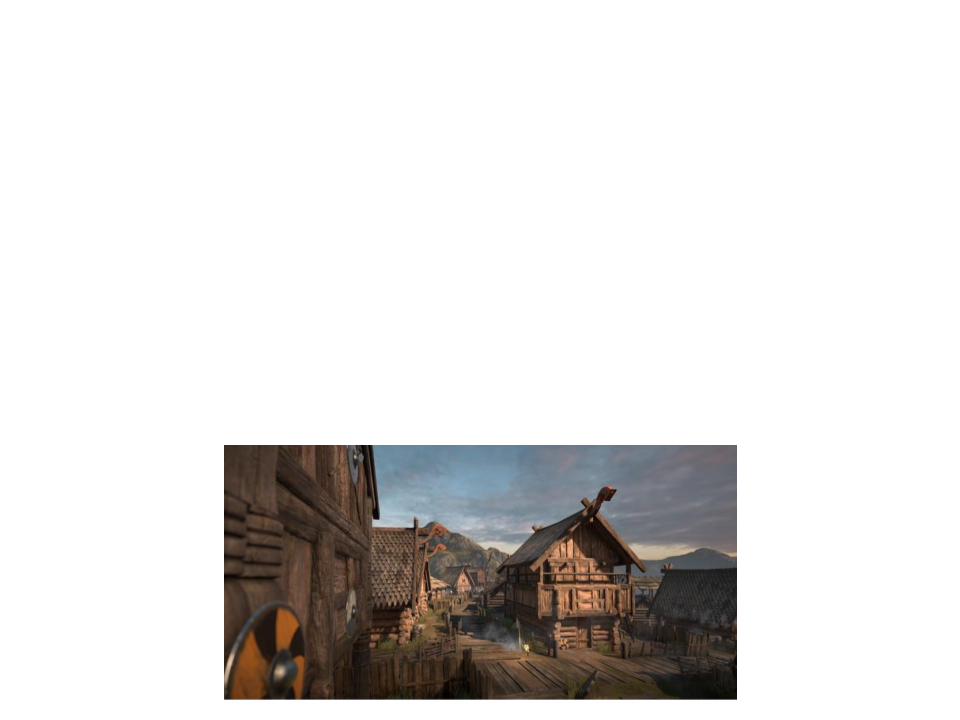
Physically Based Shading: render objects in a way that accurately
simulates the flow of light of the real world.
Example of scene rendered using the standard shader on all models:
Standard Shader: Content and Context
•
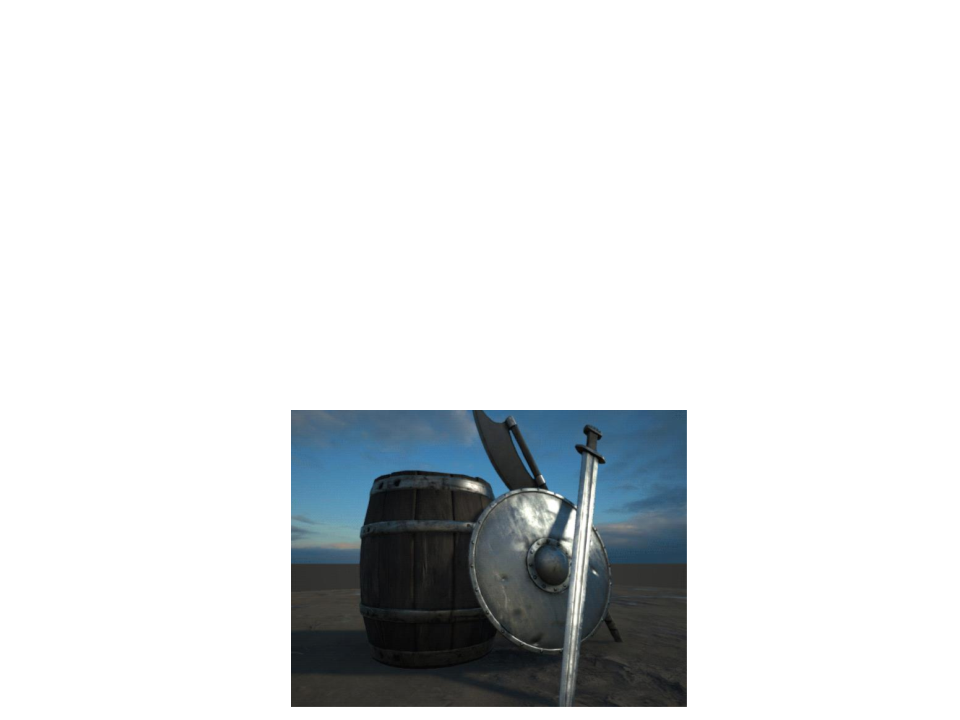
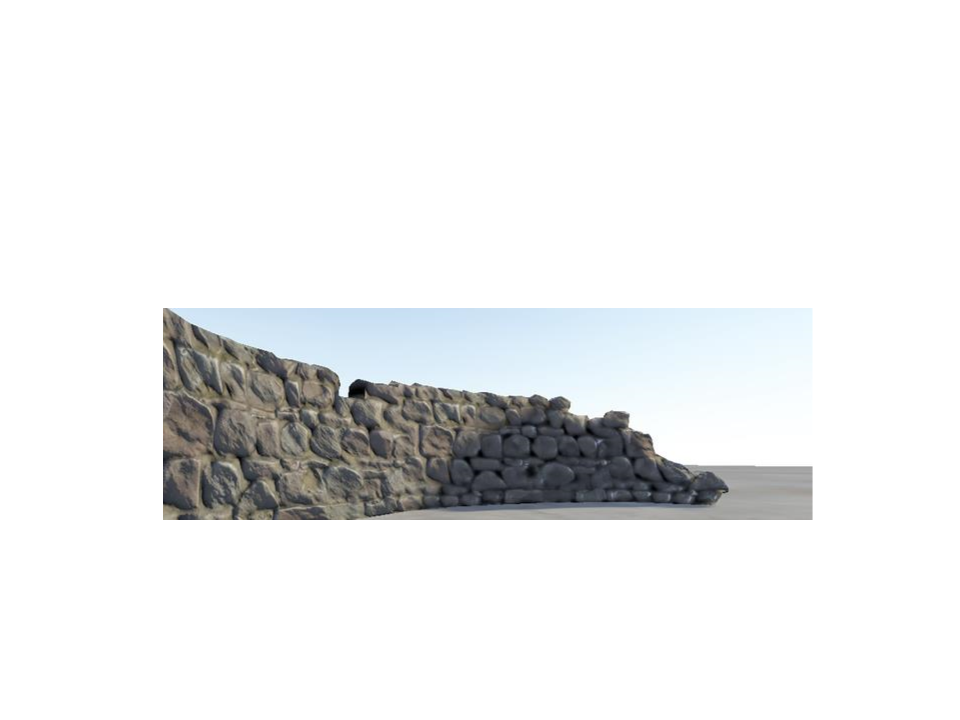
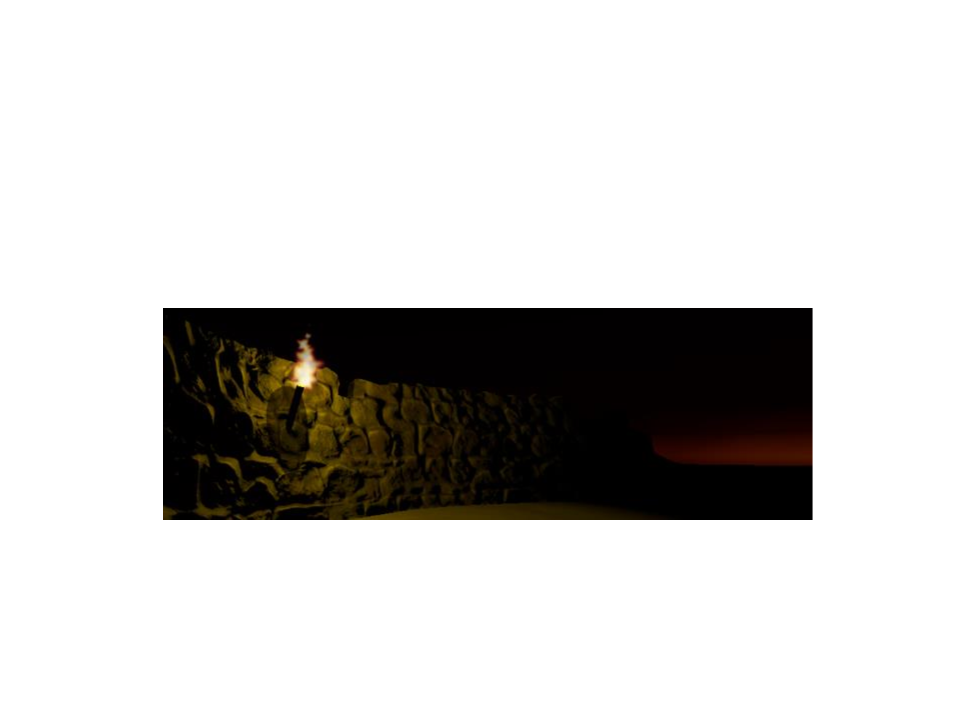
The appearance of material based on the Standard Shader is
influenced by the content and context of the scene.
–
Context: light sources, skybox, indirect light, etc.
–
Content: scene objects, textures, etc.
•
Example of scene with variations in context:

Metallic vs. Specular Workflow
•
There are two options of workflow when creating a material
using the Standard shader: "Standard" and "Standard
(Specular setup)“.
–
–
Standard (Metallic setup): the shader exposes a “metallic” value that
states whether the material is metallic or not.
•
The Albedo color will control the color of the specular reflection and most light will
be reflected as specular reflections.
Standard (Specular setup): a specular color is used to control the color
and strength of specular reflections in the material.
•
This makes it possible to have a specular reflection of a different color than the
diffuse reflection for instance.
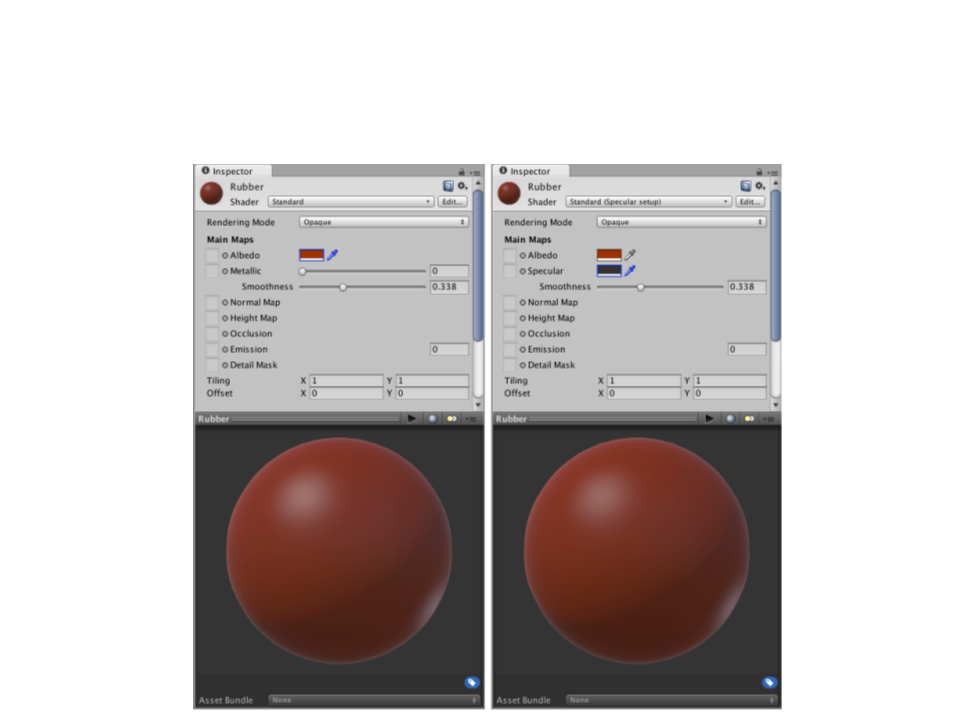
Metallic vs. Specular Workflow
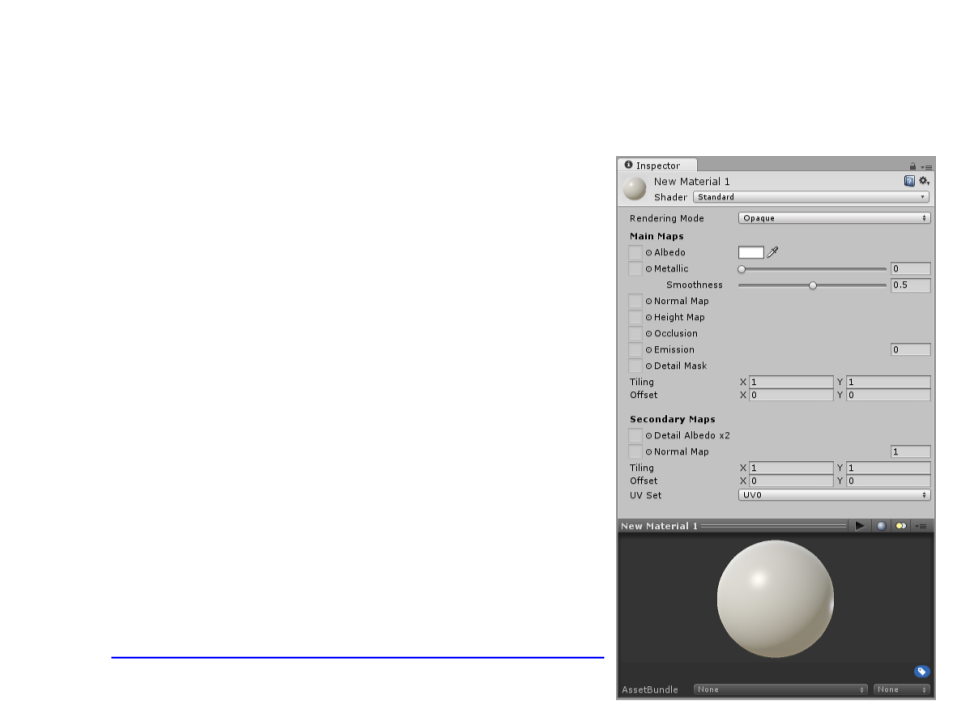
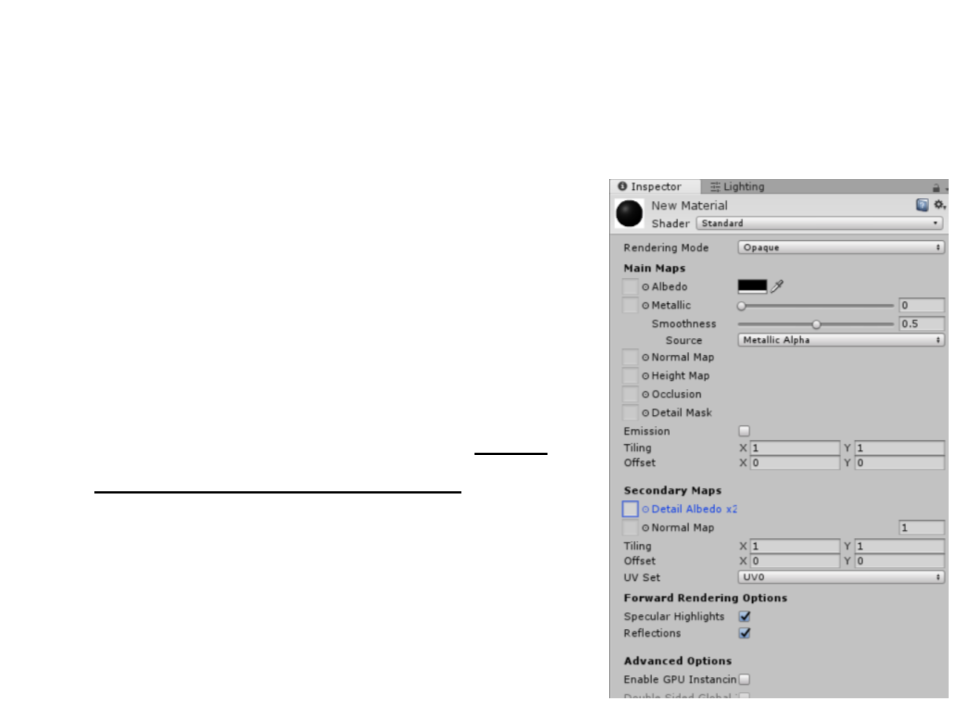
Standard Shader
•
Parameters:
–
–
–
–
–
–
–
–
–
–
Rendering Mode
Albedo
Specular Mode: Specular
Metallic Mode: Metallic
Smoothness
Normal Map (Bump Mapping)
Height Map (Parallax Mapping)
Occlusion Map
Emission
Detail Mask & Maps
Textures: http://www.inf.puc-rio.br/~elima/cg/textures.html
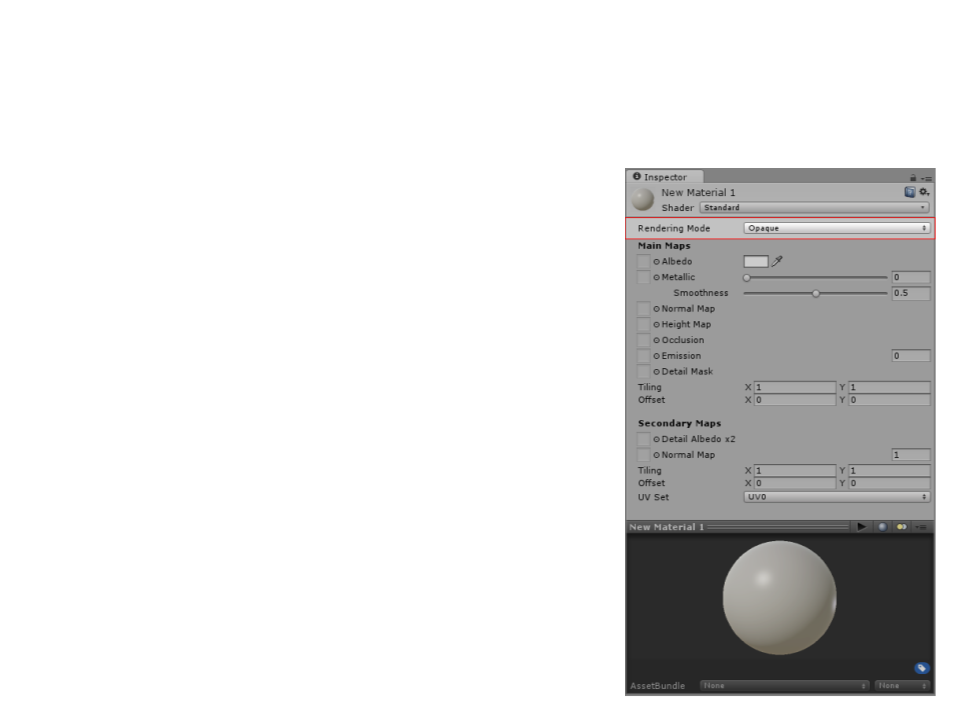
Standard Shader: Rendering Mode
•
Rendering Mode: defines whether the
object uses transparency, and if so,
which type of blending mode to use.
–
Opaque: suitable for normal solid objects with
no transparent areas.
–
Cutout: used to create a transparent effect that
has hard edges between the opaque and
transparent areas. Useful to create leaves or
cloth with holes.
–
–
Transparent: suitable for rendering realistic
transparent materials such as clear plastic or
glass. Reflections and lighting highlights will
remain visible.
Fade: allows the transparency values to
entirely fade an object out, including any
specular highlights or reflections it may have.
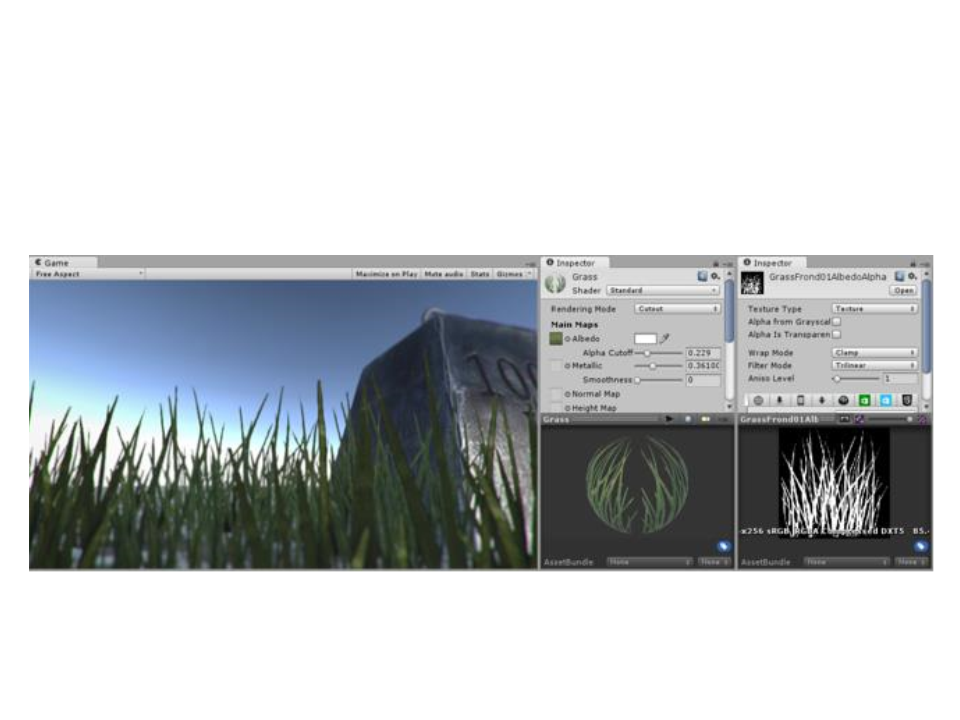
Standard Shader: Rendering Mode
•
Cutout Mode – Example
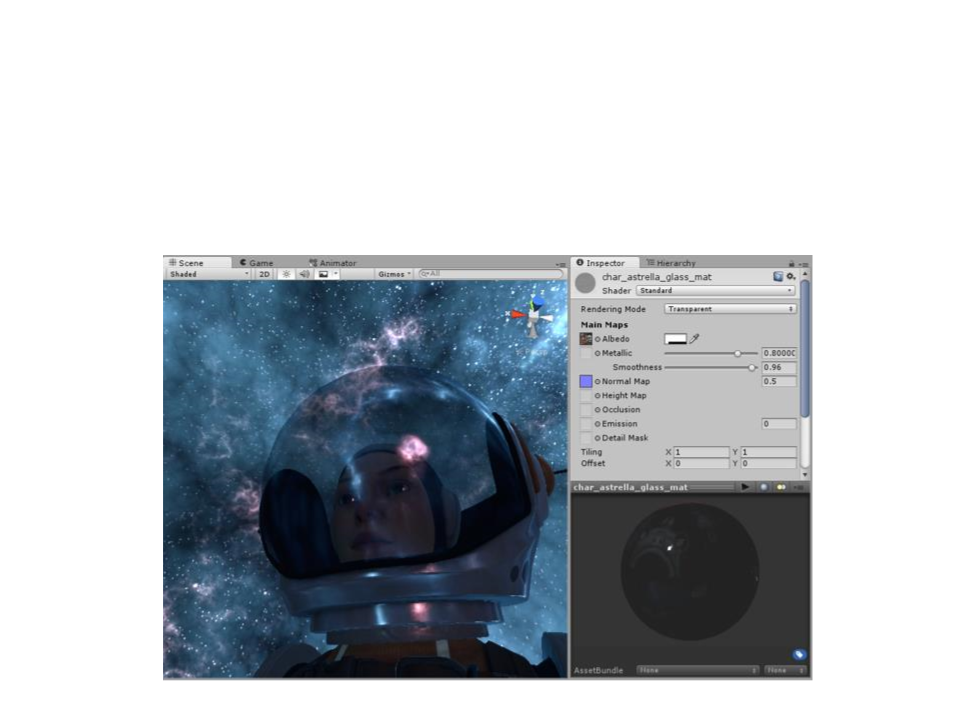
Standard Shader: Rendering Mode
•
Transparent Mode – Example
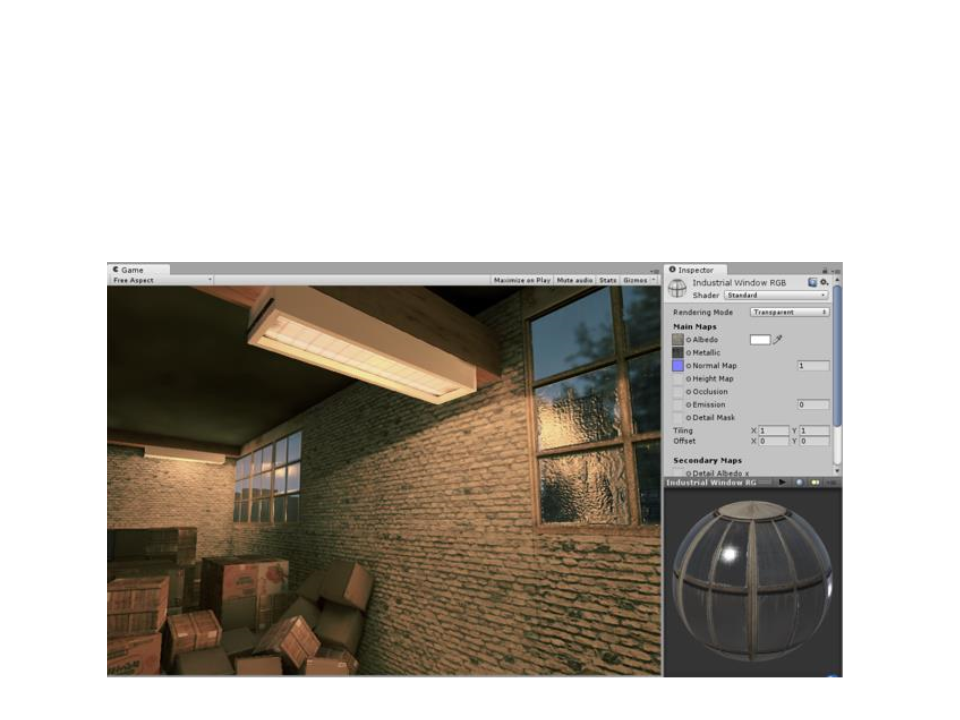
Standard Shader: Rendering Mode
•
Transparent Mode – Example with fully opaque areas
Standard Shader: Rendering Mode
•
Fade Mode – Example
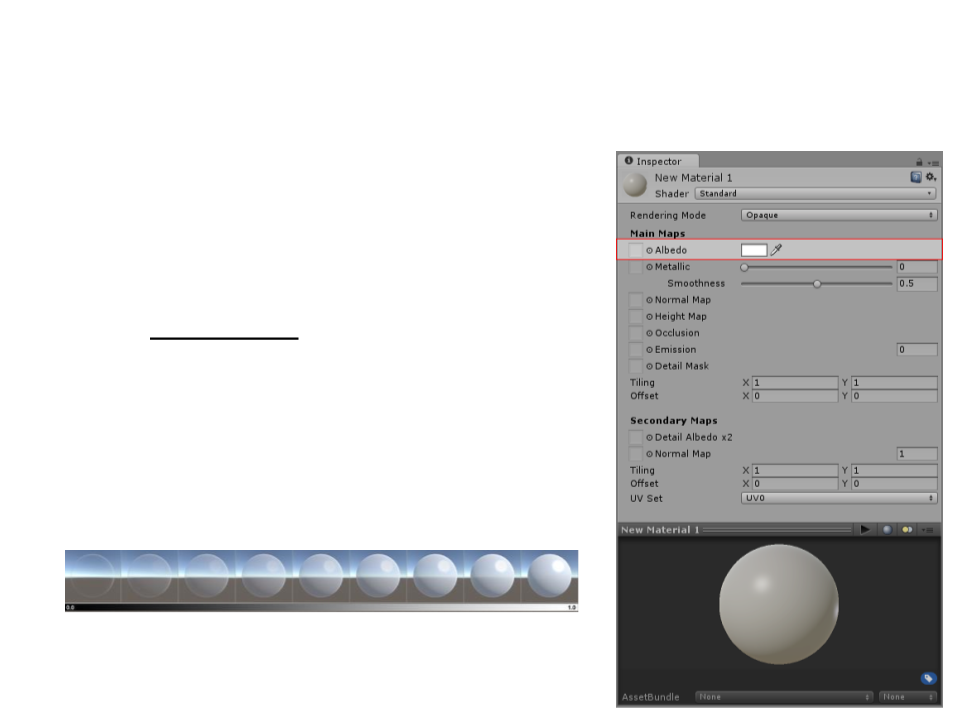
Standard Shader: Albedo
•
•
Albedo: defines the base color or
texture of the material.
The alpha value of the Albedo color
controls the transparency level for the
material.
–
This only has an effect if the Rendering
Mode for the material is not set to
opaque.
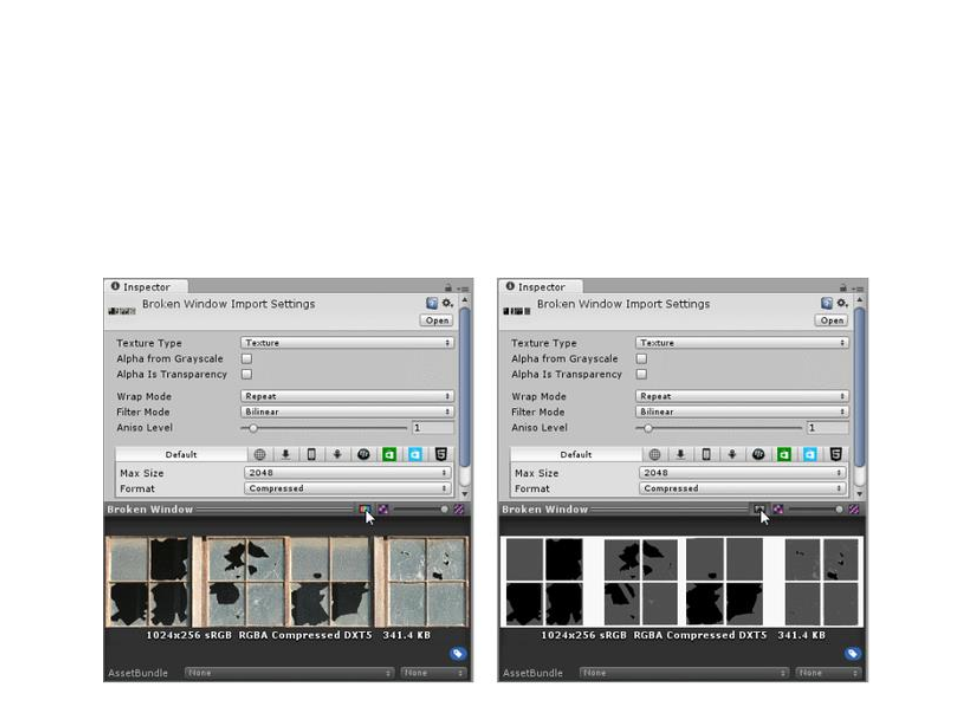
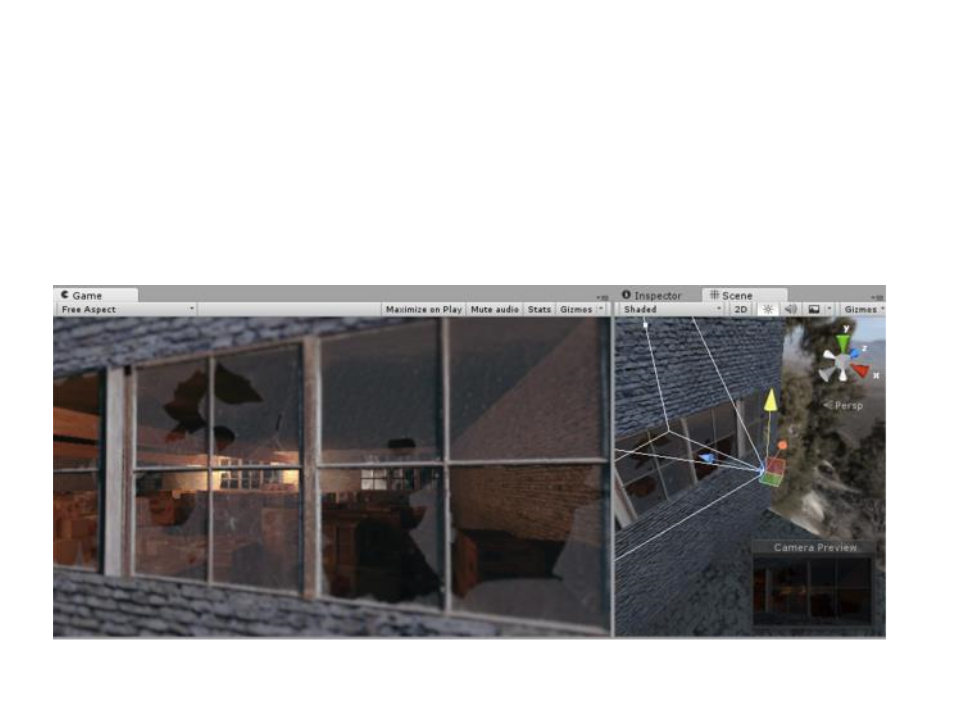
Standard Shader: Albedo
•
Transparencies in areas of the material must be specified
in the texture alpha channel.
Standard Shader: Albedo
•
Transparencies in areas of the material must be specified
in the texture alpha channel.
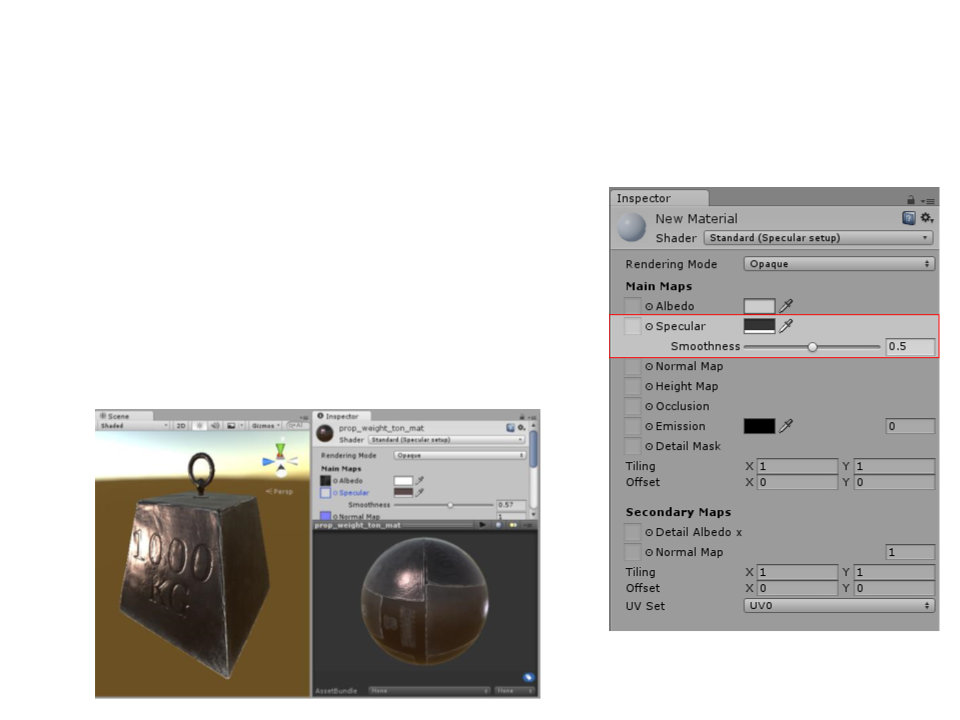
Standard Shader: Specular
•
•
Specular (Specular Mode): represents
the direct reflections of light sources,
which typically show up as bright
highlights on the surface of objects.
Example:
Standard Shader: Specular
•
•
The color of the Specular parameter controls the strength and
color of the specular reflectivity.
The Smoothness parameter controls the clarity of the specular
effect.
–
Low smoothness value = even strong specular reflections appear
blurred and diffuse.
–
High smoothness value = specular reflections are crisper and clearer.
ꢇꢀꢈꢉꢊꢋꢌꢍꢎꢆꢅꢏ
ꢄꢅꢃꢆ
ꢁꢁꢂꢃ
ꢀ
ꢐꢀꢑ
ꢒꢃꢀꢎꢉꢂꢑꢊꢐꢂꢆꢍꢌ
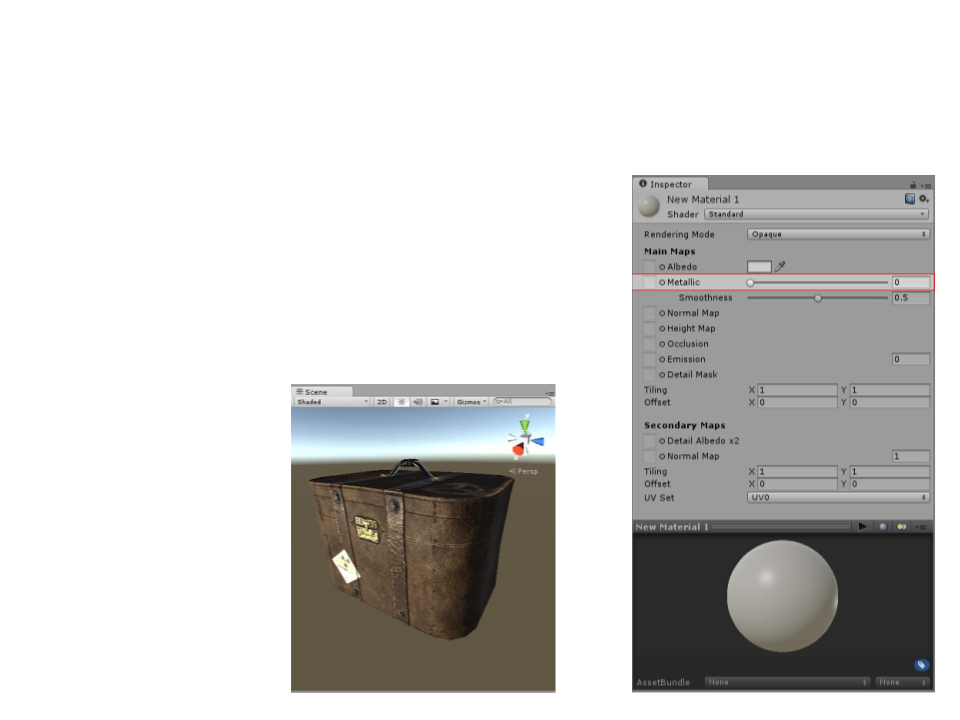
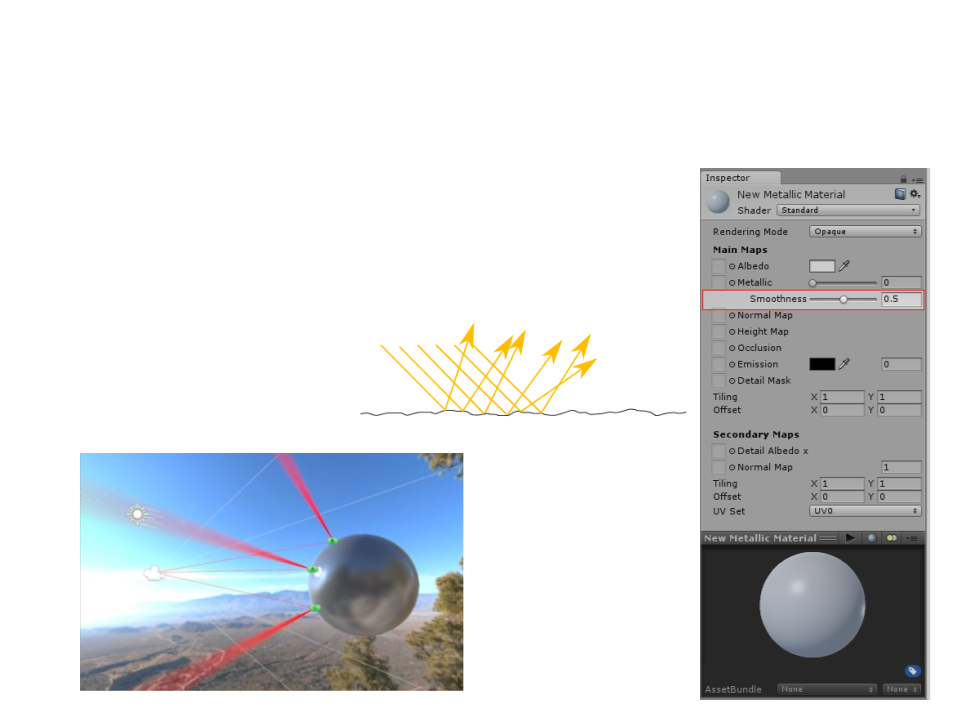
Standard Shader: Metallic
•
•
Metallic (Metallic Mode): specular
reflections arise naturally depending
on the settings of the Metallic and
Smoothness levels (rather than being
explicitly defined as in the specular
mode).
Example:

Standard Shader: Metallic
•
The metallic parameter determines how “metal-like” the
surface is.
–
When a surface is more metallic, it reflects the environment more and
its albedo color becomes less visible.
–
When a surface is less metallic, its albedo color is more clear and any
surface reflections are visible on top of the surface color.
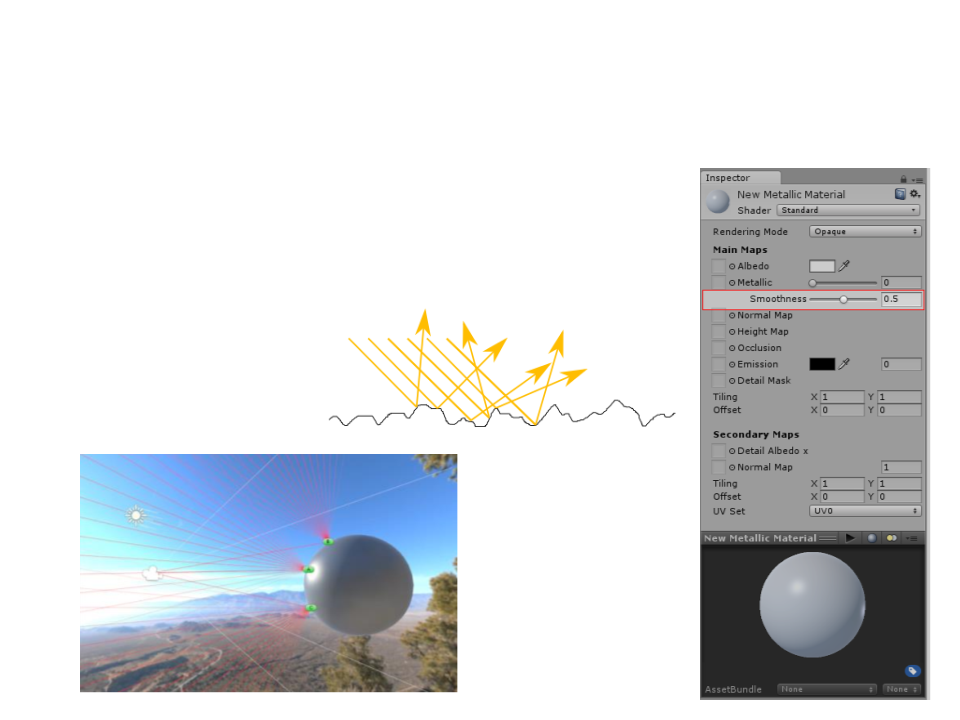
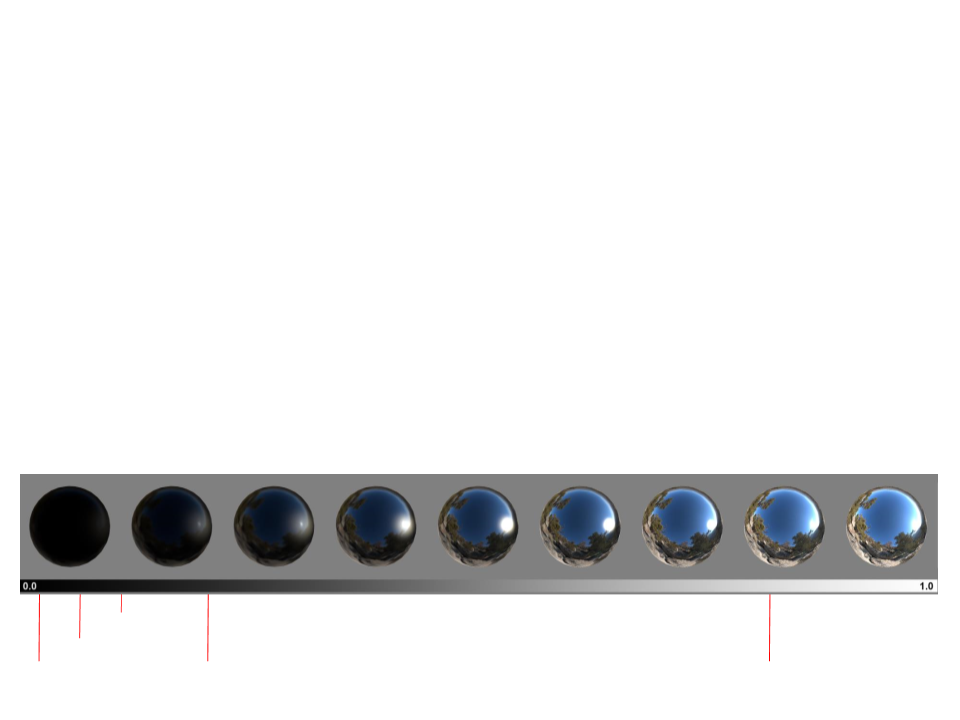
Standard Shader: Smoothness
•
•
Smoothness: defines how light scatters when
it hits the surface of the object. Represents
“
microsurface details” of the object.
Low Smoothness:
Standard Shader: Smoothness
•
•
Smoothness: defines how light scatters when
it hits the surface of the object. Represents
“
microsurface details” of the object.
Median Smoothness:

Standard Shader: Smoothness
•
•
Smoothness: defines how light scatters when
it hits the surface of the object. Represents
“
microsurface details” of the object.
High Smoothness:
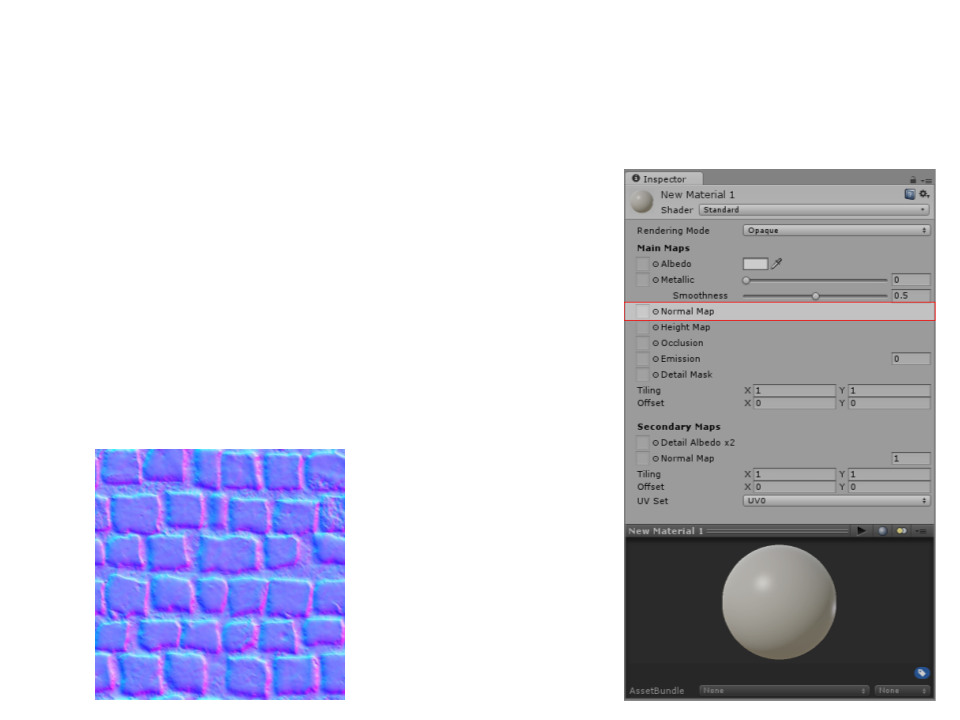
Standard Shader: Normal Map
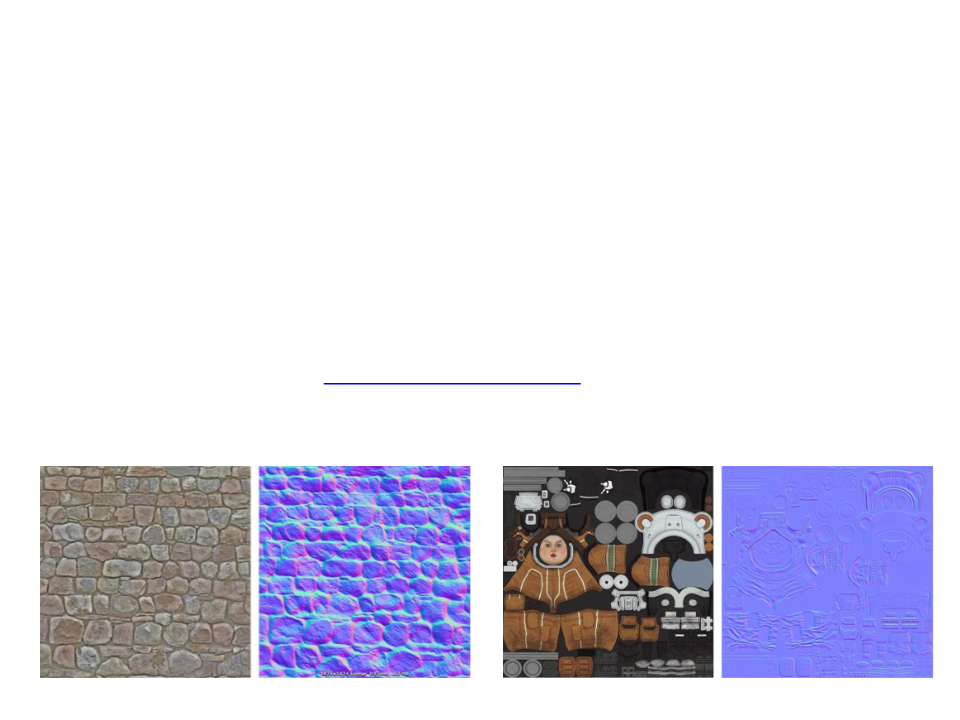
•
•
Normal Map (Bump Mapping): adds
surface detail such as bumps, grooves,
and scratches to a model which catch
the light as if they are represented by
real geometry.
Example of Normal Map texture:
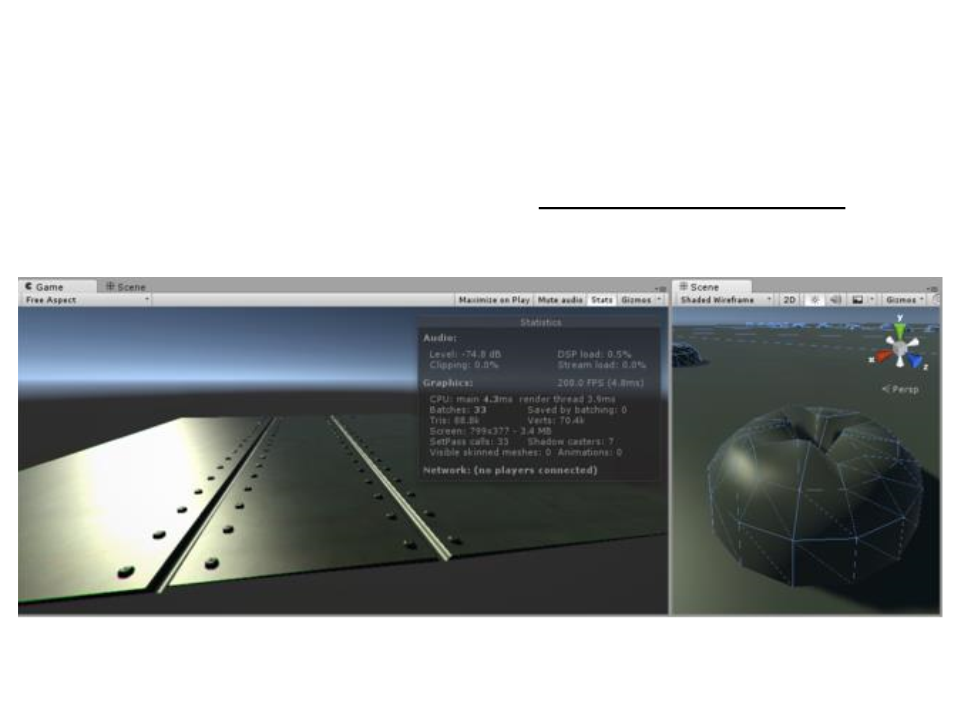
Standard Shader: Normal Map
•
Example: screws in metal surface (without bump mapping)
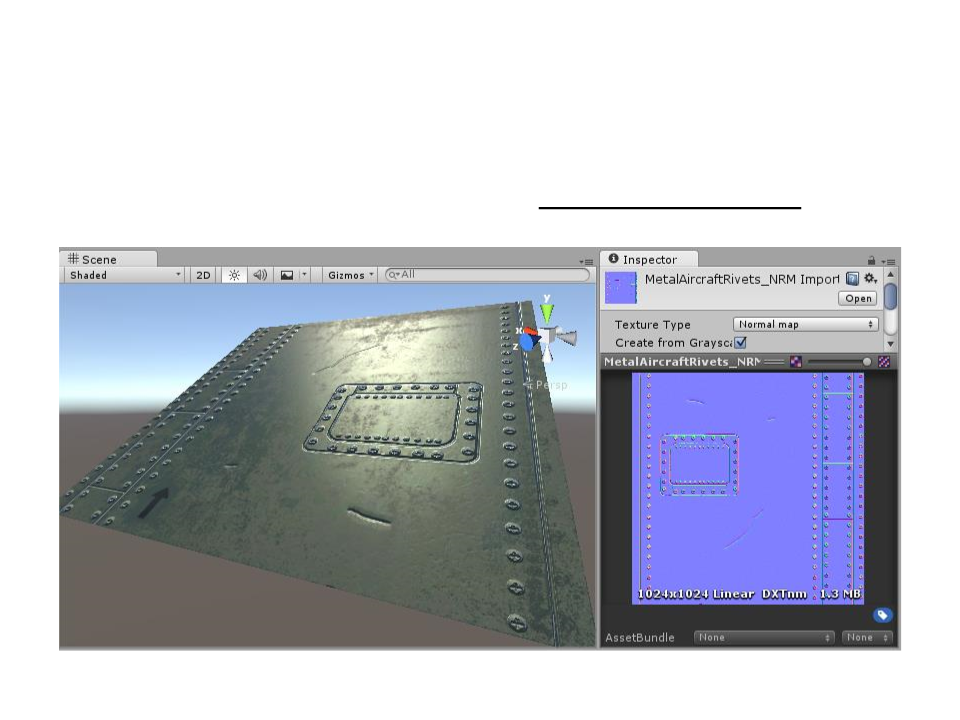
Standard Shader: Normal Map
•
Example: screws in metal surface (with bump mapping)

Standard Shader: Normal Map
•
•
Bump mapping is a technique for simulating bumps on the
surface of an object. This is achieved by perturbing the
surface normals of the object and using the perturbed
normal during lighting calculations.
What are Surface Normals?
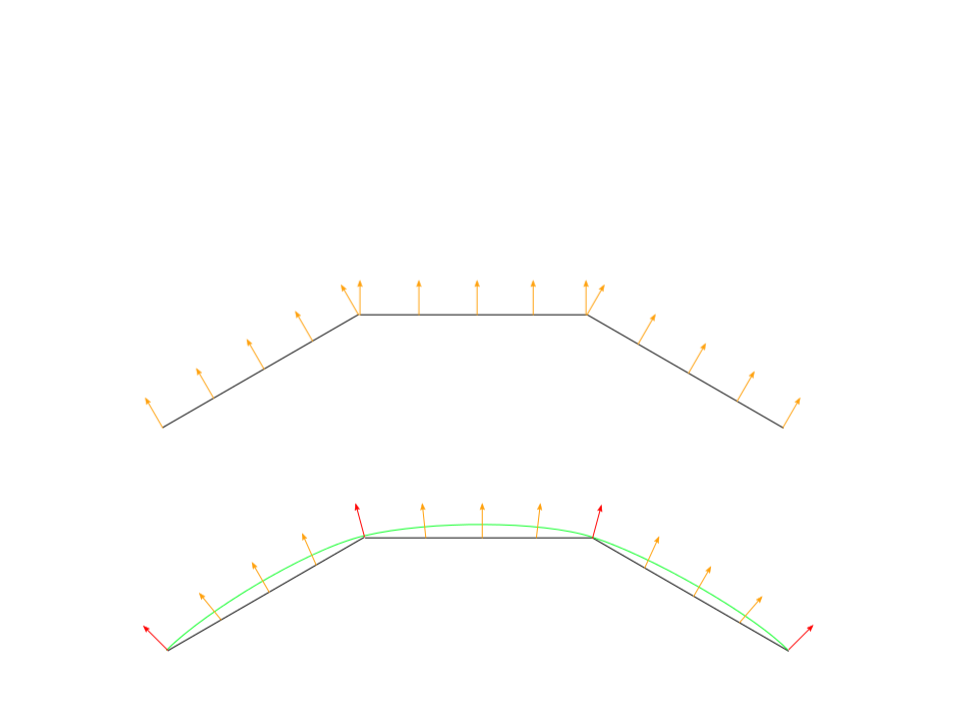
Standard Shader: Normal Map
•
What are Surface Normals?
Flat Surface:
Smooth Surface:
Standard Shader: Normal Map
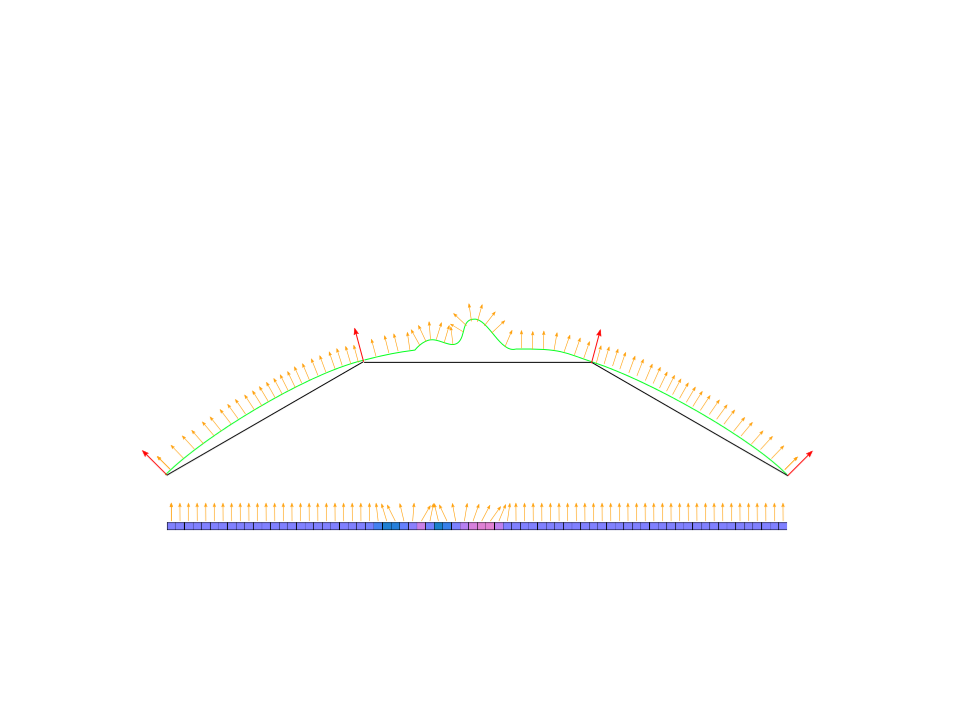
•
What is Normal Mapping?

Standard Shader: Normal Map
•
What is Normal Mapping?
Standard Shader: Normal Map
•
How do I get or make normal maps?
–
–
–
During the 3D modelling process:
•
Very high resolution model + lower resolution “game ready” model.
From a texture:
•
ShaderMap - http://shadermap.com/
Can be produced by hand.
Standard Shader: Normal Map
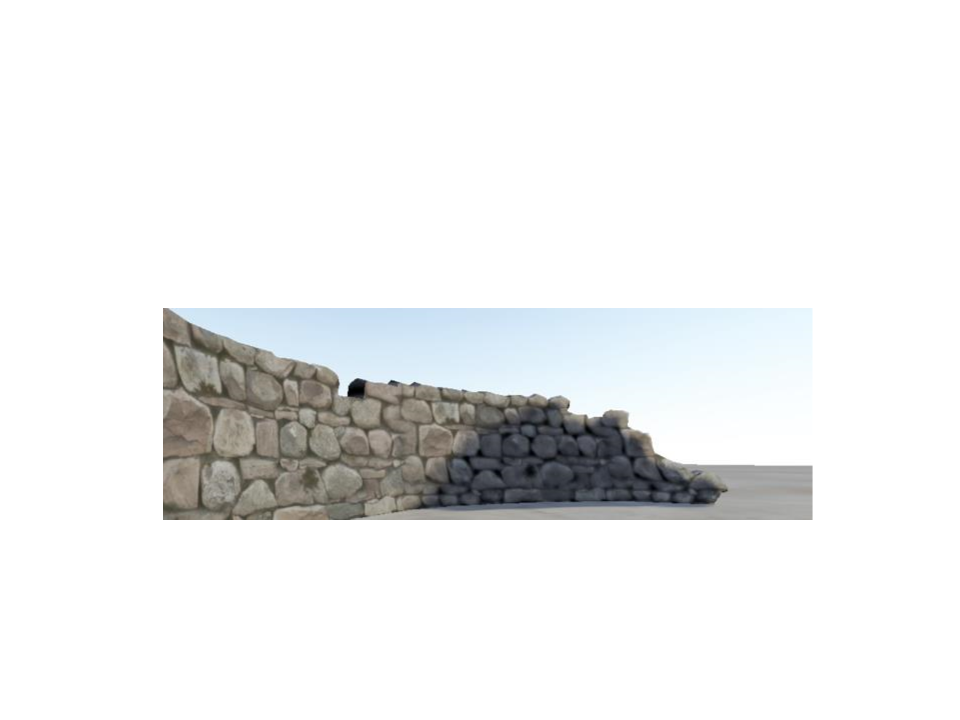
•
Result:
Without Normal Mapping
Standard Shader: Normal Map
•
Result:
With Normal Mapping (directional light)
Standard Shader: Normal Map
•
Result:
With Normal Mapping (point light)
Standard Shader: Height Map
•
•
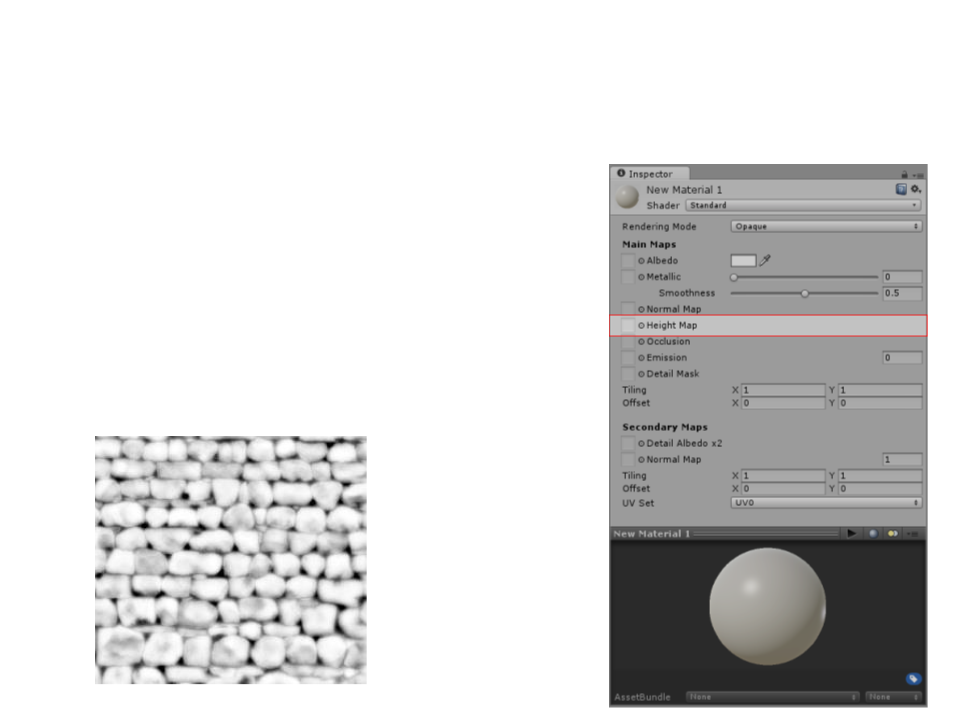
Height Map: as normal maps, height
maps add surface details. Are used to
give extra definition to surfaces and
render large bumps and protrusions.
Example of Height Map texture:
Standard Shader: Height Map
•
•
Height mapping (also known as parallax
mapping) is a similar concept to normal
mapping, however this technique is more
complex - and therefore also more
performance-expensive.
While normal mapping modifies the lighting
across the surface of the texture, parallax
height mapping goes a step further and
actually shifts the areas of the visible surface
texture around.
–
The effect is drawn onto the surface of the model
and does not modify the actual geometry.
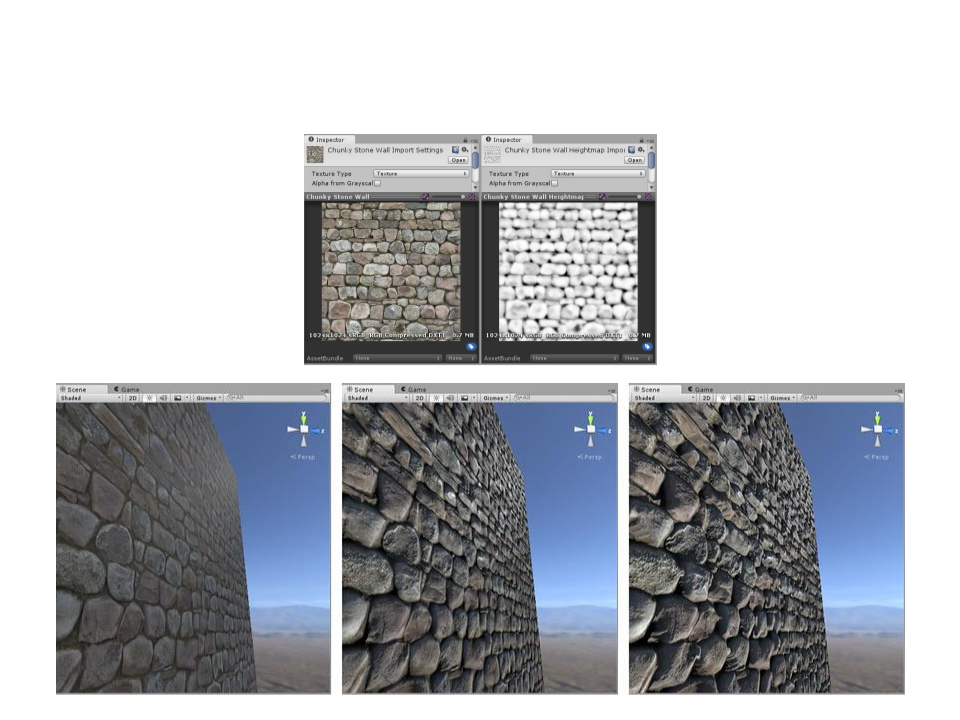
Standard Shader: Height Map
Without Bump Mapping
With Normal Mapping
With Hight Mapping
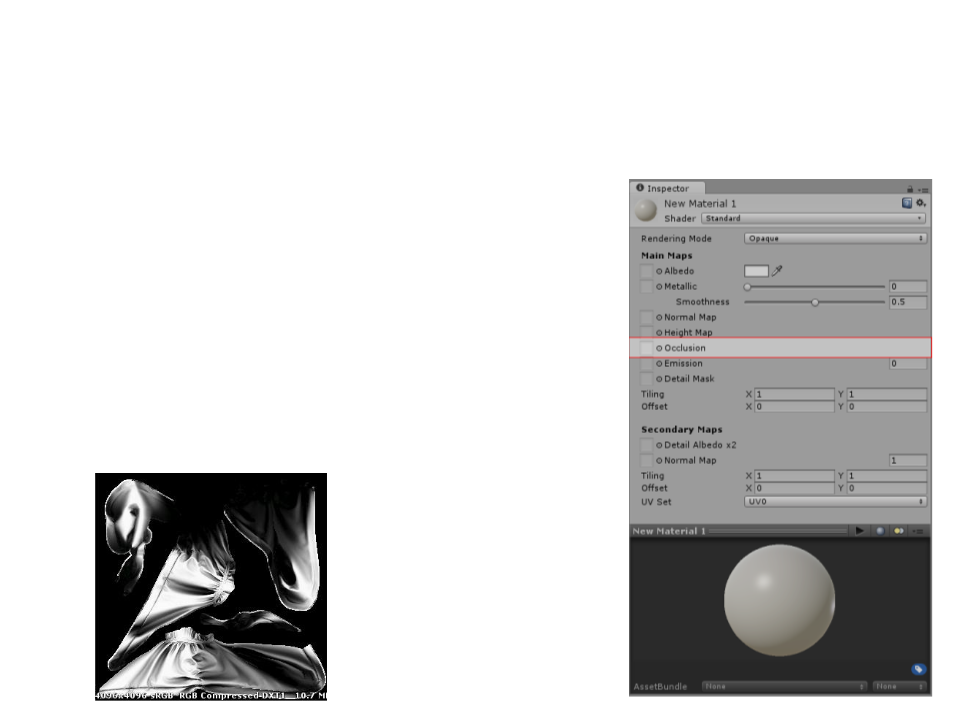
Standard Shader: Occlusion Map
•
•
Occlusion Map: used to provide
information about which areas of the
model should receive high or low
indirect lighting.
–
Example: concave areas usually do not
receive much indirect light.
Example of Occlusion Map texture:
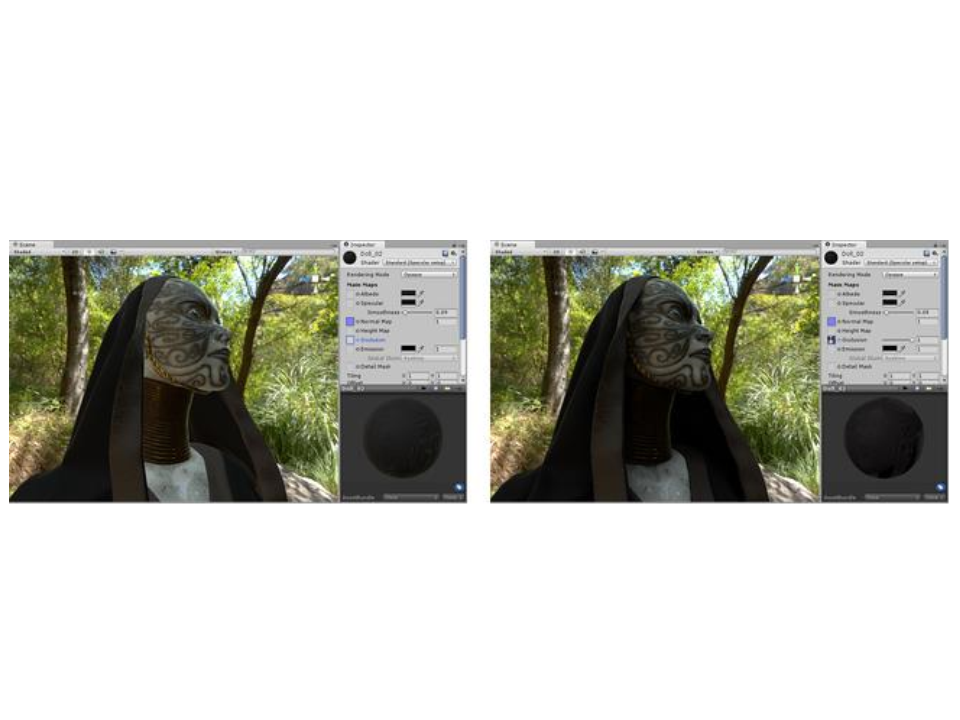
Standard Shader: Occlusion Map
Without Occlusion Mapping
With Occlusion Mapping
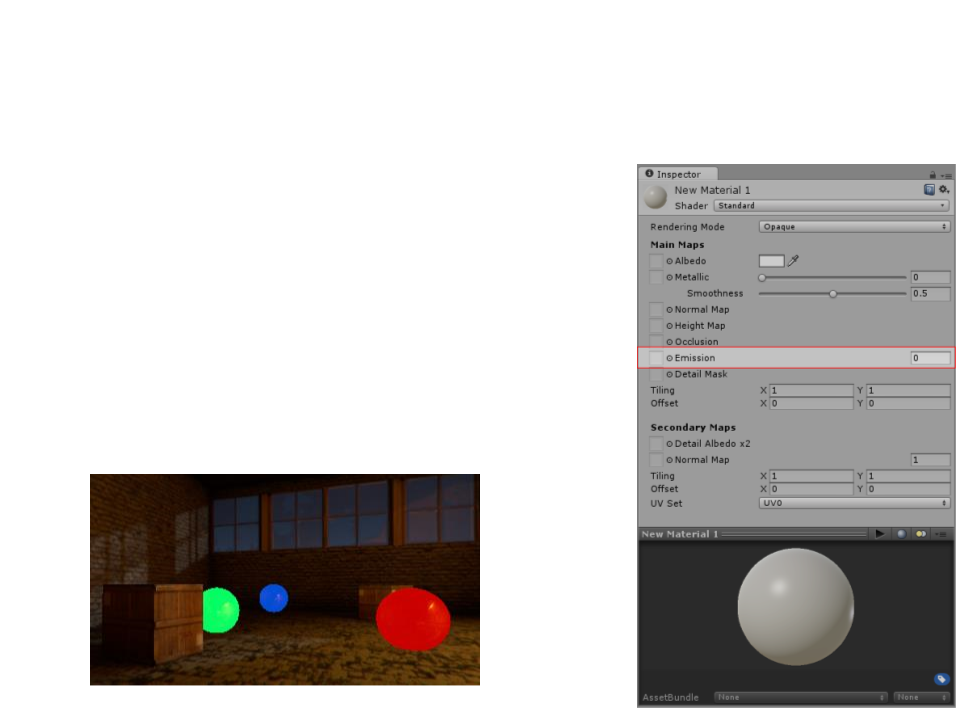
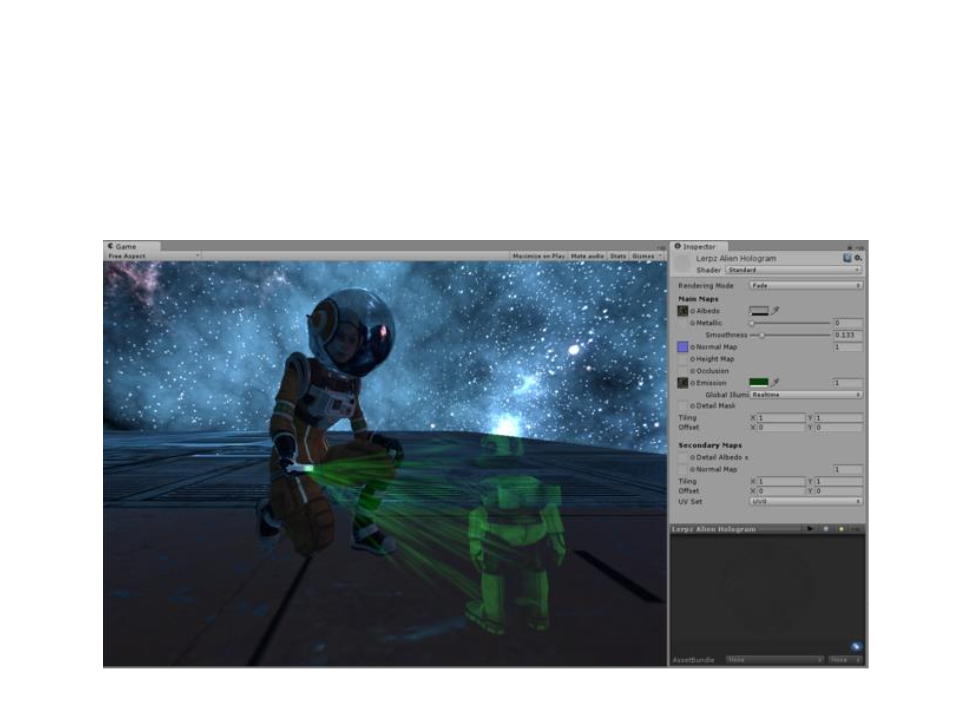
Standard Shader: Emission
•
•
Emission: controls color and intensity of
light emitted from the surface. When
an emissive material is used in your
scene, it appears to be a visible source
of light itself.
Example:
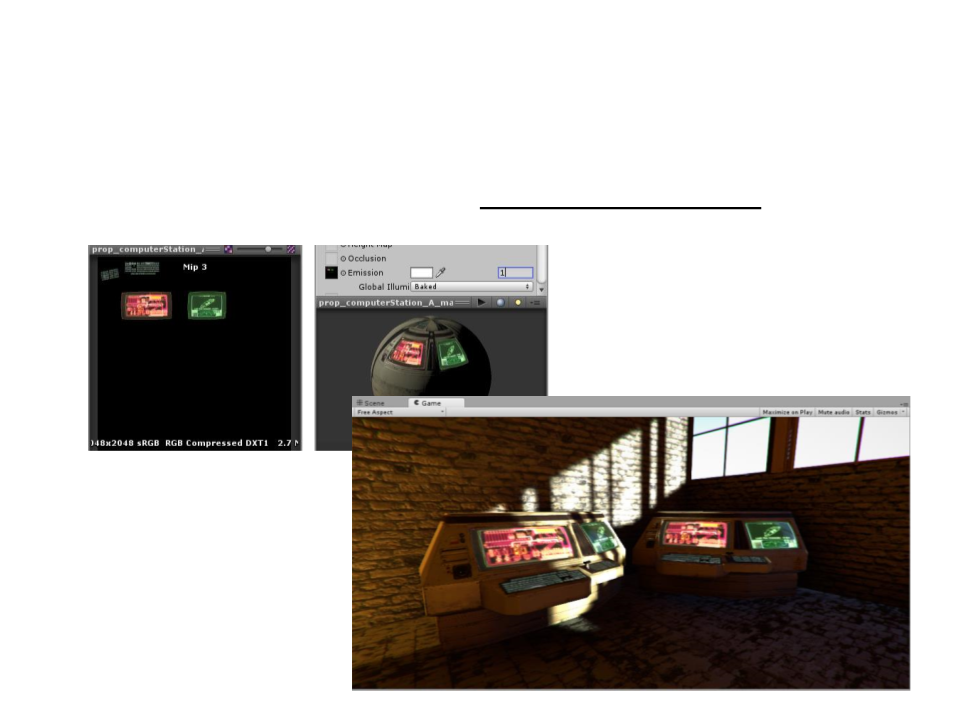
Standard Shader: Emission
•
It is also possible to assign an emission map texture:
Standard Shader: Secondary Maps &
Detail Mask
Secondary Maps: allows the overlay of
a second set of textures on top of the
main textures (second Albedo color
map and a second Normal map).
•
•
The reason to use secondary maps is
to allow the material to have sharp
detail when viewed up close, while
also having a normal level of detail
when viewed from further away.
–
Without using a single extremely high
texture map to achieve both goals.
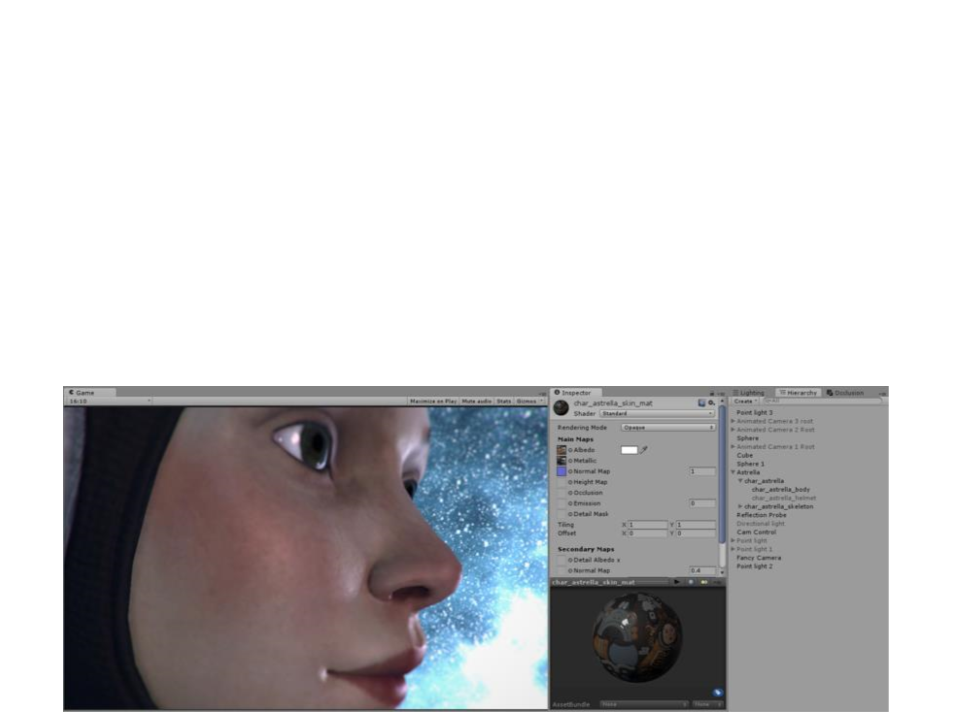
Standard Shader: Secondary Maps &
Detail Mask
•
•
Typical uses for detail textures are: adding skin detail,
adding tiny cracks and lichen growth to brick walls, adding
small scratches to metal containers.
Example (without secondary maps):
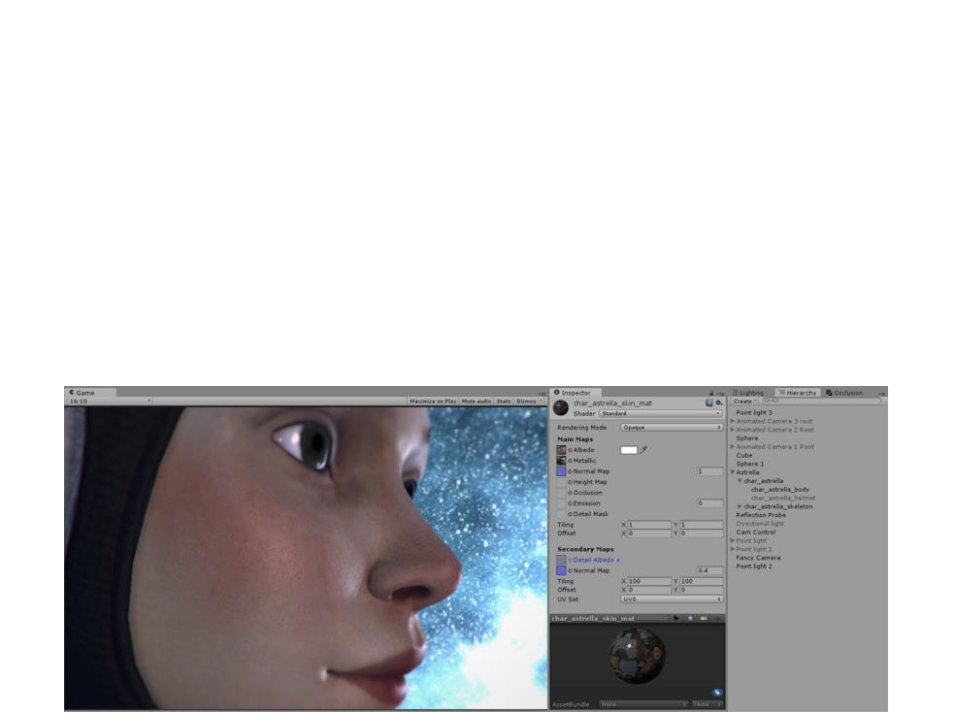
Standard Shader: Secondary Maps &
Detail Mask
•
•
Typical uses for detail textures are: adding skin detail,
adding tiny cracks and lichen growth to brick walls, adding
small scratches to metal containers.
Example (with secondary maps):

Other Built-in Shaders
•
•
•
•
•
•
•
•
•
•
FX: Lighting and glass effects.
GUI and UI: For user interface graphics.
Mobile: Simplified high-performance shader for mobile devices.
Nature: For trees and terrain.
Particles: Particle system effects.
Skybox: For rendering background environments behind all geometry.
Sprites: For use with the 2D sprite system.
Toon: Cartoon-style rendering.
Unlit: For rendering that entirely bypasses all light & shadowing.
Legacy: The large collection of older shaders which were superseded by the Standard Shader.

Exercise 1
1
) Update the “Make Your Fantasy Game - Lite” demo scene to
make better use of the Standard Shader features.
–
Download: https://assetstore.unity.com/packages/3d/environments/fantasy/make-
your-fantasy-game-lite-8312
–
The updated scene must:
•
Use normal mapping;
•
Improve specular configuration;
–
You can find better textures in the asset store. Examples:
https://assetstore.unity.com/packages/2d/textures-materials/floors/outdoor-
ground-textures-12555
•
•
•

Further Reading
•
•
•
Hughes, J. F., et al. (2013). Computer Graphics: Principles
and Practice (3rd ed.). Upper Saddle River, NJ: Addison-
Wesley Professional. ISBN: 978-0-321-39952-6.
–
Chapter 20: Textures and Texture Mapping;
Marschner, S., et al. (2015). Fundamentals of Computer
Graphics (4th ed.). A K Peters/CRC Press. ISBN: 978-
1482229394.
–
Chapter 11: Texture Mapping
Web:
–
https://docs.unity3d.com/Manual/Shaders.html